Get it? Math Lab.... sounds like Me.... Lab?.... No? ok
So ![]() spikeyxxx you're like a super mathematician, I'm doing the Blender Cloud Procedural Shading course and it is super heavy dense in tough, difficult and impossible things and worst of all there's like a lot of math involved. I wanted to use this to bother you a lot and ask you math questions when it comes to procedural shading.
spikeyxxx you're like a super mathematician, I'm doing the Blender Cloud Procedural Shading course and it is super heavy dense in tough, difficult and impossible things and worst of all there's like a lot of math involved. I wanted to use this to bother you a lot and ask you math questions when it comes to procedural shading.
The course is good but Simon goes way too fast and doesn't get into the really basics and assumes you know what happens mathematically under the hood.
*WARNING, HERE BE MATH*
DUDE! Now I get it!

That image with the orange lines isolating the diagonal part is where the subtraction happens, which is all due to the map rage limiting it into that zone.
Thanks Ingmar, my mind works like that, I have to see the picture in my head of what is going on, otherwise I wont internalize it.
![]() dostovel I'm happy that I could help you 😀! With me, it's the same: I need to visualize things in order to understand them 🕵️♂️.
dostovel I'm happy that I could help you 😀! With me, it's the same: I need to visualize things in order to understand them 🕵️♂️.
![]() spikeyxxx And I always thought that I have the free choice whether I want to round 0.5 up or down 😉😁! But that's probably because we're living in a "Matrix" 😉😁🕹!
spikeyxxx And I always thought that I have the free choice whether I want to round 0.5 up or down 😉😁! But that's probably because we're living in a "Matrix" 😉😁🕹!
![]() spikeyxxx And why is it important that the scaling is done along a global axis whereas the translation uses local coordinates?
spikeyxxx And why is it important that the scaling is done along a global axis whereas the translation uses local coordinates?
![]() duerer things are somewhat different than I thought and the Blender Manual is not quite clear....
duerer things are somewhat different than I thought and the Blender Manual is not quite clear....
Scaling scales along the input coordinates axes, not along the World axes! This Cube is rotated 90° around the Z-axis, so the Generated Coordinates have rotated with it:
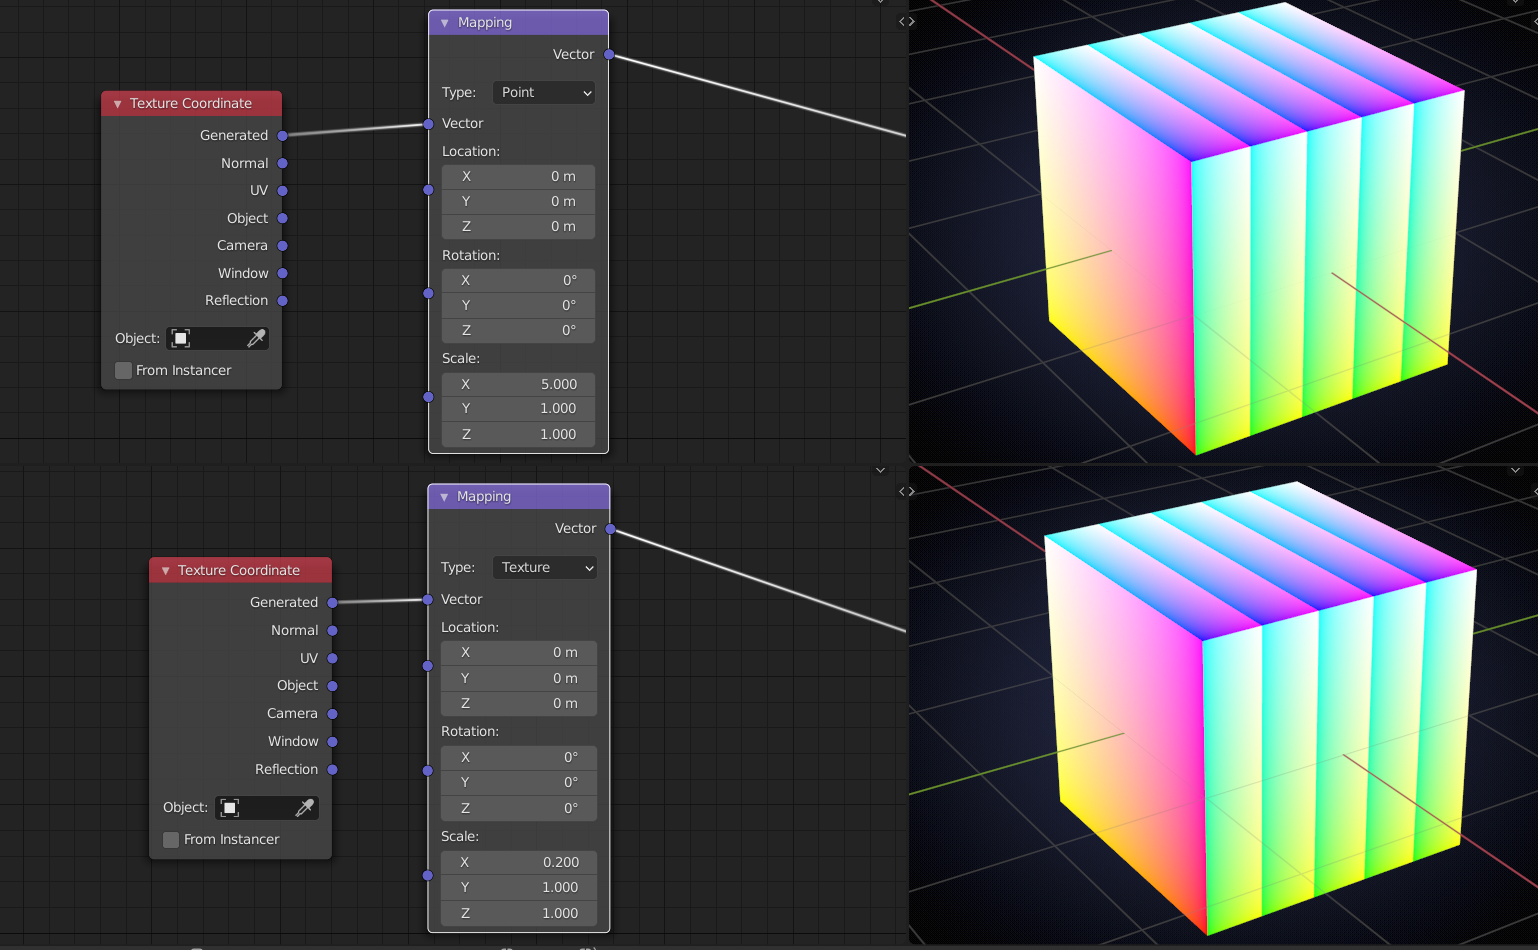
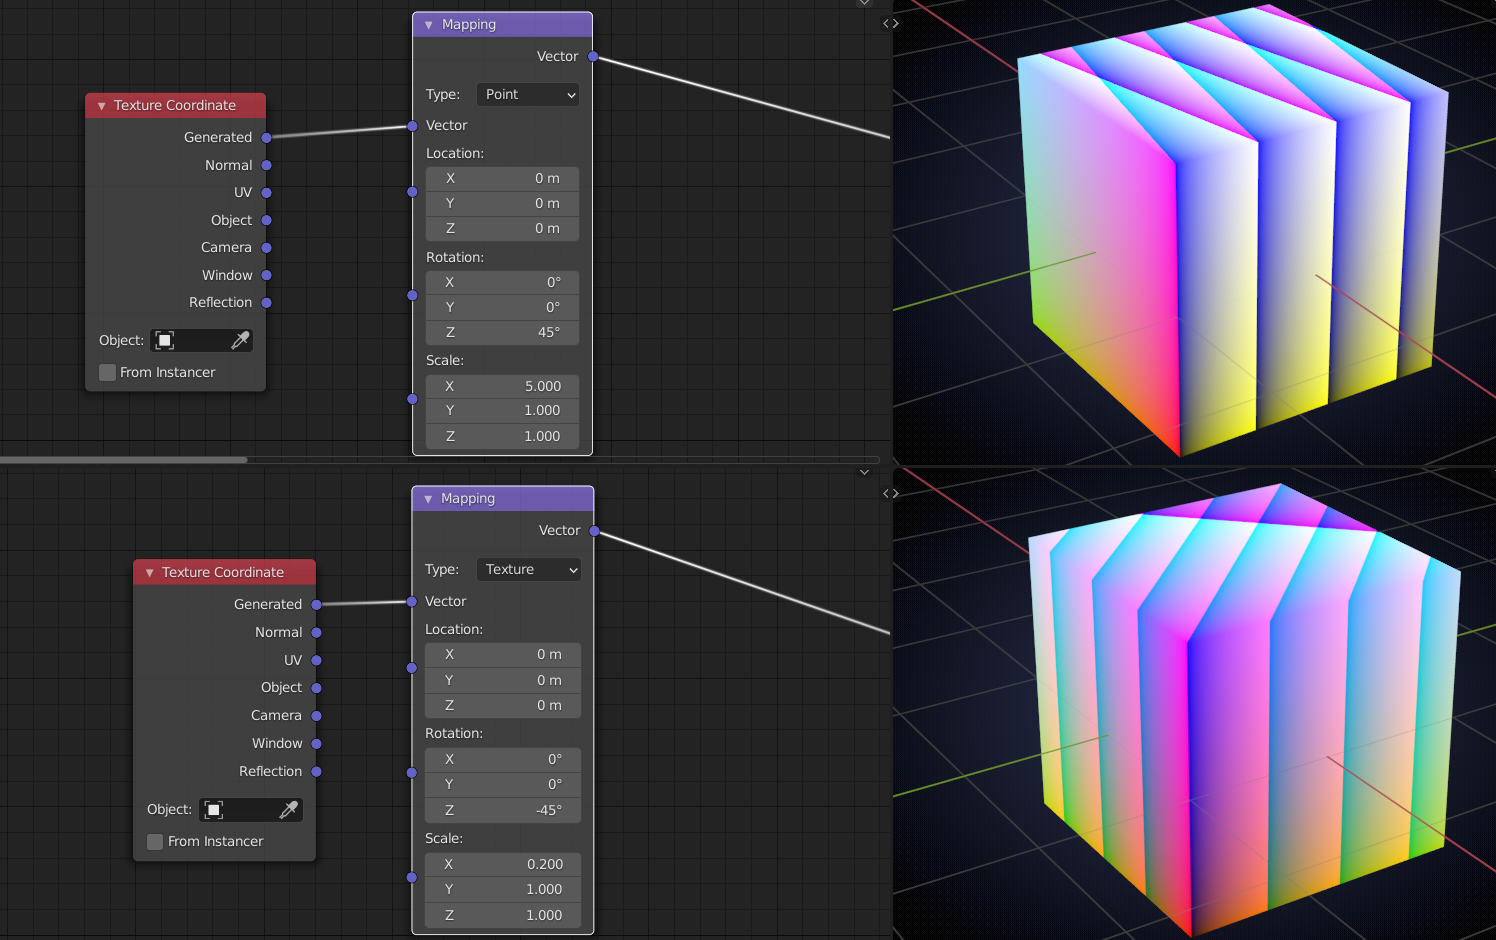
Point has scaled first along the Cube's X-axis and then rotated. Texture has first rotated and then scaled along the rotated X-axis.
Again, seen from the top:
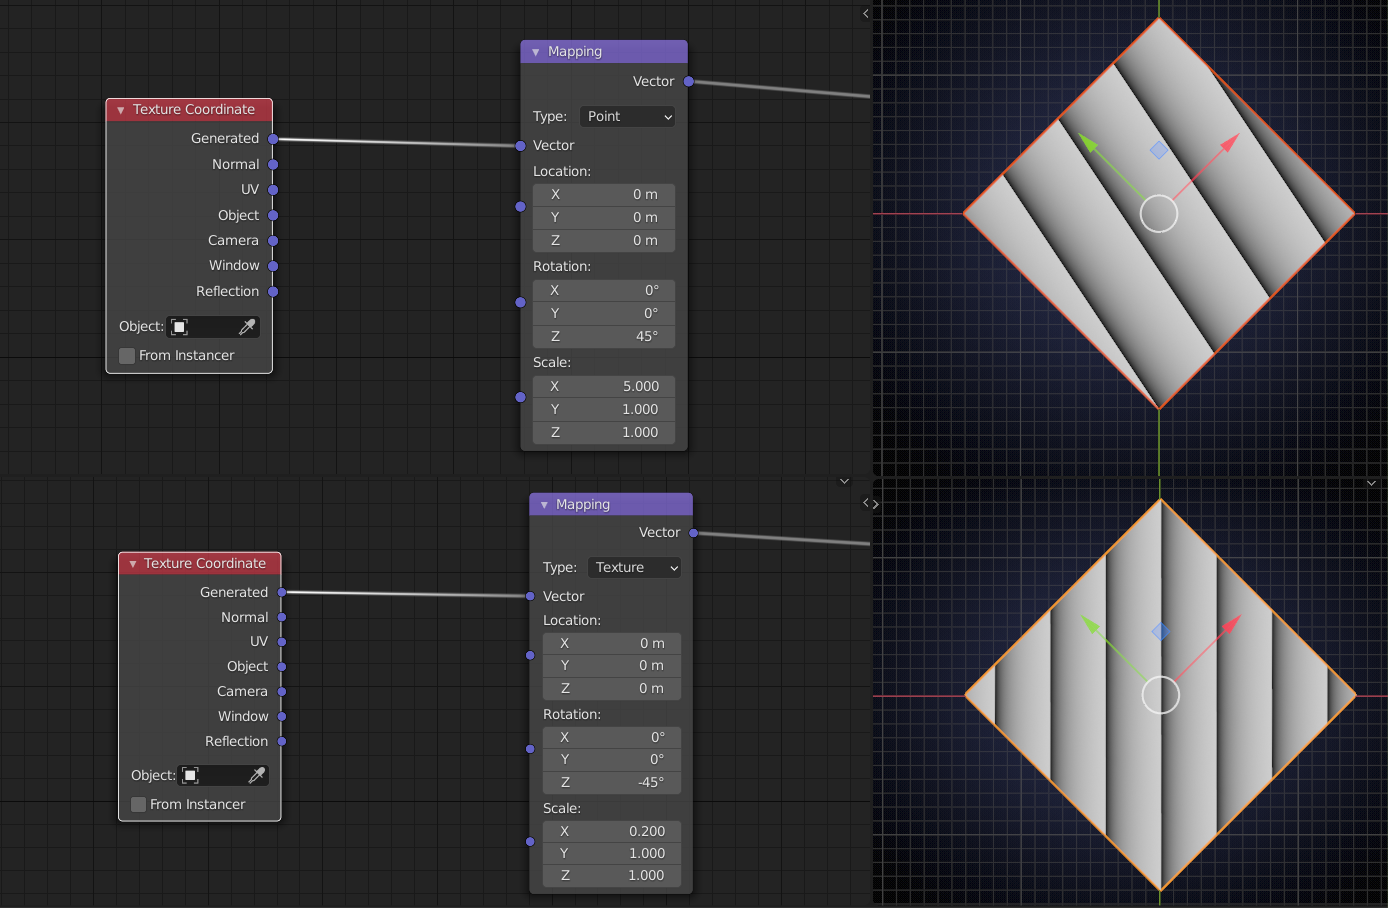
A slightly different setup to show the different X- axes when changing the Location:
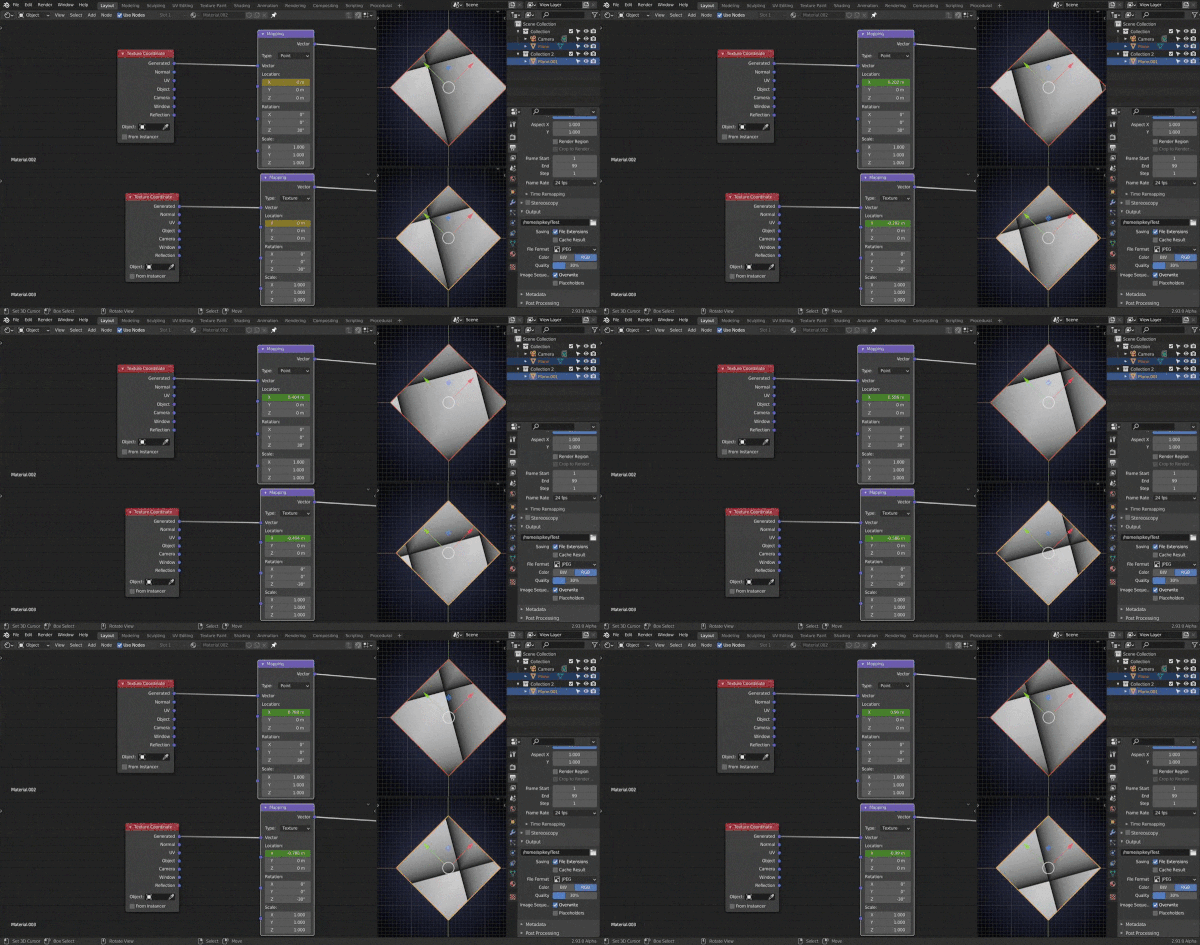
When set to Vector, that is the same as Point, but without the (ability to change the) Location.
Normal is the same as Vector with inverted Scaling and then the result is normalized (divided by it's length when not zero and left (0, 0, 0), at the Origin (where the length is zero)):
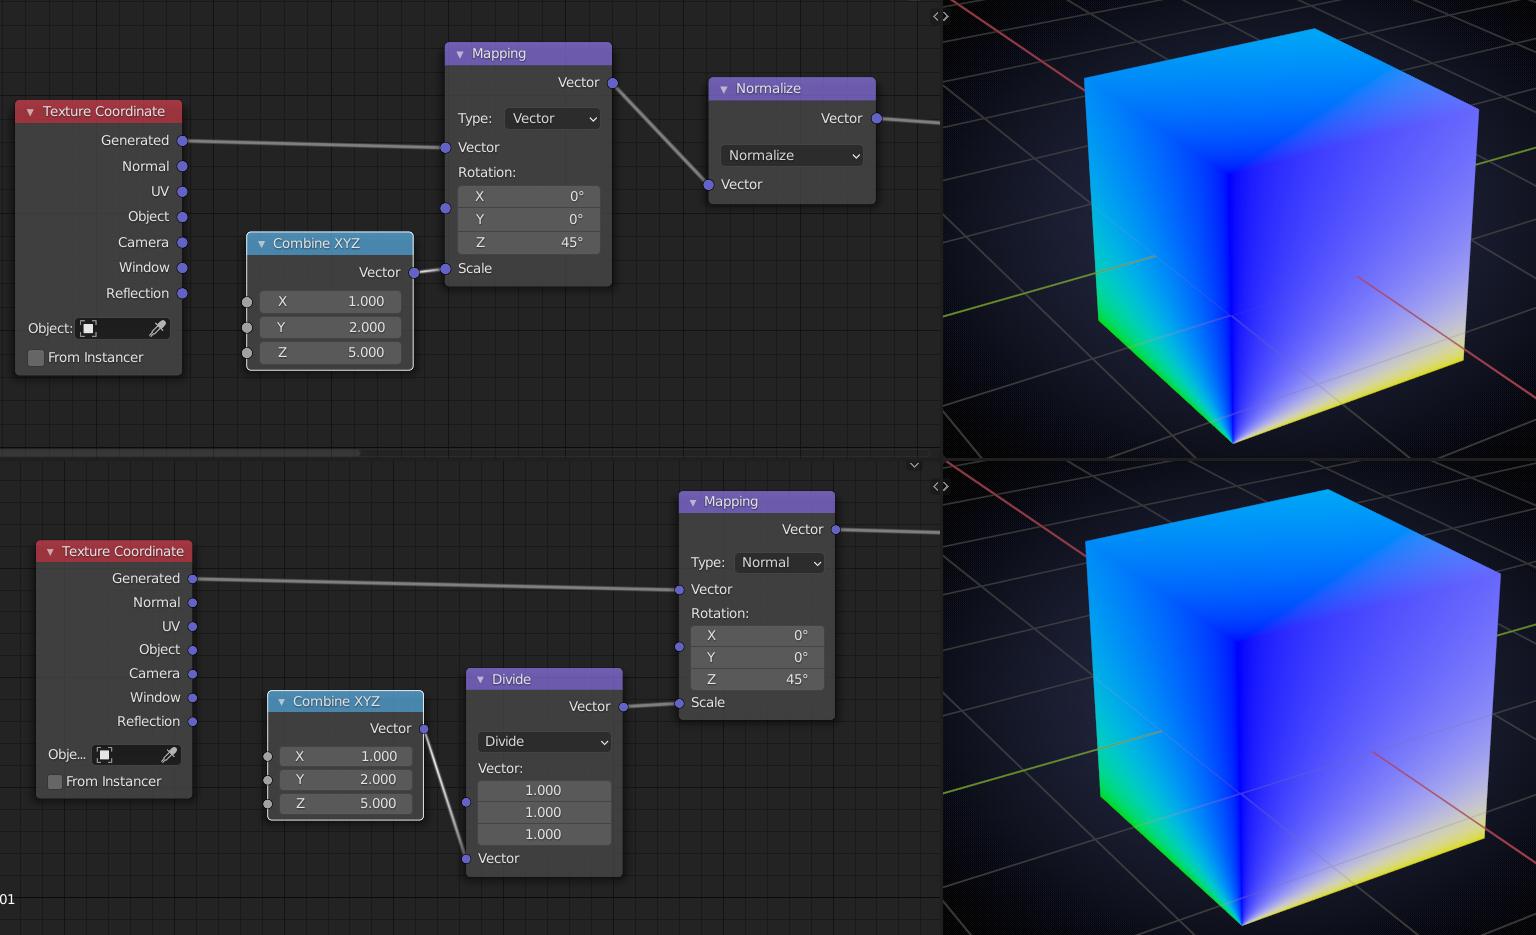
Because the resulting Vectors are normalized, scaling uniformly has no effect:
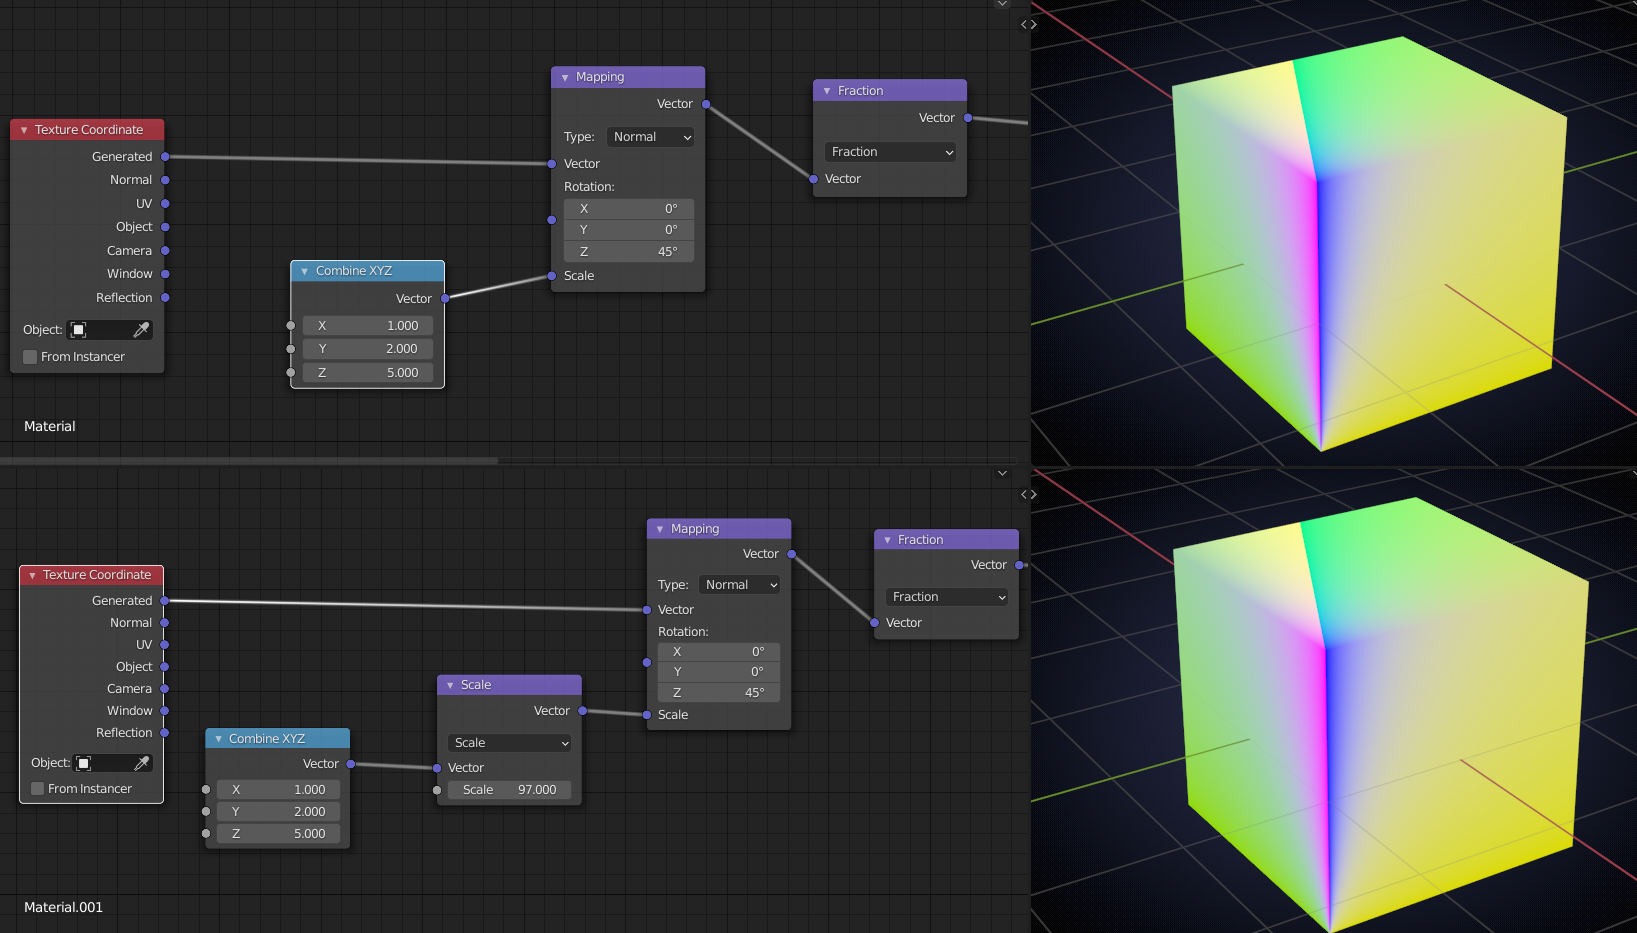
When to use these? Maybe to create cool effects like:
I don't know. The Manual says:
For this vector type, the node performs the inverse transpose of the transformation and normalize the result. Such transformation ensures correct normals after non-uniform scaling. So this type should be used when transforming normals.
I do not know what they mean by 'transforming normals' 😢
The Cycles Encyclopedia says:

(Btw. did you get the 2.83 version yet?)
So far I have not seen anyone use Vector or Normal yet.
I'll have to re-watch @jlampel 's Shading fundamentals. As far as I can tell (but I haven't finished it yet...) he doesn't cover them in his new Texturing course.
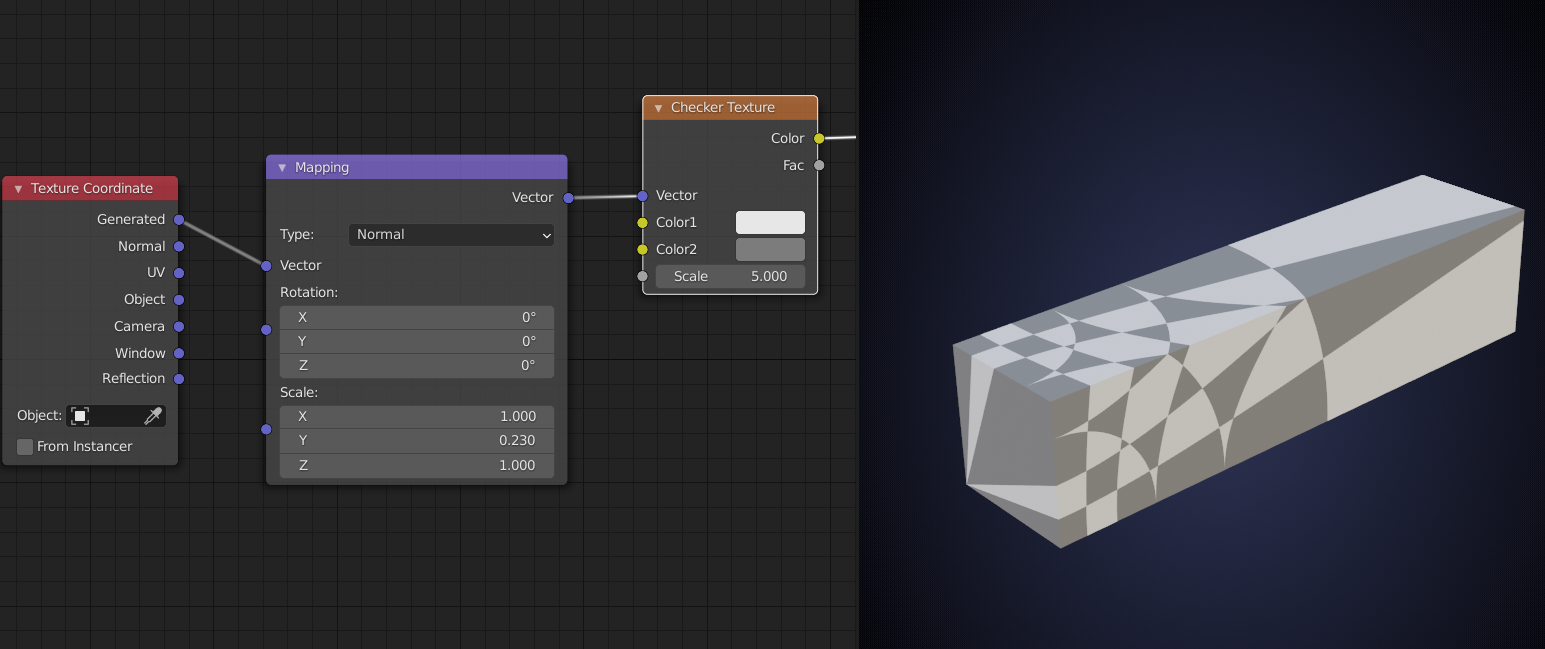
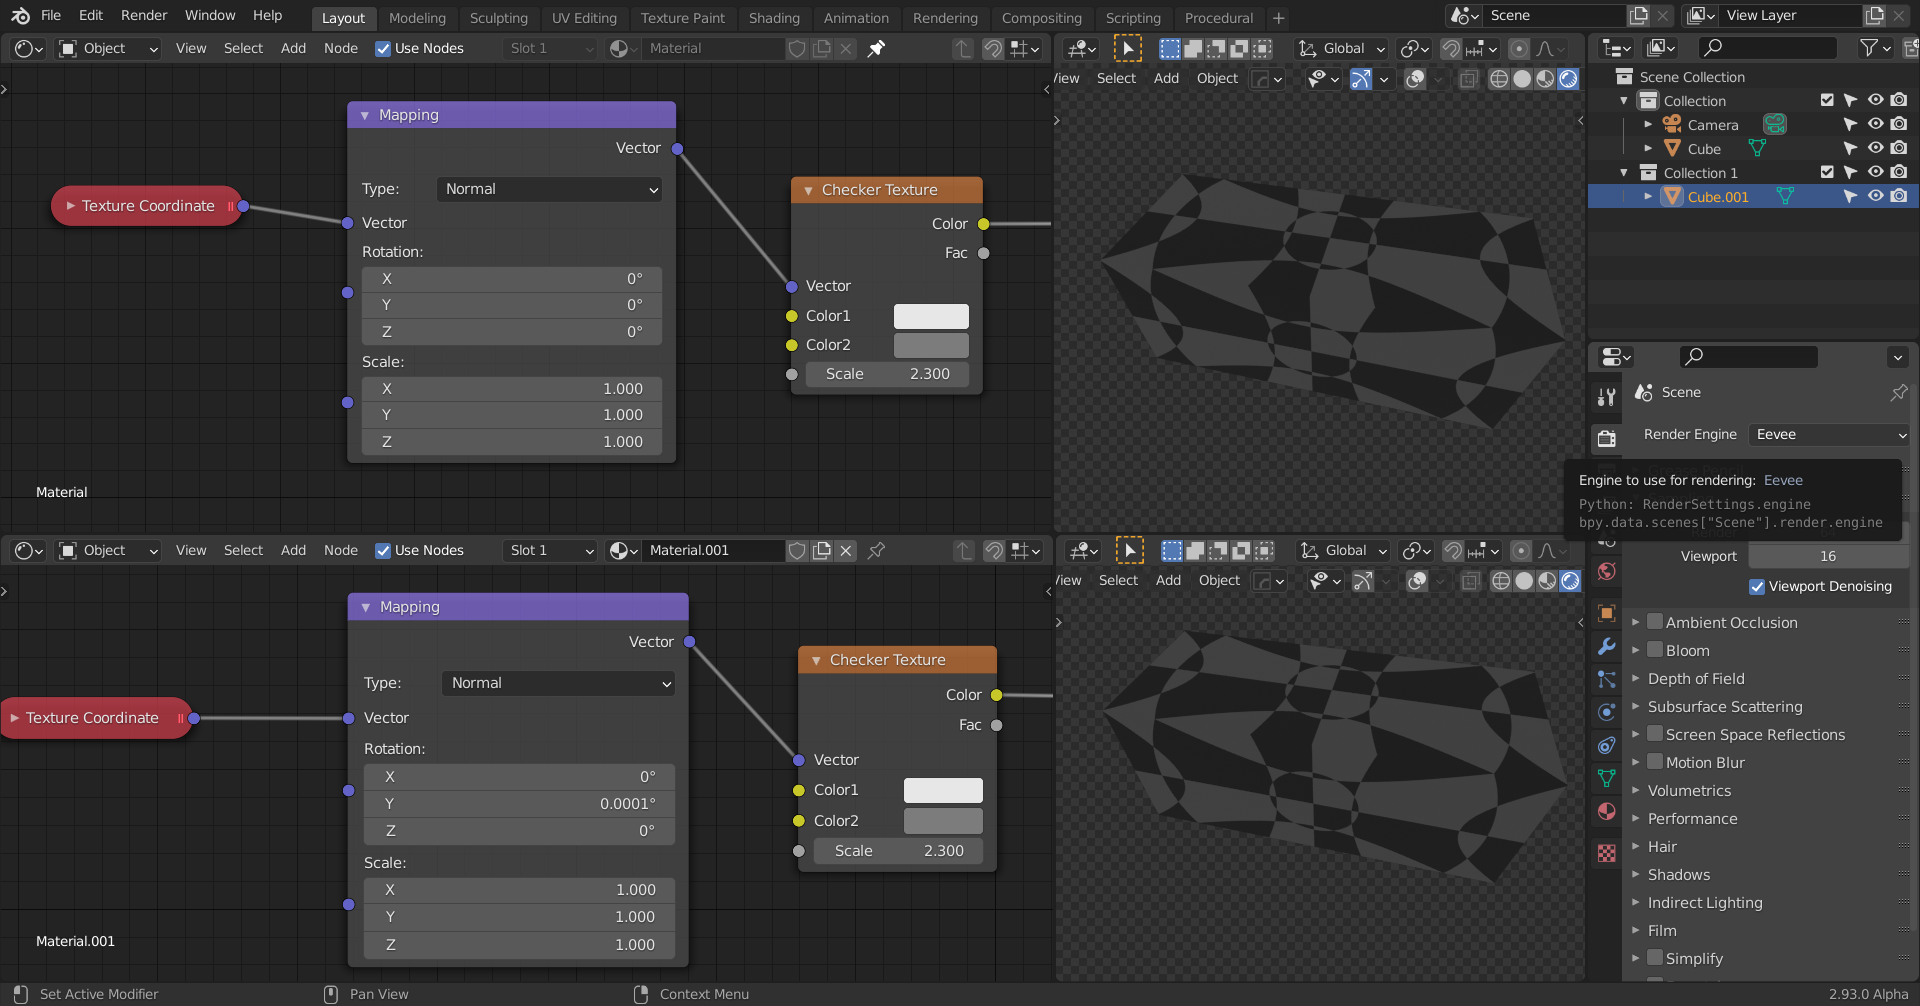
And there is a bug:
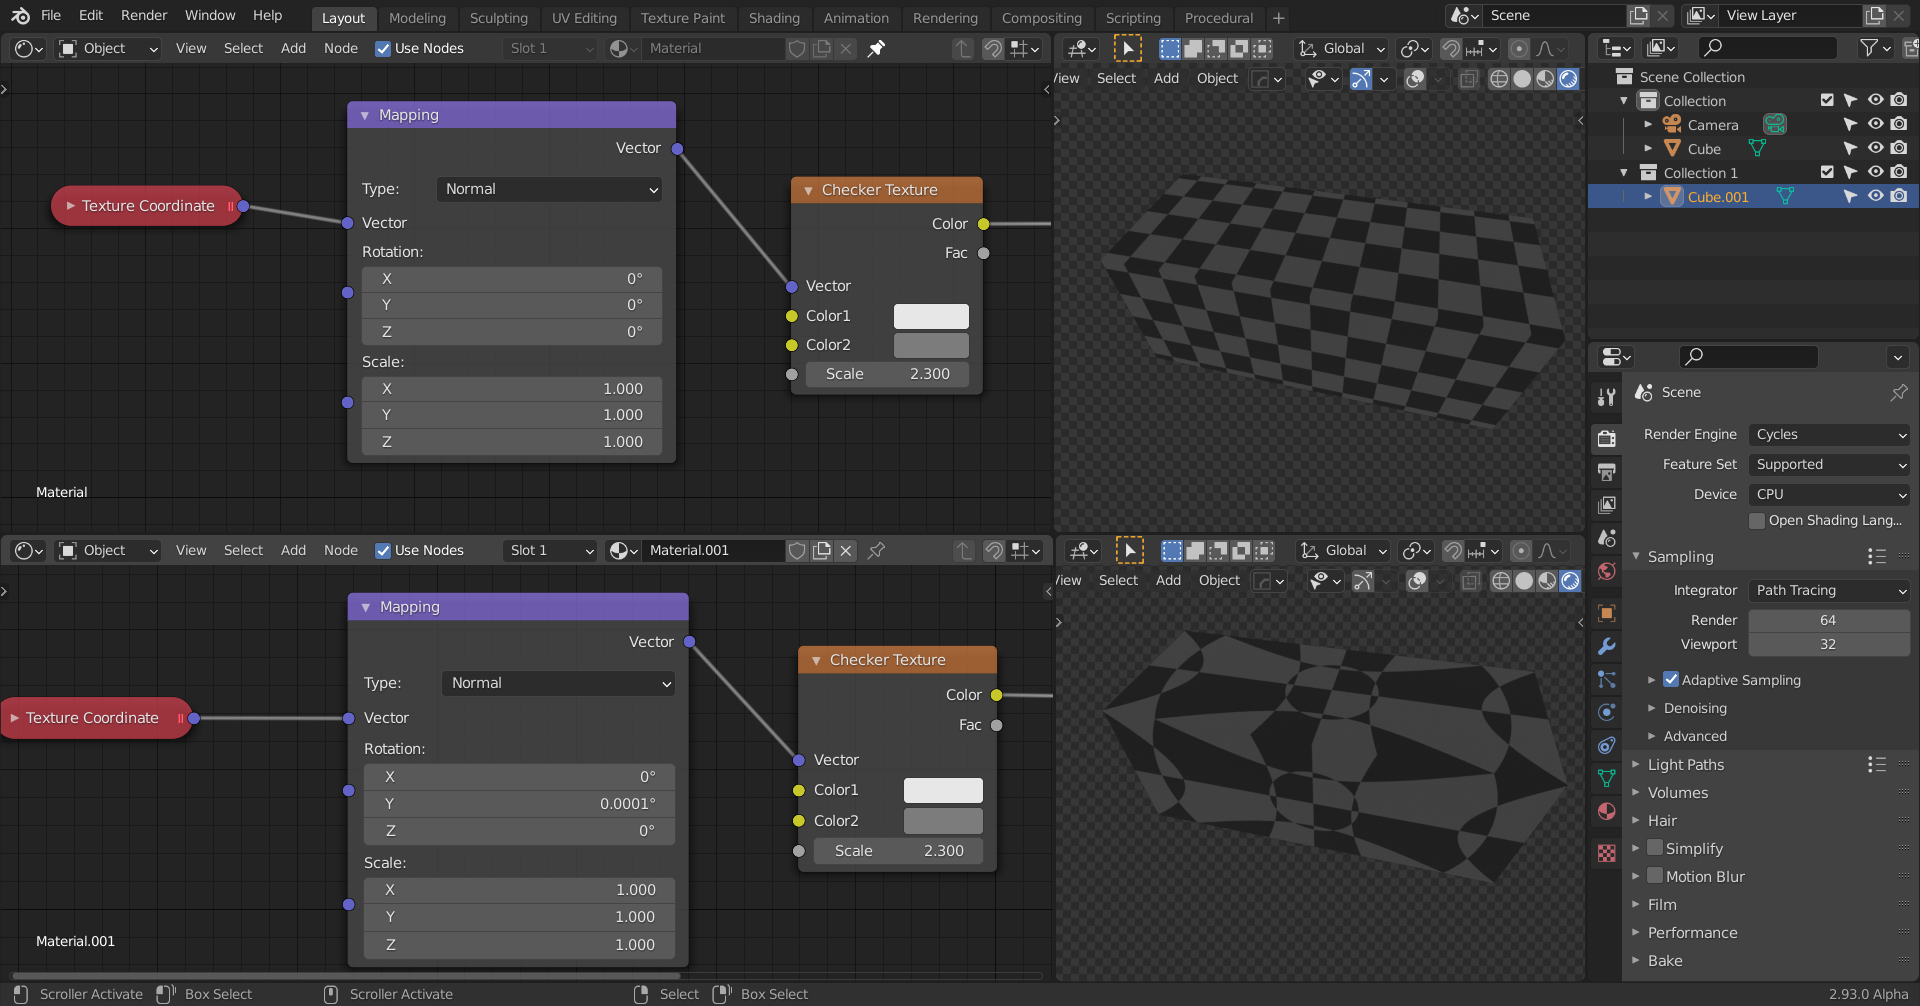
Changing the Rotation slightly, or the Scale, gives the right result
Only in Cycles, Eevee is correct:
Thank you, ![]() spikeyxxx, for these in-depth explanations 😀! Now, I have something to study 😉🕵️♂️👨🎓!
spikeyxxx, for these in-depth explanations 😀! Now, I have something to study 😉🕵️♂️👨🎓!
Chapter 1-3 Coordinate Types takeaway:
- Generated takes into account world coordinates
- Object the world origin
- UV by unwrapping
- Normal by the way normals are pointing perpendicular to the face
- You can separate coordinates XYZ with the node
- Window is fixed to the view, same as Camera I think
- Reflection simulates how and object would reflect based on the angles and stuff
Moving on
- "Generated Coordinates" take into account the "Texture Space Box" (not to confuse with the object's "Bounding Box"!).
- "Object Coordinates" are referring to the origin of an object.
I have a math question.
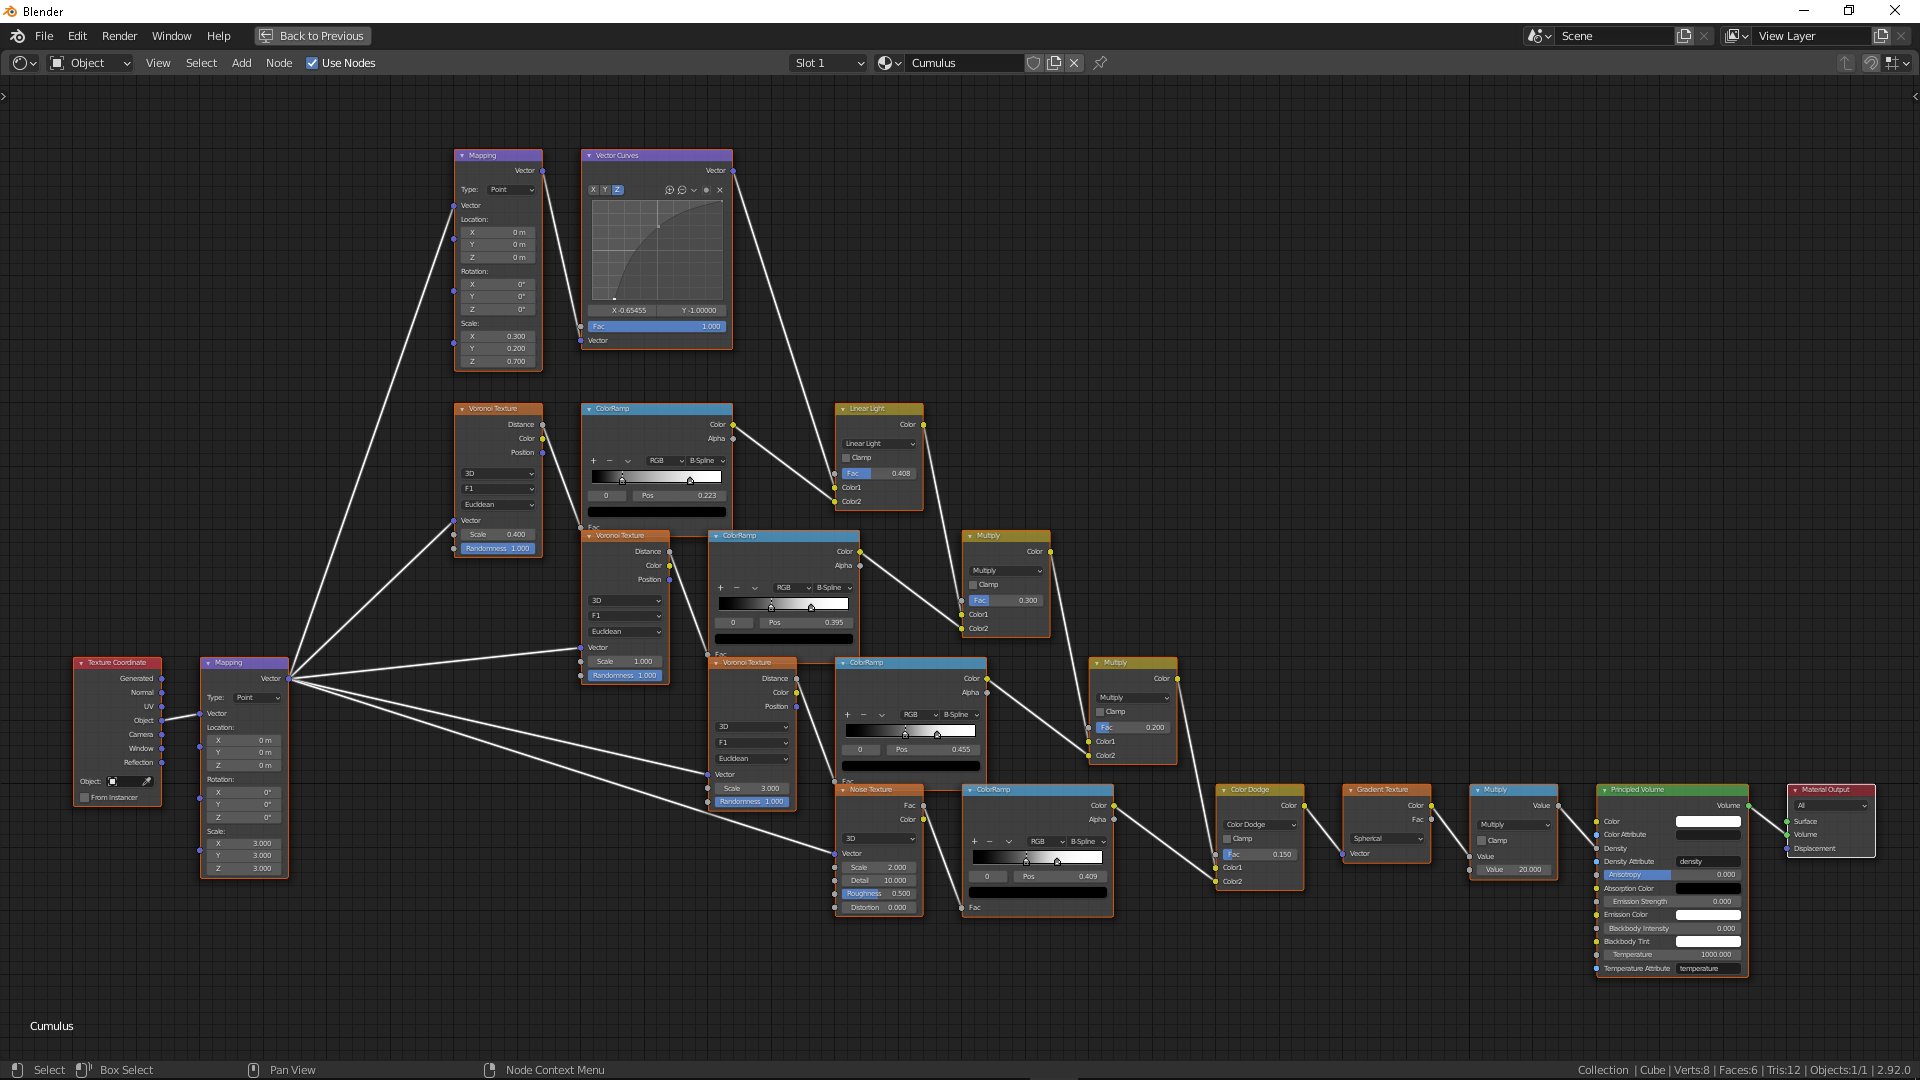
I am writing a script to add clouds at the press of a button. I have finished the script for one cumulus cloud and it works.
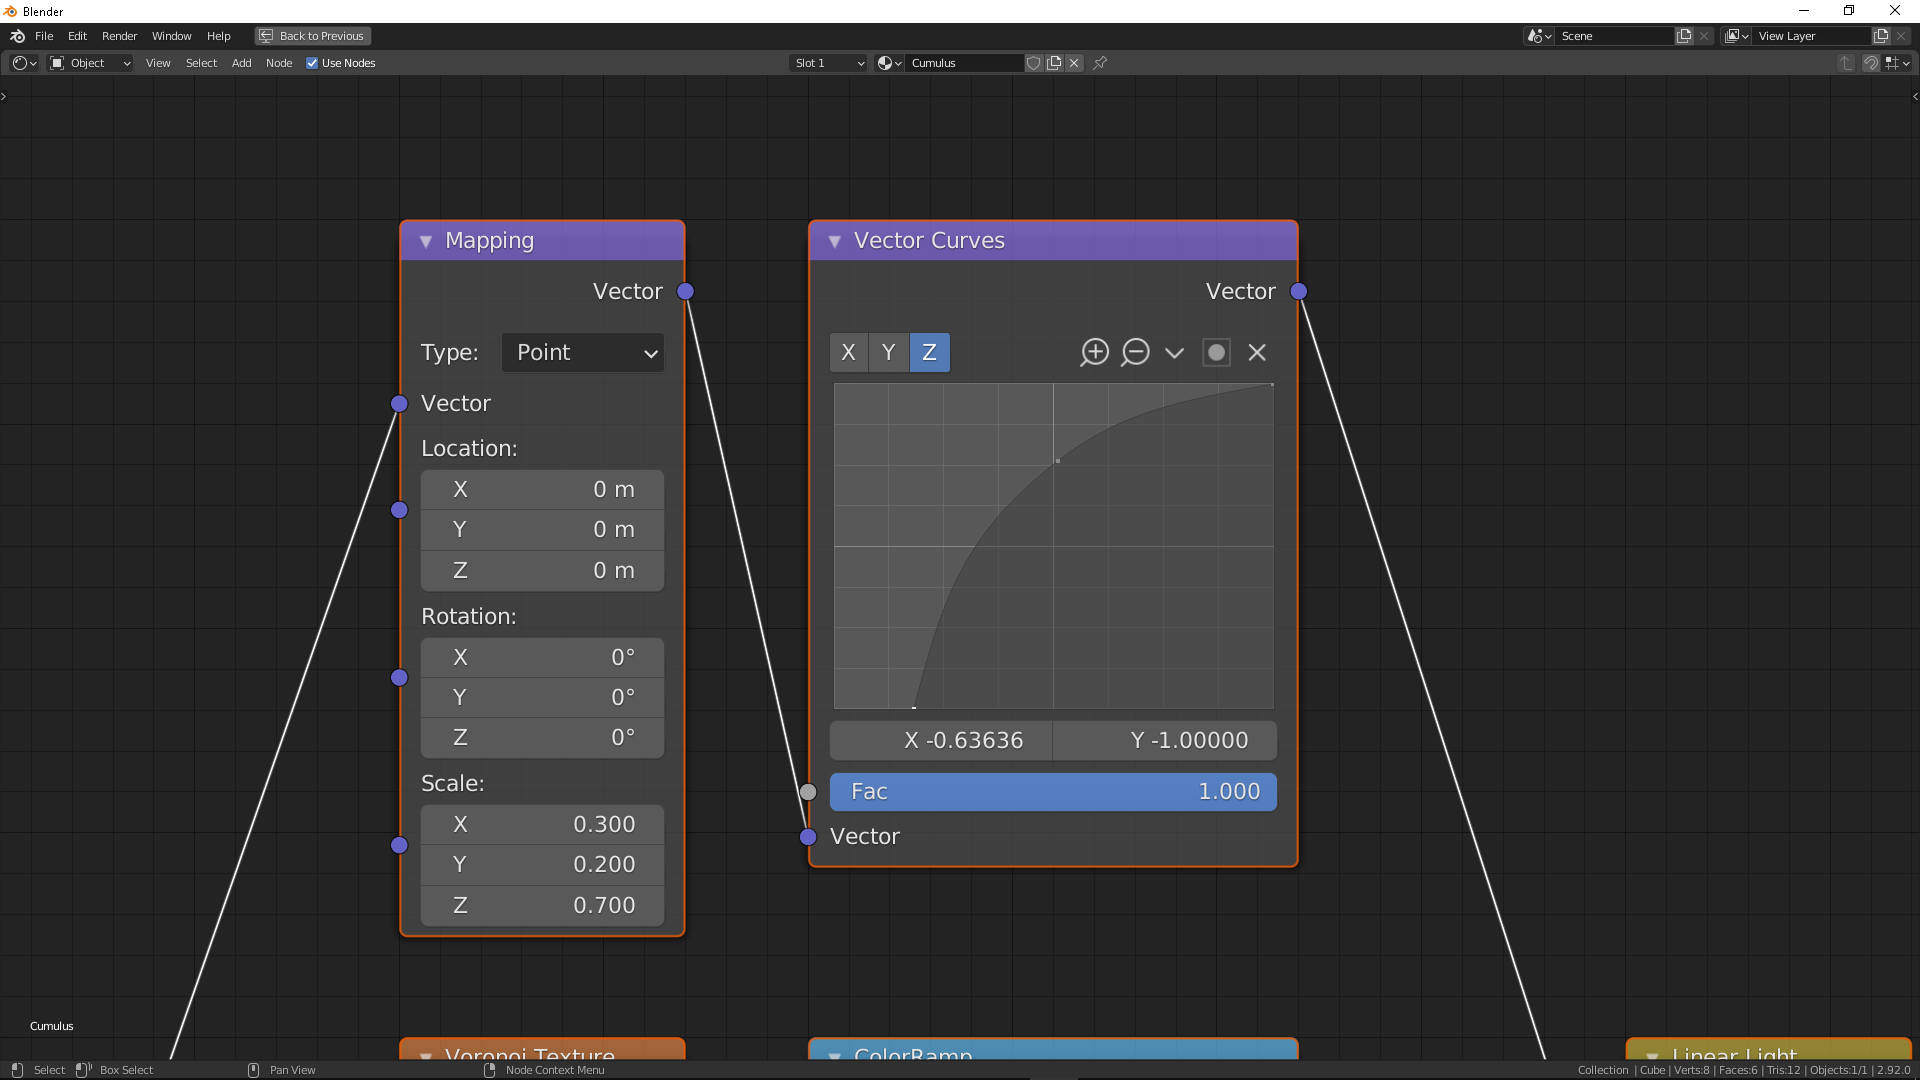
The question, I have added a Vector Curves Node but cannot for the life of me figure out how to adjust the curve in the script, so I was wondering if there was another option, I was thinking of a Separate XYZ Node, do some math, then a Combine XYZ Node, any ideas??
or maybe @jlampel or @theluthier maybe you could give me a hint on scripting the curve if it is even possible.
Thanks in advance and appreciate the help.
This is what I have. Curve is manually adjusted
Wait, you're doing scripts? so what was that about your head blowing up upon entering this here math domain all about? Adrian just be like ok, and wow because, tssss I mean people here lately are like everyone over achievers. What happened to the days when just being a modeler was enough? Can people even do math in peace these days? jesus.
Thanks @jlampel , it's been years since I did any scripting. This was just an exercise to learn scripting with Blender.
@adrian2301 treating it as a math question; you can write every curve as a mathematical expression. In your example that would be a cubic formula, but you could approximate it with a quadratic one like so:
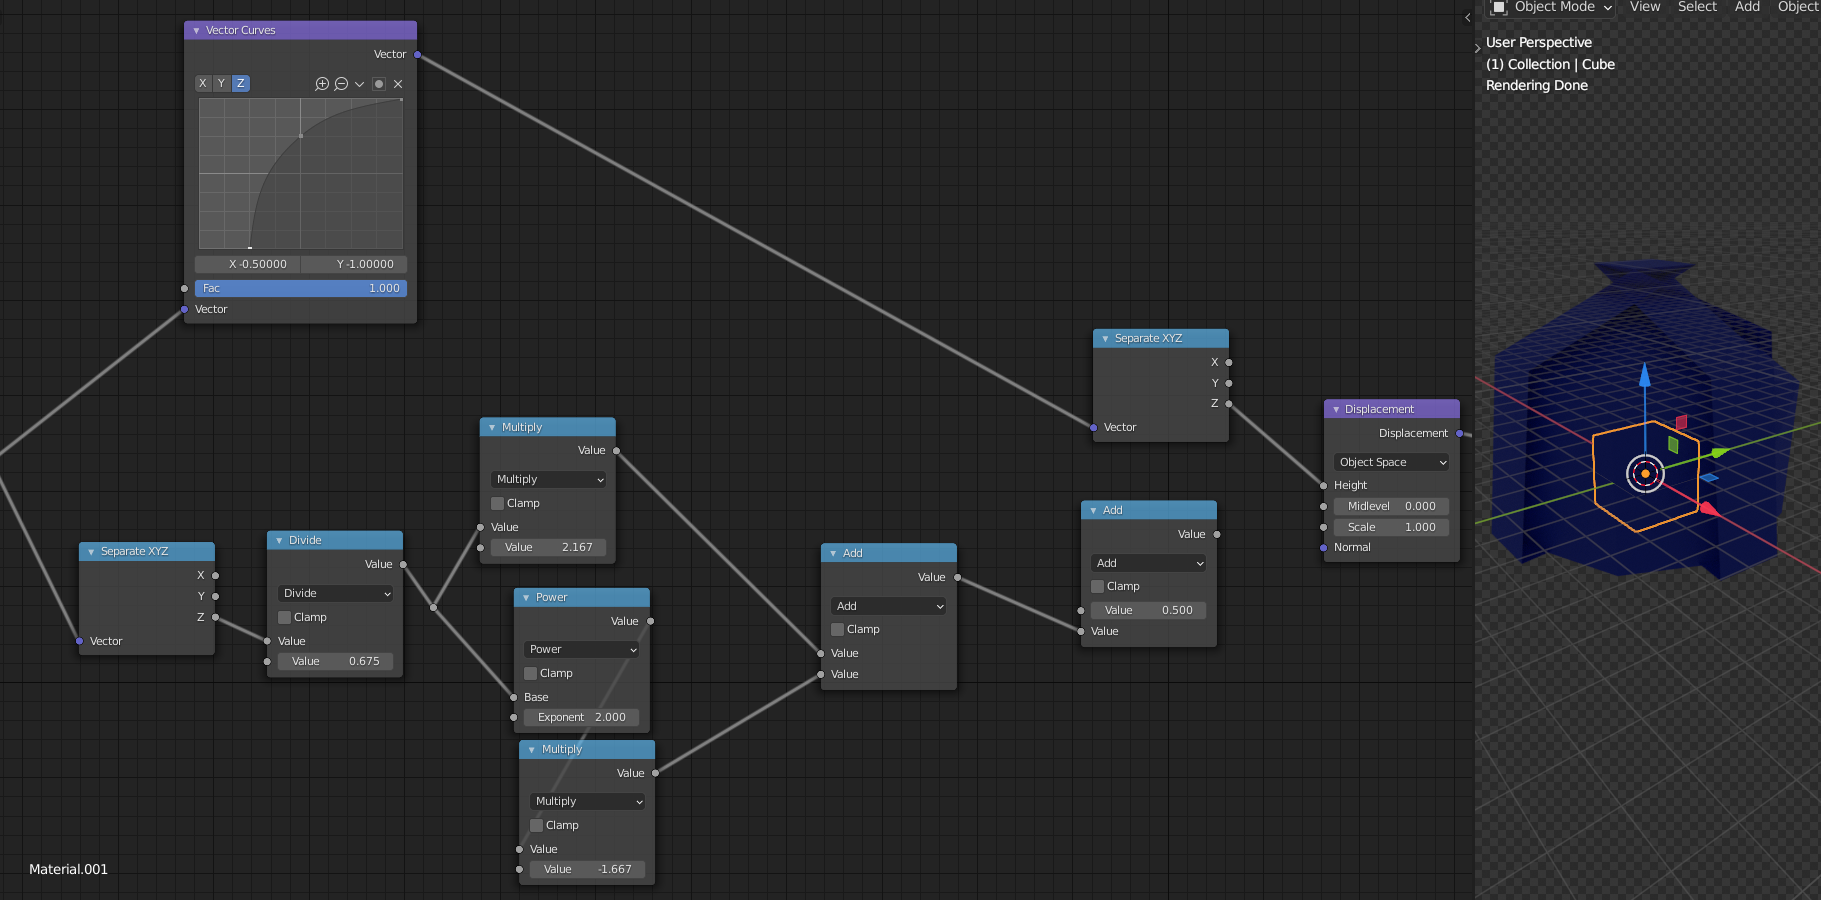
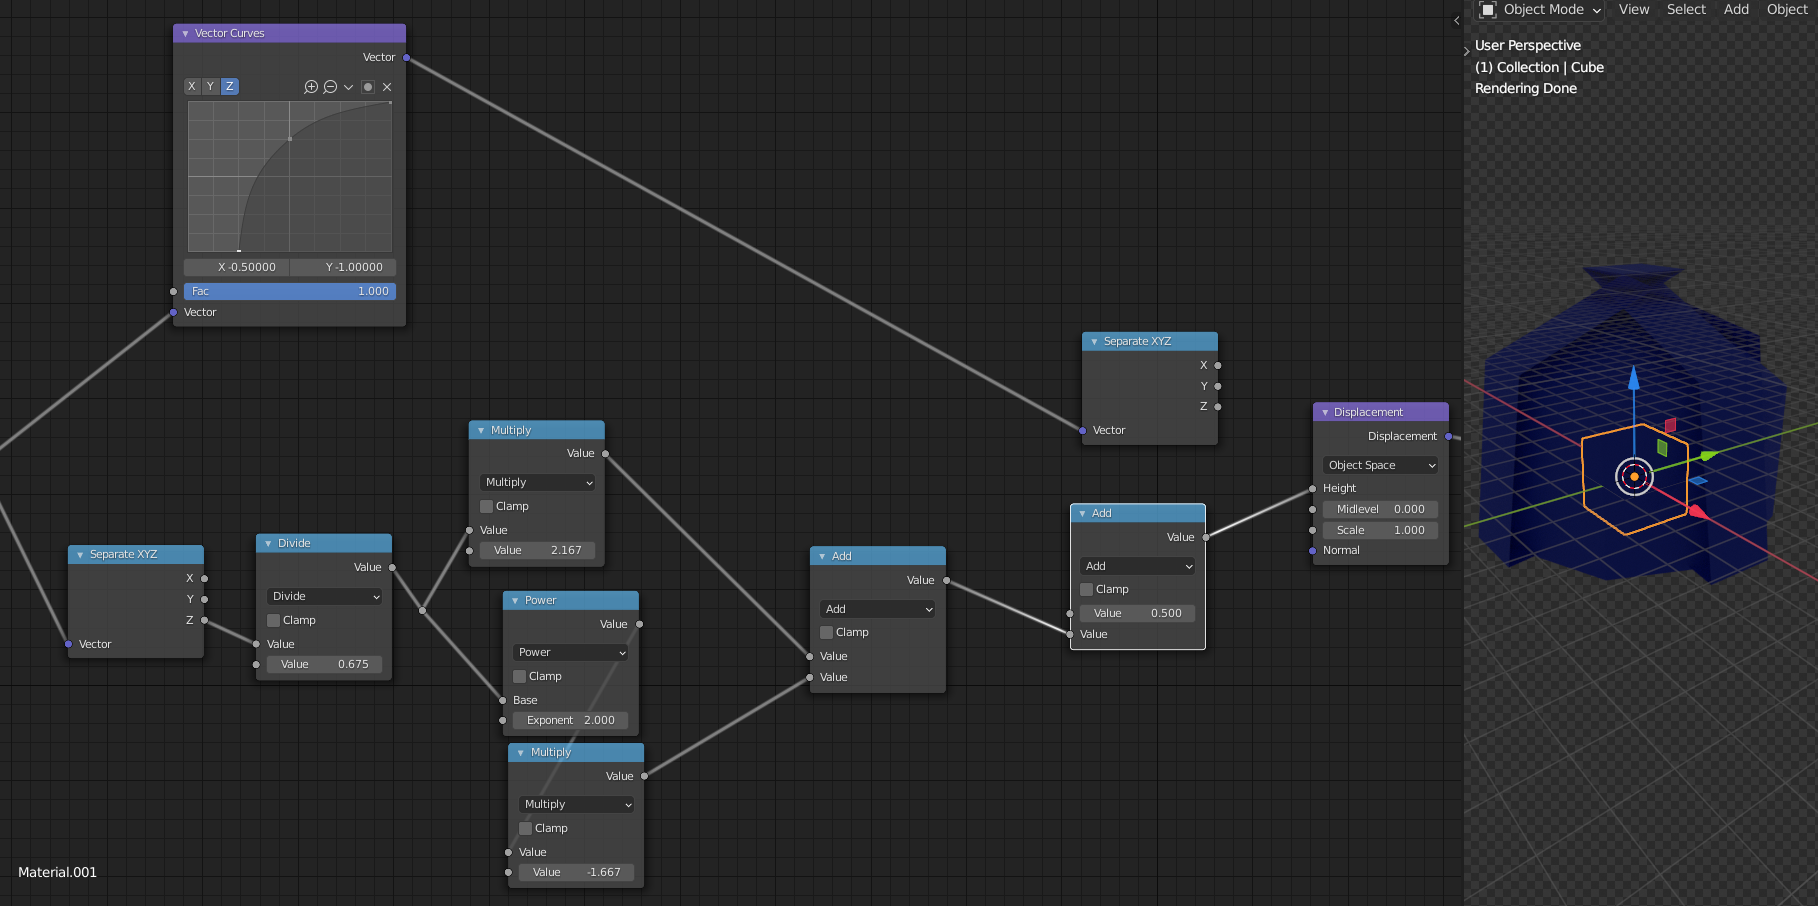
You have 3 points given on that curve (I simplified the numbers a bit), so if the expression you are looking for is of the form:
ax² + bx + c
then you get 3 equations:
for x= -0.5: 0.25a + (-0.5)b + c = -1
for x=0: c = 0.5
for x= 1: a + b + c = 1
You know c from the second equation, so you are left with a and b, but multiplying the first one with 2 and adding it to the third one gets rid of the b, therefor you can evaluate a and from there you can calculate b.
Had to make a correction, b/c your curve is not quadratic, but cubic, but....
The thing is, in general, if it has to be exact, you're in trouble, but to approximate a curve can be as difficult as how good the approximation has to be ;)
Chapter 1:4 - Value Control, takeaways:
- When you are controlling values and you see the gradient in a flat plane moving left and right, you'd think that's the only thing that is happening, but actually values are causing a shift in the Z axis as well. The handy value graph is a great tool to visualize the height information.
- The operation Add and Subtract shifts the values up and down.
- The operation Divide and Multiple scale the values.
- There's some talk about linear interpolation along the gradient that I don't quite get. It seems to be something about the gradient just going from left to right.
- The Power operation introduces curvatures and bending.
- The color ramp node is great for remapping a gradient, but even better is the map range node.
- Remapping the values linearly? I don't get that. But I think it has to do with how Spikey has been throwing a straight line in the Cartesian plane sometimes when showing some math.
- The efficiency of the node tree is something to keep in mind since it can bog down a scene with too heavy computation.
![]() dostovel Remapping the values linearly is the same as linear interpolation, which is a fancy way of saying something like: "draw a straight line between the two given points."
dostovel Remapping the values linearly is the same as linear interpolation, which is a fancy way of saying something like: "draw a straight line between the two given points."
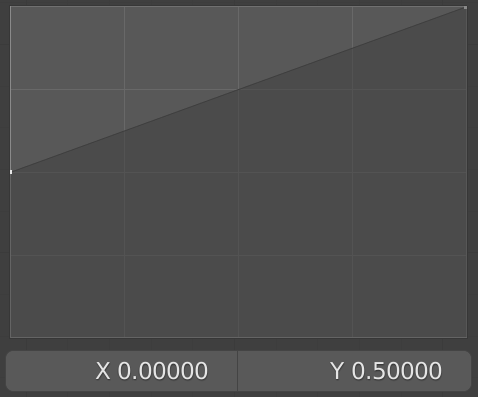
Here 0 'goes to' 0.5 and 1 'goes to' 1. Then, because there is a straight line connecting them, 0.5 goes to 0.75, which lies exactly halfway between 0.5 (which is where 0 is 'mapped to') and 1 (where 1 is 'mapped to')
Should you make the line longer (but keep it straight and through those points), then that is called linear extrapolation, to hide the fact that it is just a straight line. Otherwise people might recognize that Math is not so difficult and mathematicians aren't very clever at all....
Thanks ![]() spikeyxxx , I knew there would be a calculation that could be used instead of the Vector Curve Node, I also knew that you would know that.
spikeyxxx , I knew there would be a calculation that could be used instead of the Vector Curve Node, I also knew that you would know that.
This is the node set up for the Cumulus cloud in @theluthier clouds course, so the curve doesn't need to be exact. after all a cloud doesn't have an exact shape. ⛅
I figured that it didn't have to be exact in this case ;)
If you know some shapes of basic curves in math, than you can easily approximate what you want; like sine/cosine, tan, quadratic equations,...
This is also usually used to calculate Fresnel (with a fifth power); most famous in CG is Schlick's approximation for the Fresnel curve, but the guy (Schlick) has done more in this area, basically making easier to calculate approximations of difficult functions.
Ok yeah, thanks Spikey, I thought that was where that linear thing was going, you had mentioned it before and it came to mind when I heard it in the tutorial.
@adrian2301 That's really cool what you're doing with scripting. I'm unfortunately not that familiar with Blender and Python despite some basic Python knowledge. But hopefully, I'll get a better understanding of procedural shading and its usage for the creation of 3D objects.
Another point: I'm wondering why Simon Thommes uses the "RGB Curves" node instead of the "Vector Curves" node.