
Blender has been a go-to tool for modeling and animation since day one, because, well, that's how 3D graphics have traditionally been made.
But in recent years, digital sculpting and painting have really taken off, and if you didn’t already know, Blender is more than capable of handling both!
That said, trying to sculpt or draw with just a mouse and keyboard? Not ideal.
A drawing tablet is the way to go. If you’re here, chances are you’re already considering one or have one and just want to make sure it plays nice with Blender.
I’ve put together some recommendations for hardware that works well, but no matter what you choose, there are three key things to get right:
- Blender settings for pressure sensitivity
- Download drivers and customise your tablet settings
- Using a Pen Display with Blender
- Enhancing Your Workflow with a Shortcut Remote
__________
1. Blender Settings for pressure sensitivity
Any plug-and-play device will automatically be recognized by Blender, however in some cases (normally on Windows) you might notice a lack of pressure sensitivity.
Open your Preferences and select Input.

If you're on Windows, you should see an option under "Tablet" for "Tablet API". This might be set to Automatic, but if you're on Windows 8 or later, set this to Windows Ink. If you're still running anything earlier than Windows 8, You'll need to switch it to Wintab.
Mac and Linux rarely have pressure sensitivity issues, but quite often the problem for Windows users can be fixed by look at the Tablet API setting (this is Windows Only).

2. Download drivers and customise your tablet settings
Whatever device or brand of drawing tablet you choose, you will need to download and install the correct drivers for it, and they typically come with software that allows you to customize various settings for buttons, pens, etc.
Some will allow you to customize specific button combinations for specific applications - for example, I have a Blender setting for my XP-Pen Deco Pro.

Unless I am using Blender, all commands default back to the original settings for buttons, dial and pen. Most drawing tablets have buttons built into the bevel, and a dial of some sort.
Blender is reknowned for its reliance on shortcut keys, and so choosing which shortcuts to program into your limited button selection can be a bit of a process, but do take the time to see which commands you tend to use most, and program accordingly. Remember that you can always modify them later!
If you're looking for my preferences for using Grease Pencil, here's how I've set up my Deco Pro buttons:

Suggested Button Shortcuts for Blender
Here’s how I’ve mapped my Grease Pencil settings:
- Ctrl-Tab – Mode selection
- Space – Play animation (with Ctrl: maximize viewport)
- Shift, Ctrl, Alt – Essential modifier keys
- Pen Buttons – Emulate a 3-button mouse
I keep my pressure response settings neutral, and my pen's middle-click function allows for easy viewport navigation (Alt + MMB for panning, etc.).

As you can see, I have fairly neutral setting for pressure response - nothing fancy - and the pen can emulate my 3-button mouse. So for example, should I wish to pan my view, Alt MMB is easy enough. If I want to zoom, I can use one of the four ring functions to do so.
3. Using a Pen Display with Blender
A pen display - such as the Movink 13 - typically don't have physical buttons that serve the same function. The software will allow you a range of onscreen controls that are highly customizable and can be toggled.

My preferences are minimal, and yet double the number of controls offered by a drawing tablet. Here's how I organize my settings:

I've created two shortcut panels of 8 buttons each. One allows for pen modifiers, the other more global controls.
Shift, Ctrl and Alt are there, as are undo, brush increase and decrease (no dial for this function so they have to be assigned to two buttons) and delete.
My Screen Keys happen to be a little more Universal so that I can work in other modes - Esc and Enter, Move Rotate and Scale, and one button is assigned to toggling the on-screen keyboard - handy if you want to label layers.
My Movink Pen has an extra button which I can assign a shortcut to as well - I've made this my CTRL-TAB function to bring up my mode select menu, and my middle-mouse click controls the pan/scroll for moving around the screen.
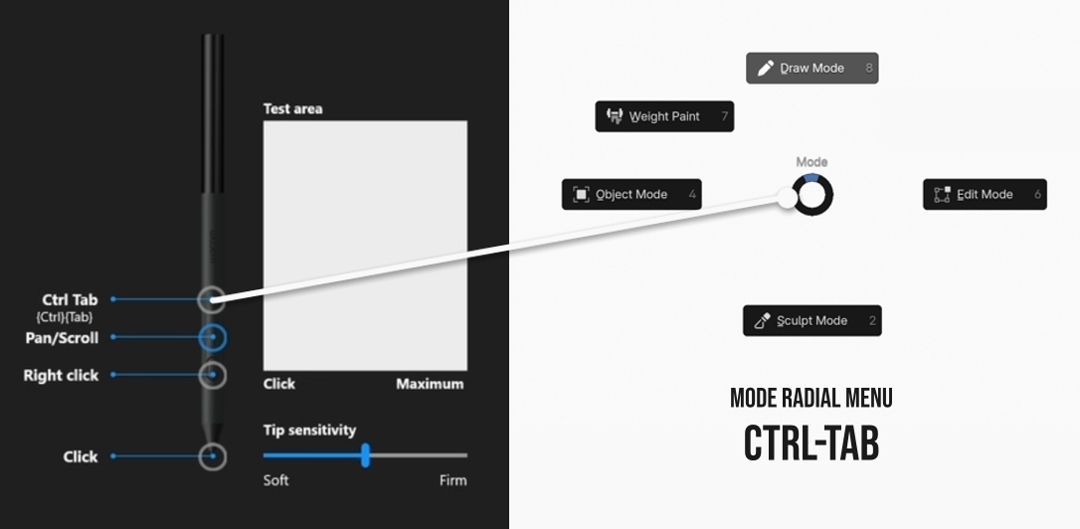
So far, I have found this to work very well across a number of grease pencil tools. You may have noticed My pan/scroll is assigned to just MMB - this is because I use this mode MORE (the default is orbit) so I switched this in my preferences.

Holding Shift while using MMB will now do the opposite function (in this case, Orbit)
This set up gives me quite a range of flexibility when working, allowing me to switch modes on the fly, select, grab, scale, rotate points, I can even do an Alt-S function to scale the thickness of lines in edit mode (Alt and Scale). Most other functions are accessible through contextual right-click menus.
4. Enhancing Your Workflow with a Shortcut Remote
Should you require even MORE access to a library of shortcuts when on the go, then I recommend using a shortcut remote such as the ACK05.

This device can almost completely replace your keyboard for Blender shortcuts, and should you have a tablet that lacks buttons, it will more than compensate for that.
Sometimes I will draw directly on my Surface Laptop in a mode that obscures all the keys and trackpad, and I have need of certain controls!

The advantage a Shortcut Remote gives you is up to 40 shortcut keys. It can ALSO be mapped for several applications and even versions of Blender!
Let's keep things simple.
Here's how I've mapped my settings for use with Grease Pencil - and Blender in a more general way:

The scroll Wheel can have up to 4 functions.
For Blender, I will need to increase/Decrease Brush size, zoom in and out, and orbit horizontally and vertically.
Here, you will see "Scroll" which has the same MMB function as zooming, but the name can't be changed (bit of a caveat here). Everything else though - I can map [ and ] for Brush resizing, and 4,6 and 8,2 for incremental orbiting Horizontally and Vertically, respectively.
I have mapped my most universal shortcut keys to two key groups:


This set up allows me to navigate the Blender interface with ease.
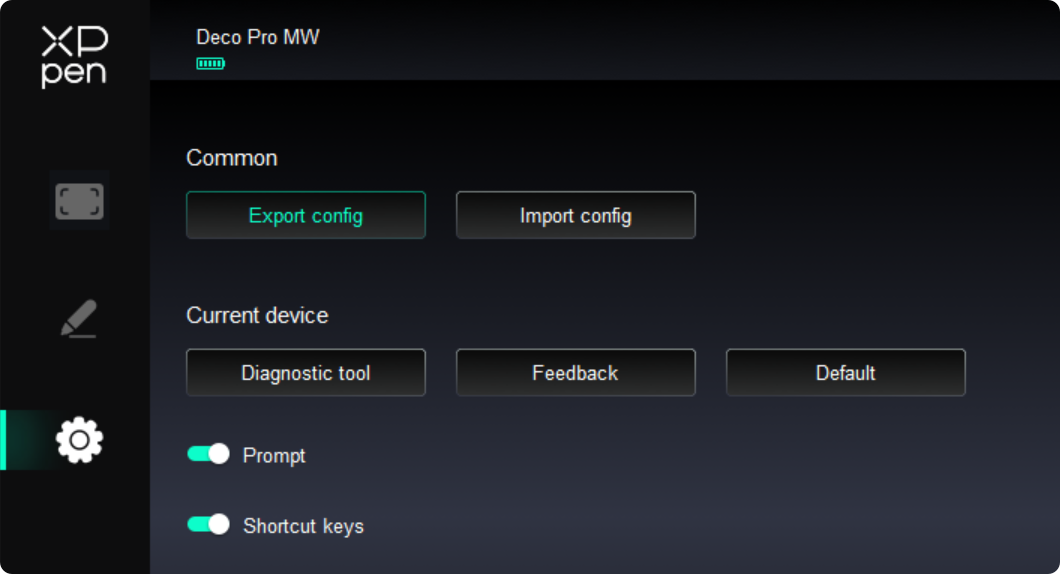
As you work more in this set up, you might find Shortcuts that you really need. It is simple to remap them and the software automatically saves the changes.
Finally, if you want to share this layout, you can export the configuration easily from settings:
Feeling more confident?
If there's any takeaway here, any drawing peripheral will require you to check the above settings to ensure they work optimally.
It doesn't matter what brand or device you choose to go with, or what OS you're running Blender on.
The basics remain the same: OS settings, Device drivers and software, and Blender preferences.

Once you're up and running, you'll be equipped to try out a range of courses focusing on sculpting and drawing!
- Core - Fundamentals of Digital Sculpting
- Draw! An Introduction to Blender's Grease Pencil (Free)
-
Concept - Create Concept Art with Blender
Happy Blending!
- Paul Caggegi
Switching the Tablet API to Windows Ink finally fixed my pressure sensitivity issues in Blender. I’ve been struggling with this for a while, so thanks for the clear tip!
https://duttonlegacy.com/series/dutton-ranch
My best score in eggy car https://eggycargame.cc is still nowhere near what some players are posting. It's one of those games that looks easy until you actually start playing.
The thing I like about https://nanobanana3ai.app">nano banana 3 packaging creative studio for packaging mockups is how it helps when I need a usable base before polishing. It helps keep credible material detail from drifting between versions.
Switching to Windows Ink solved it for me right away.
Great post! I agree that mindset is so important. The 80/20 split really makes you think. I'll try to focus on my vision more. Thanks for the tips!