CLASS ANNOUNCEMENT #5 (Feb 1, 2018): The class is officially closed! Thanks to all who participated. Be sure to check page 43 for the closing "statement" and commendations.
CLASS ANNOUNCEMENT #4 (Jan 30, 2018): The timing worked out where this week's homework stretch is 10 days instead of the usual 7. So you've got extra time to complete the assignment! I'll look for submission through tomorrow, the 31st, and then I'll do a final post to close out the class.
BTW week 4's live event is archived if you missed it.
CLASS ANNOUNCEMENT #3 (Jan 15, 2018): Week 2 is done - We're halfway through the class! Today WEEK 3 begins where the focus is digital sculpting. This is a far more artistic method of shaping 3D models, so if you struggled in week 2, week 3 should be refreshing.
- Only 1 course to watch this week: Fundamentals of Digital Sculpting
- Live Event tomorrow at 2pm EST
- Please submit homework anytime between Jan 15 - Jan 21 with "BC1-1801 Week 3 Homework Submission" at the top of your post.
Keep up the awesome work, Class! So much creativity and hard work being contributed from everyone 🤘
CLASS ANNOUNCEMENT #2 (Jan 8, 2018): Week one is accomplished! Today WEEK 2 begins. We're moving forward from basic viewport interaction and into mesh modeling; into Edit Mode and the modifier stack.
- Reminder that you have 2 courses to watch this week: Mesh Modeling Fundamentals and Modeling with Modifiers.
- Live Event tomorrow at 2pm EST
- Please submit homework anytime between Jan 8 - Jan 14 with "BC1-1801 Week 2 Homework Submission" at the top of your post.
As always, don't hesitate to ask questions in this thread!
CLASS ANNOUNCEMENT #1 (Jan 2, 2018): The class has officially started! Today we held the first live event to kick things off. The recording will be published by tomorrow at the latest is now available in "Past Events".
That means it's now up to you to watch the Blender Basics Course and submit your homework to this thread. Please add a big, bold title to your homework submission reply so I can easily tell. Like this:
"BC1-1801 Week 1 Homework Submission"Also don't hesitate to ask questions along the way. I'll be checking this thread daily to answer questions, give advice, check homework.
This thread is for CG Cookie Citizens that are participating in the "Getting Started with 3D Modeling and Blender" class! Its purpose is to serve as central communication for all participating Citizens (excluding Hobby plan Citizens) to ask me and each other questions and to post homework. As the instructor of the class, I will be monitoring this thread on a daily basis (especially Mon-Thurs) throughout the month of January to review homework and answer questions.
This thread is intended only for Citizens who are participating in the class. Free members are welcome to observe the thread but please respect that communication is reserved for Citizens.

Welcome to the CGCookie Class: Getting Started with 3D Modeling & Blender! This is the first "Class" format where Citizen members are invited to focus together on a particular topic/skill together for a month. Participation is this:
It will take place from January 2nd through January 31st and the topic is for beginners that want to get into 3D modeling. The class is based on pre-recorded courses that students are expected to watch each week along with weekly Live Events.
Download the latest official version of Blender and watch the Blender Basics course. The goal this week is to simply get familiar with the application. We’ve all been there: Opening Blender (or any 3D package), gazing at all the crazy UI, trying to orbit in the viewport, crying...Ok, maybe you were stronger than me and didn’t cry. But the reality is 3D software is daunting. There’s SO MUCH to digest especially when you’re a beginner.
This first week we’re going to overview Blender and 3D from an absolutely beginner perspective. What is Blender for? What can it do? Wait, this isn’t a juicing seminar?
During the Live Event we're also going to open the floor, ask me anything (AMA) style, so I can answer all your questions about getting started with Blender.
HOMEWORK: Create a scene out of primitive shapes. It can be anything from a landscape to a spaceship to a character. Just get comfortable with creating and positioning mesh objects. Here's an example:
Take a screenshot of your scene and post it in a reply to this thread *during the week of Jan 1-6*.
Enter the world of mesh modeling! The oldest form of building objects in 3D, in the computer. We’ll discuss the technical art of “pushing and pulling verts” as modelers often call it. First, watch the Mesh Modeling Fundamentals and Modeling with Modifiers courses to be introduced to this wild, geometric world.
Practice makes perfect here and during this week's Live Event we’ll be mesh-modeling a few objects to demonstrate tools and workflow available with Blender. It’s ideal if you practice along with me!
HOMEWORK: Model either 1, 2, or 3 unique objects using mesh-modeling techniques. They can be as simple or as complex as you like, but they can't be primitives. I want to see that you've used mesh tools to significantly customize your shapes. For example, you could model a hammer, a cell phone, a keyboard, a game controller, a picture frame, a coffee cup - choose something fun!

Take a screenshot of your shaded model + wireframe-over shaded (as pictured above) and post it in a reply to this thread *during the week of Jan 7-14*.
Digital sculpting is the more artistically intuitive method of 3D modeling. If pushing and pulling verts felt like the hard way of doing things, sculpting will be a welcomed alternative! Watch the Fundamentals of Digital Sculpting course this week.
During the Live Event, we'll discuss the pros and cons of digital sculpting as well as how it compares to mesh modeling. Again, practice makes perfect with any craft, and we will also practice sculpting. Be sure to have your pen and tablet ready!
HOMEWORK: *Submit during the week of Jan 15-21*
There’s still much more to learn about modeling with Blender. Remember, it’s a craft. Time + practice is the only way to develop your modeling skills.
This week your challenge is to dive into the Modeling in Blender Learning Flow. While the class gives you a boost, the Flow takes you further into intermediate and advanced modeling techniques/workflows. Test the waters and see how far you can go this week.
During the Live Event we'll discuss the journey of becoming a skilled modeler as well as the potential for turning it into a career. Finally, I’m going to sift through homework submissions to commend my favorites and offer critiques!
HOMEWORK: Model and/or sculpt something challenging this week! Try tackling a character or a complex vehicle, etc. Show me what you've learned; what you're capable of!
Take a screenshot of your shaded model and post it in a reply to this thread *during the week of Jan 21-31*.
This is great mmonaloren! Thanks so much for sharing.
If your Melvin sculpture is too dense for sculpting efficiently, I recommend decimating his model down to a more manageable density. Simply add a decimate modifier in object mode, set the value around 0.2 or 0.1 and wait for it to decimate. The modifier reduces mesh density while trying to maintain all the detail, prioritizing density where it's needed and away from where it's not needed. Once you get to a density you like, apply it and continue sculpting.
Nice work, ![]() az93. Primitives are a skosh lumpy but good overall. On the spectrum of polished primitives, yours lean toward more polished 👍
az93. Primitives are a skosh lumpy but good overall. On the spectrum of polished primitives, yours lean toward more polished 👍
Melvin's looking pretty good too! His meta-shape is authentic and recognizable. Still some room for surface smoothing and polish. Commendable work though. Good stuff this week!
To be consistent I gotta give you a B for assignment completeness. Quality is an A though.
No worries ppanagiotis156 it was arguably on-time-ish, down to the last second 😅
Another quadruped, nice! Grady did a fox earlier. The front legs are a little wonky in that image, especially noticeable on the screen-right front leg. Like it thickens toward the foot a bit. The back and muzzle are little square too...kinda nitpicking it though. Solid work for your choice sculpt ultimately!
And your primitives look good too. Slight lumpiness but edges are crisp and shapes clearly recognizable.
I'd say Melvin edges out in front as your strongest sculpt. Very authentic to the art. Only crit is that his body is a little flat from front to back. Looking from the front, he's appropriately wide but looking from the side he's a little on the thinner side.
Overall you've earned an A for the week. Good stuff!
Thanks to all for feedback. Great experience and really enjoyed the class!
First, I've got to say, fantastic work overall, especially for a first sculpt.
Here's a few things where using references from multiple angles like @theluthier mentioned at the end of today's live stream can really be helpful. It may be a little hard to tell some of these from just the one angle of your sculpt (or just using one angle in a reference) but here's a few things about canines in particular but a a lot of these types of quadropeds in general.
First, with the front legs, image walking around on your hands and knees. Your elbows would be pointed back towards your body. The dog's forelegs would operate in a similar manner. I think in my fox, I went the wrong direction on one of these bends which is one reason it came out looking wrong. (I was trying to think my way through it, and if I'd given myself more time, I probably would have figured this out and corrected it, but I was trying to keep that on inside 30 minutes on the sculpt, focusing on the overall above details because some things can still be easily fixed on it at this point.) I think yours seems like it might be going the right way, but something to keep an eye on if you want to push this further.
There were a couple of things with the head. Most dogs have an almost lazy S (like an S shape that doesn't quite double back on itself is what I mean) shapes going form the head to the nose rather than straight lines, most notably from the top view to form the muzzle and from the side as well. On some dogs (like a Chihuahua), this is more pronounced from the "top" view, and some, like shepherds (like I think this one is) it's less obvious from a top perspective. Take a look multiple pictures, and I think you might can see what I mean. (This shape on the head is common on most felines and canines in particular in some varying degree.)
And like Kent said, these points are a bit nit picking, but it's little things like this that you want to learn to pay attention to in using references, both from pictures and ones you physically have access to, that can really help to push your work further.
Fantastic job here! My biggest recommendation is try using some multires sculpting on the pillows and cushions to soften them and give them a more realistic look. Check out some reference photos to see how they're formed.
And just a note about scenes like this in general... One thing a lot of interior scenes in particular suffer with is that so many feel "stiff" and "stale" and almost like a "showroom" model because they lack certain details. It's great that you have the sculpt, the plants, and the lamps, but think about who lives in this room. Are they married? Single? Have kids? What interests do they have? Hobbies? Do they like to read? If so, what kind of books or magazines? Are they neat and tidy or lazy and messy? All of these can help inform what kinds of things you might want to put into a room like this and will make the resulting scene more visually appealing and interesting.
Most importantly, add imperfection! Using multires to sculpt wrinkles will help, but so will changing the rotation of the tables (and anything that's not a "perfect" circle that gets put on them) even by 1 to 5 degrees. Pull one or two of a stack or line of objects just slightly out of alignment -- even for a "tidy" appearance. Remember, nothing in realitiy is "perfectly" placed, so adding these imperfections of placement and rotation go a long way to helping a scene feel more realistic.
What you have here is great, and is a great start! Keep pushing it, and you can turn it into something amazing!
Here's a reference of one of my own dogs that shows what I mean with that "lazy S" shape, from as near a top as I could find that I had and from the side. Note that while it is near a pyramid shape when taken as a whole, it's more like a stepped pyramid but with more rounded transitions. How sharp this transition is depends on the animal (cat, fox, dog, etc) and the breed (Chihuahua, shepherd, etc), but it is present. Bears have this too. Hoofed animals, like deer and horses, might have more of a straight from the top, but from the side, they still have it on the side view, though less distinct.

This is not my week 4 submission (I'm still working on that, and most likely will be through the weekend!)
I just wanted to post this as the finished sculpt of week 3's homework. It's still has rough edges and it would be nice to paint the Guardian to look like it does on the set, but that would take time I don't have right now.
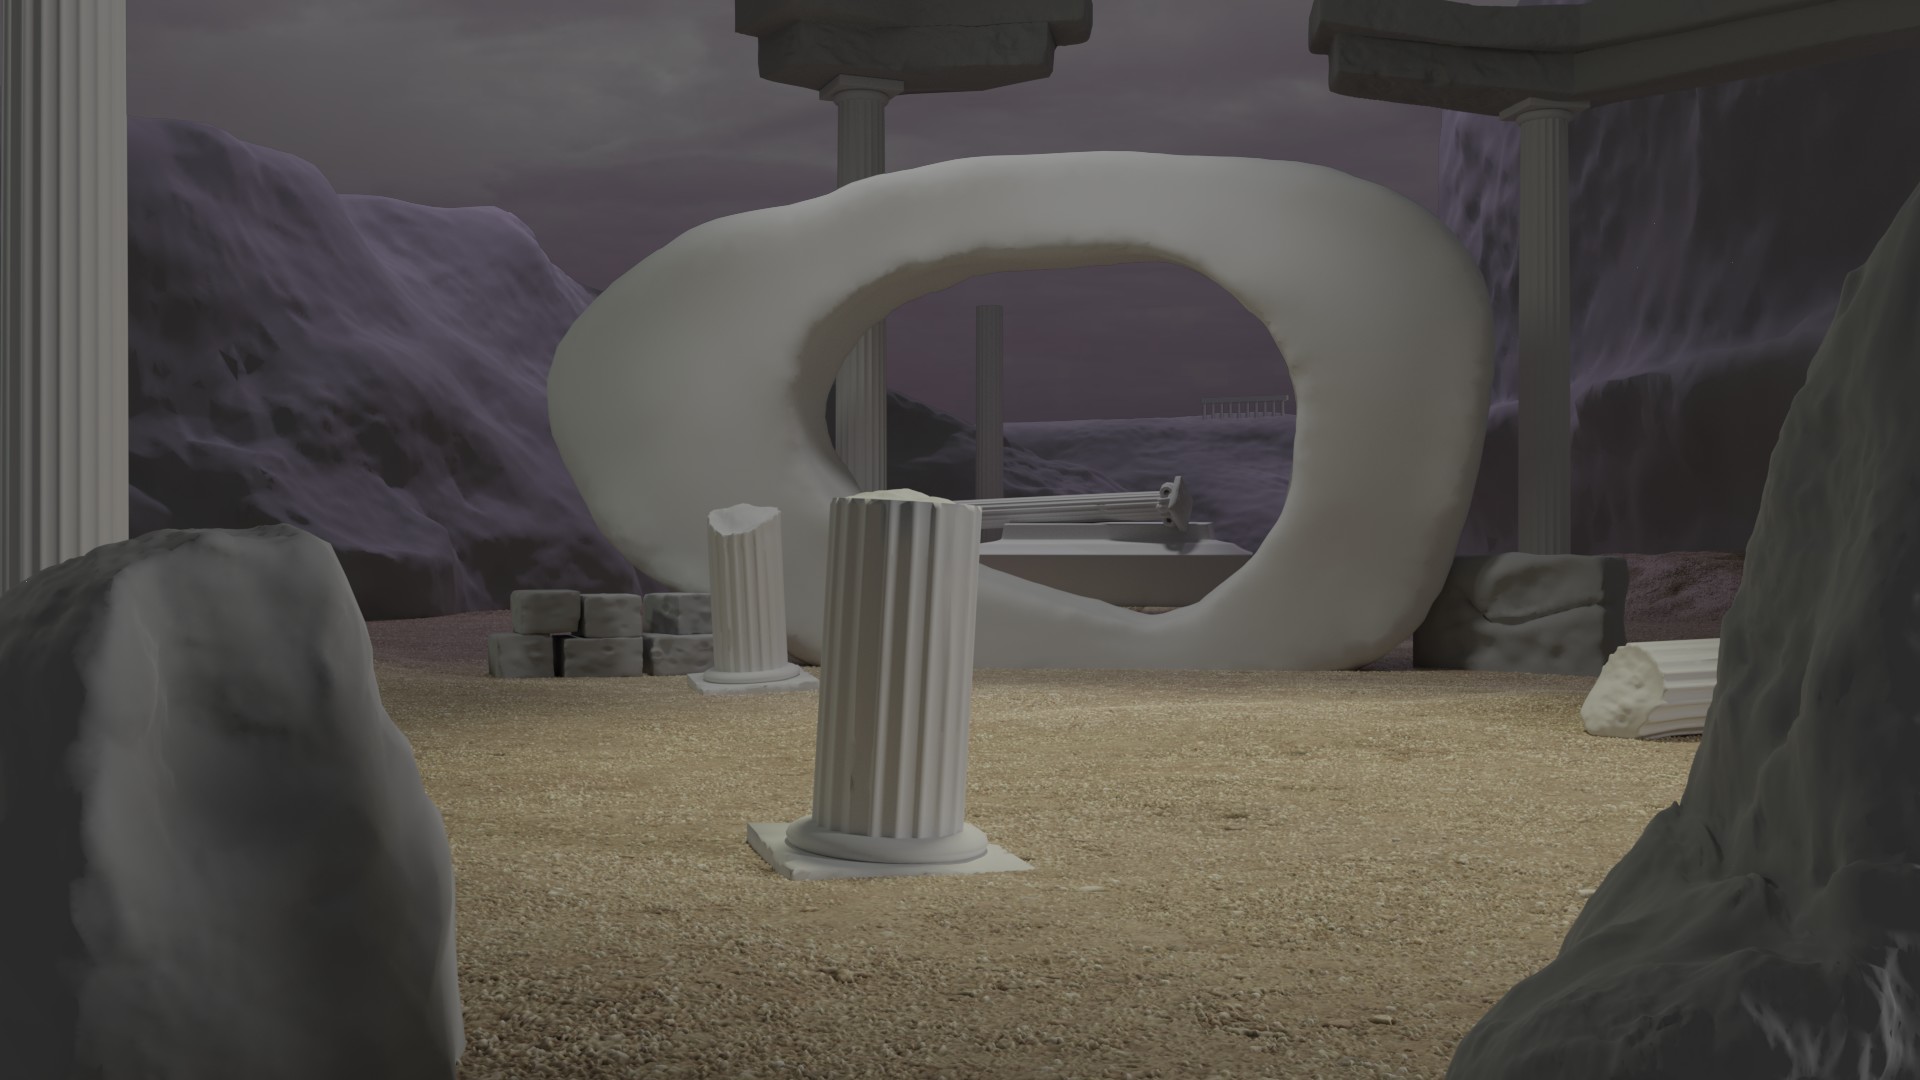
Nice to see you got it working with the mountains in the background. Maybe paint it in March when the next class starts :)
Looking really good ![]() mathias67! You're really taking the time to craft the scene and composing the image. Love the mountains and columns. Intriguing theme here. 🤘
mathias67! You're really taking the time to craft the scene and composing the image. Love the mountains and columns. Intriguing theme here. 🤘
BC1-1801 Week 3 Homework Submission
Kent, just wanted to say how much I have enjoyed this class! It was kind of heartbreaking hearing you talk yesterday about everyone getting burned out over The Range. Glad you guys are fighting the good fight. It's been tremendously helpful this month to have, however informal they are, assignments and deadlines and the knowledge that people will review and critique my work. I've stayed more motivated and active this than anytime since I first started learning 3d. And to everyone in the community, thank you so much for making this class work, your submissions were inspiring and your feedback astute. I will definitely be back for stylised characters!! Here is my homework (inspired by Dr. Seuss). It's a little early, and could still use more texture work, but I'm leaving town for a week and wanted to get it in. 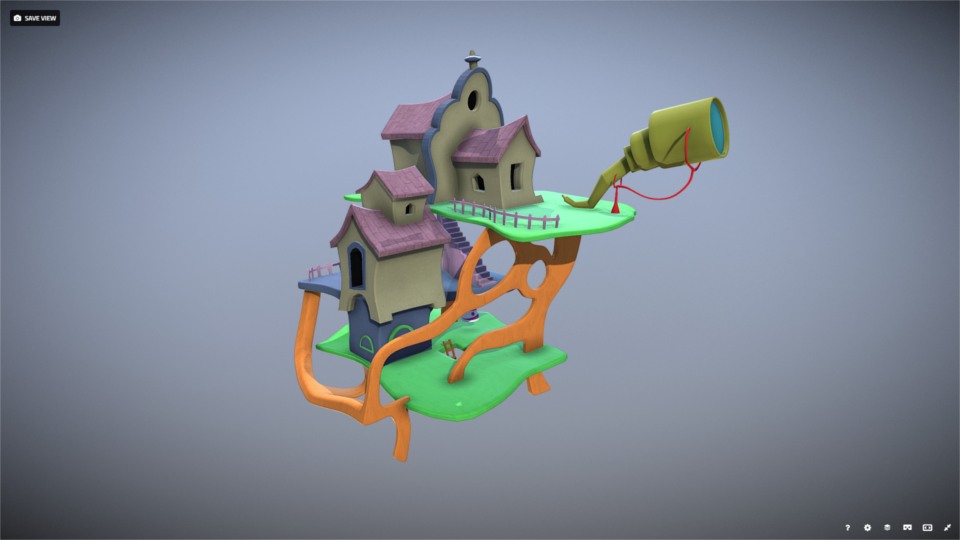
Sketchfab: https://skfb.ly/6vXTN
I think I said something along these lines a couple of weeks ago, but in light of this week's homework, I wanted to say it again.
For the last couple of weeks, we've learned how to model and sculpt individual objects. With that knowledge, you now know nearly all you need to know to be able to do a complex scene such as a room. Doing an entire room, well, is a long, time consuming process. but don't let that scare you.
The key to understanding how to do a "large, complex" scene is to realize that a huge scene is nothing more than a collection of smaller pieces. What makes it seem scary is that there is so much to do. Instead of focusing on an entire room needing to be done, simplify it. Break it down. What goes in the room? A table, chairs, lamp.. So focus on the individual pieces. Model the table. Then when you get that done, model the chair. And so on. Each piece. One at a time. Then, once you get enough pieces done, you can bring them together.
And just like doing the sculpting, take it one layer at a time. Once you have the "big" pieces in place, look at it and see what else it needs. What goes on the tables? What else is needed in the scene? In response to ![]() choyce7 's post, I listed several questions that you might want to answer if you're doing a scene. The more of those kinds of questions you answer, the better the scene will be.
choyce7 's post, I listed several questions that you might want to answer if you're doing a scene. The more of those kinds of questions you answer, the better the scene will be.
Doing a character is more or less the same. Answering the questions about who the character is, what he (or she) does for employment, what hobbies and interests they might have, and so on helps you to establish (if for no one else) in your mind what the character should look like, be wearing, and so on. And just take each part one at a time, adding detail and so on.
Finally, in regards to this assignment, if you're looking for inspiration on what to do this week, what have you done that you can push further? What can you build a scene around? Reusing assets is a very useful, and common, thing to do with 3D modeling, so keep that in mind this week.
I've seen a lot of great things come out even from those who are completely new, and I look forward to seeing what come up this week!
This is really cute. I can easily imagine it in a stylized game. :-)
Your Seuss house is awesome! Straight out of his stories and mind. Really nice work here. You nailed it. I see nothing to critique. What a way to end the class pprocyonlotor. An A+ for sure 👏
And thanks so much for the feedback. I've been so hyped about this class format and your feedback confirms my hopes for what it can be. See you in March, John!
BC1-1801 Week 4 Homework Submission
Turned out my laptop can run some sculpting pretty well. At least when the number of faces was round 200 000 it still goes on but immediately starts to choke when matcap is added but it's not so big deal, I'm just glad I was able to make this weeks homework in time.
Here they are: Velociraptor, Triceratops and Pteranodon!
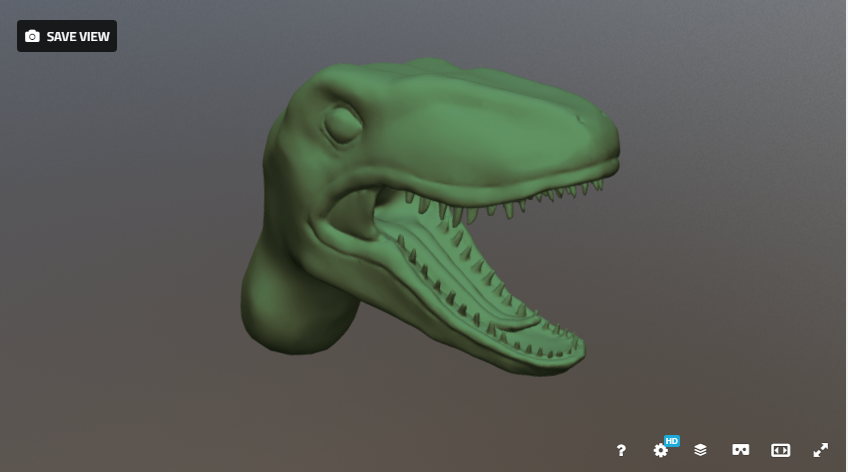
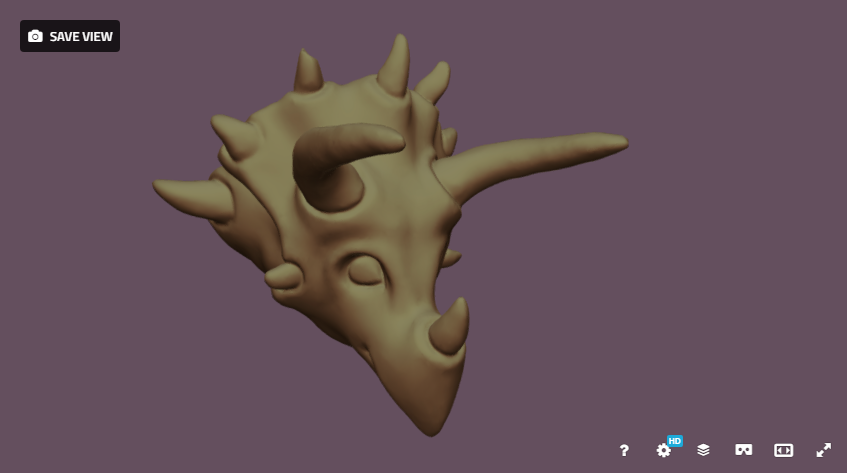

And the Sketchfab links:
Thank you both! I'm learning a lot. The reason I couldn't finish the background was because I had the detail too high. I've found that when sculpting very large background objects in constant detail it pays to take it all the way down to '1' and work up as detail is needed. Fortunately for me the set from which this scene was taken was fairly lumpy / low detail to start with so it didn't take much to get a close approximation. Also, the original scene appears to have been sculpted with gray plaster or foam (which took on a purple hue from the rear stage lights) so the only painting I'll have to do is the gate itself. I plan on taking that up after I've finished my project for week 4.
Kent: I wish I would take credit for the composition, but all I'm doing is trying to stay faithful to the set as it was shown. This is the 'Guardian of Forever' from the original Star Trek season 1, 'The City on the Edge of Forever'. As it is likely I'm the oldest person in the class (I'll be 51 this year), and having a penchant for very strange and obscure references anyway, I'm showing my age on this project. ;-)
