
~ written by Maria Semelevich
Everything that is related to science fiction captures my attention, so I would love to create a portrait in a futuristic style that is filled with elements of neon, utopia, poverty, oppression, “high tech low life” and so on. In essence, this character I’m about to make will be a real cyberpunk.
The Research
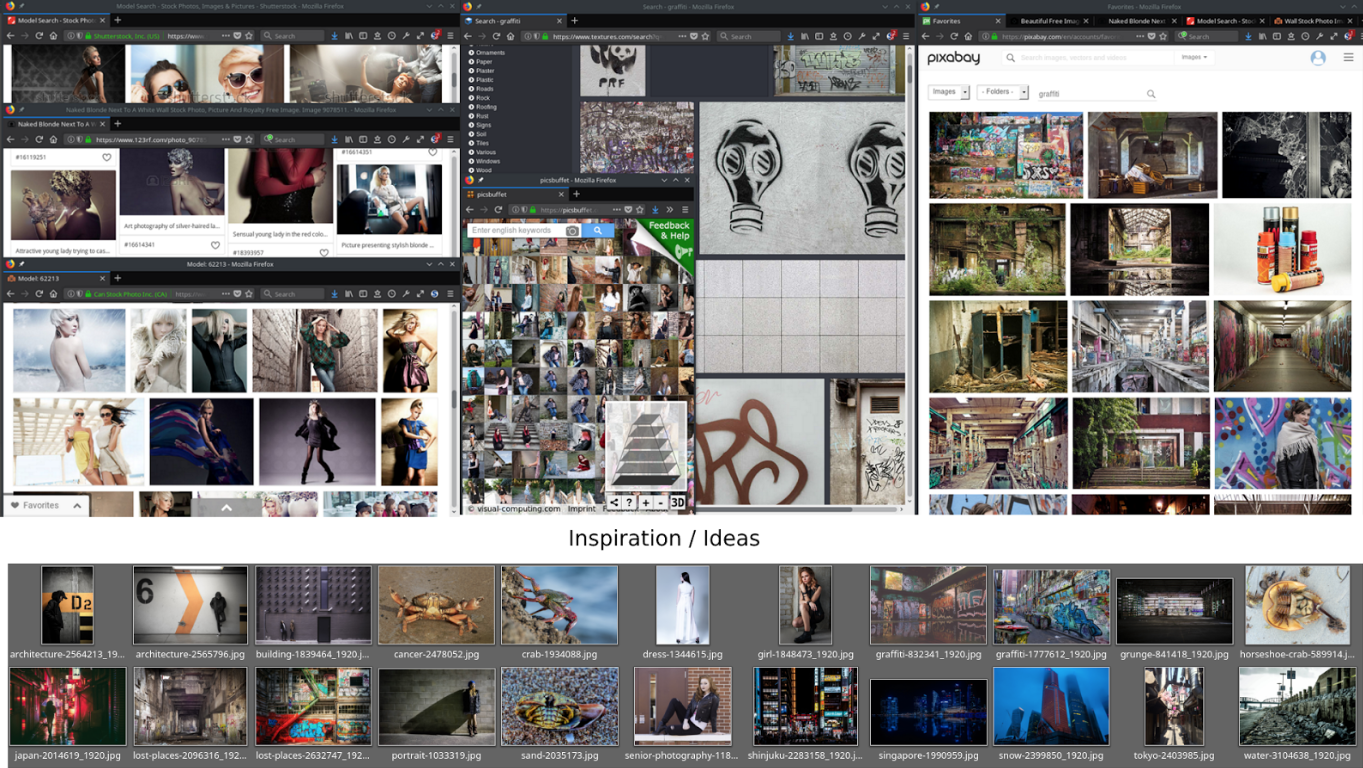
The most important part of a portrait is, of course, the character. A major first task is to find an image of a model that would reflect the character that you would like to create. The starting point is research in the field of resources and photo stocks in order to achieve maximum realism. I have a few criteria in mind that I would like to see in the futuristic character, like a barber hairstyle and a sense of natural motion. There must also be a working surface of skin where I can create mechanical parts, but without being vulgar.
Look for a photo that has as little undesirable elements as possible, such as jewelry or clothing that is incompatible with the atmosphere and genre. After a long search and a lot of options rejected, choose whichever one suits you the best. Collect inspiration and reference images that reflect your idea as well as you stumble across them. Most often these are simple photographs. I often use free and occasionally use paid photo stocks as sources. This saves time when developing an idea because inspirational images become the working material right away. It is quite logical that if you want to create something realistic, then a capture of real life is a good starting point.
Work Preparation
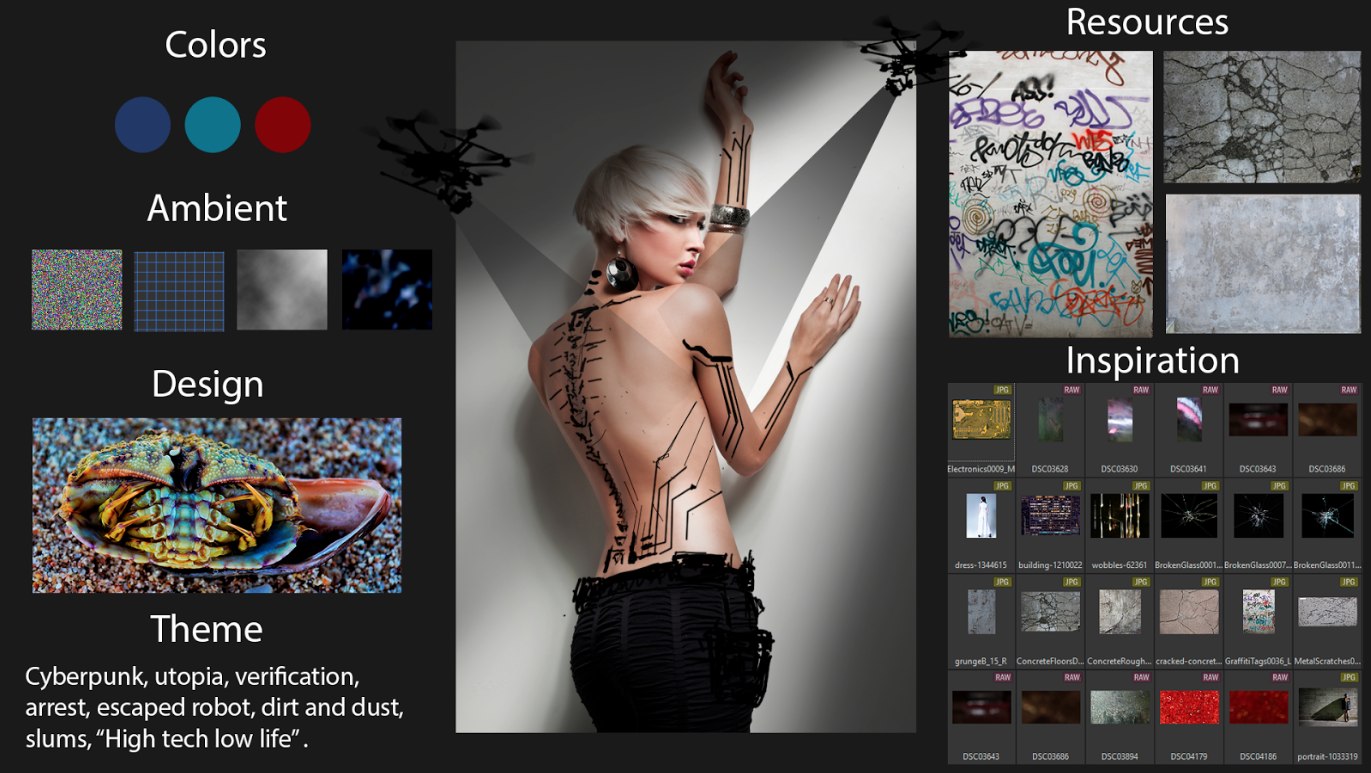
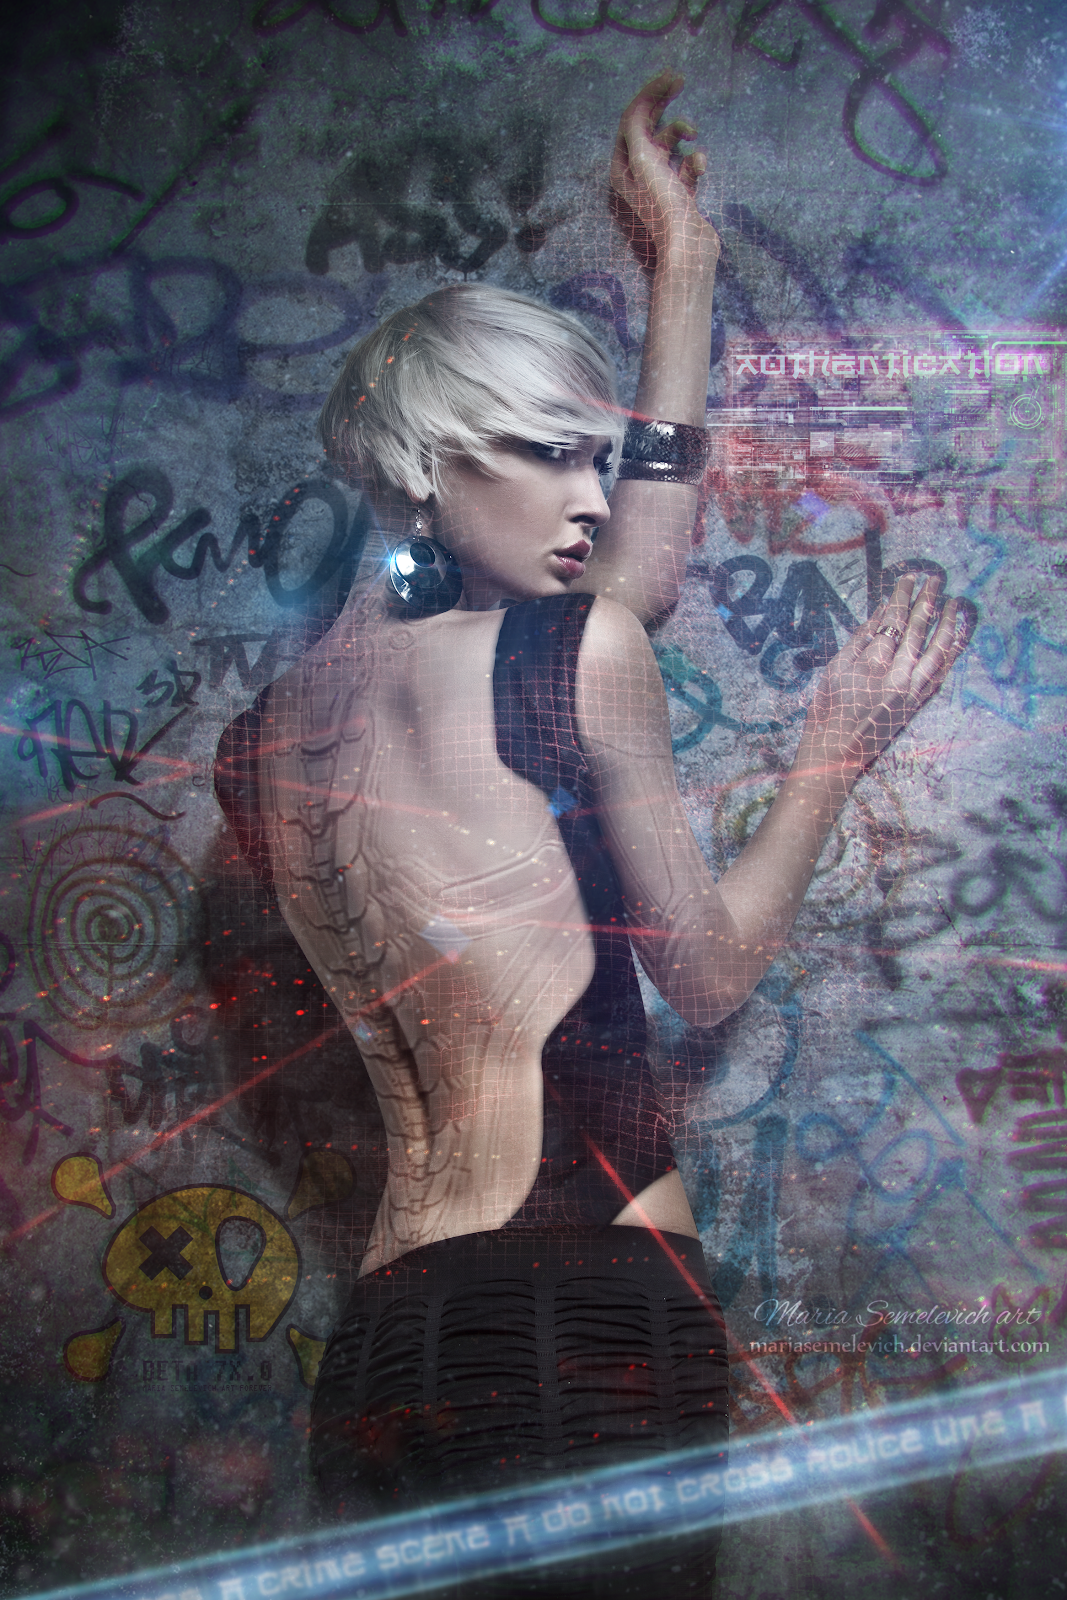
My attention was attracted to the below image in particular because the back of the model is a good working surface where I can superimpose my idea, and the pose of the model can be interpreted as an arrest or detention. Finding a good pose like this makes it much easier to show the story you want to convey. Take time to find what it is that you want to say with your artwork and make sure that the model can match that plot.
Next, collect everything that you may need to create the final piece. I do not usually hesitate to look in my own catalog of photos, renders, and experiments to find these elements. Additional resources like the texture of graffiti and the “beautiful" concrete wall had to be looked for on cgtextures.com. I only need these five images of the basic elements to get started.
Basic Composition
All those resources now need to be put in order. Separate the model from the background, separate the shadow from the model, create a basic background with basic lighting, and retouch. All the prepared images are added to the working file, and the idea is revealed step by step. At this point, I added more of my own images and details such as clothes and mechanical parts on the back of the model. Photorealistic works usually takes longer to implement, requiring time-intensive detailing and a lot of hard work. If you decide to develop in a similar genre and style, then expect that you will have to work scrupulously on masking all the different details. These are building blocks of realism. At this stage, try every idea you can think of since you can always remove whatever is not useful in the future.

Using Different Software
I would like to create an interesting effect where there are mechanical parts under the skin on the back, neck, and hands of the model. I’ll create the details on the back of the cyborg by using 3D references and my own abstract renders. Photo manipulators and artists often prefer using photos, but working with 3D makes certain tasks a lot easier.
Any study of a new skill should be adjacent to previous knowledge. This helps to better see the goal and overcome the fear of trying something new. In every picture, in every unfinished project, always try something new. In this work, my past experiments help me out. I have a huge amount of test renders of particles that I created in After Effects, and they suddenly become very handy while creating the holographic elements around the character. I place some of those renders into Photoshop, remove the unnecessary parts with a mask, and finish the details with a brush.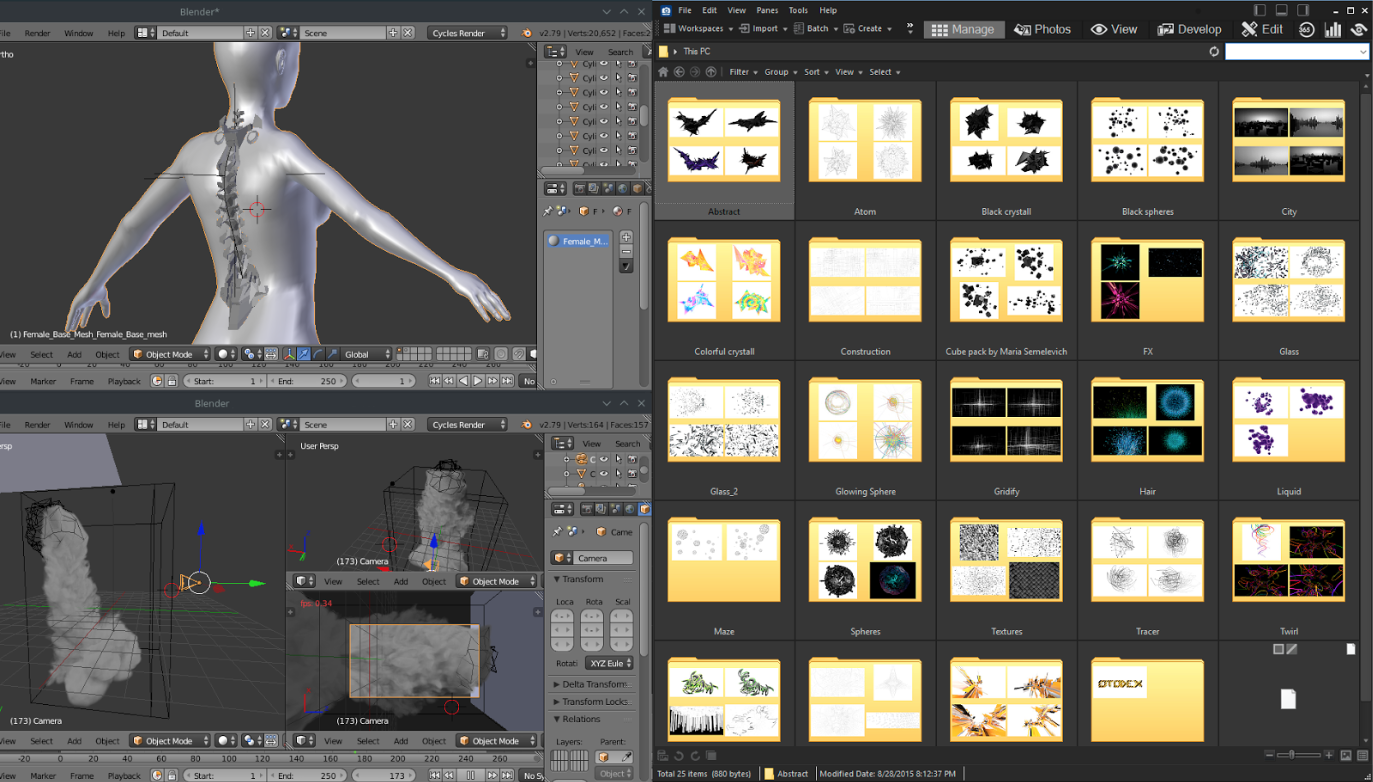
Details and Effects
To create a scan simulation, I just use the default Photoshop filters. Many avoid these Photoshop features, but you can cut a couple of corners and save time by applying them in new and creative ways. In this example, a Vanishing Point filter is used to create the grid. Noise and Displace filters on top of that produce a "digital" look and deform the texture on the model. I create a hologram with authentication separately. Futuristic font, a few old 3D and Particle renders, and Photoshop filters to unite them together is all that is needed here. I take the same simple approach with the police tape. If you take up the development of such elements, keep in mind those holograms should not be opaque, since it is not a neon sign. Holographic details are applied to the skin, clothing, and concrete and are in the atmosphere - it's all different materials. Therefore, holograms should be luminous and recognizable to the viewer, but always somewhat transparent.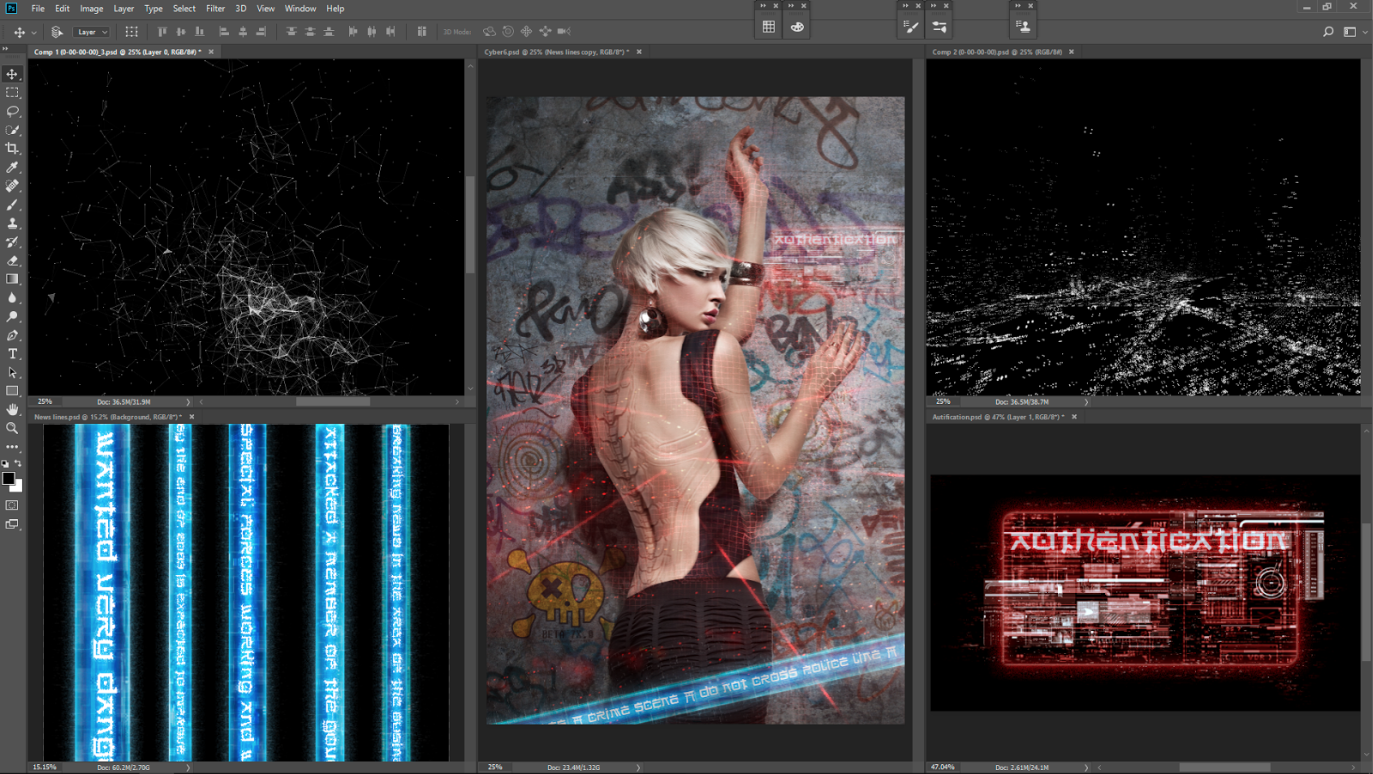
Final Touches
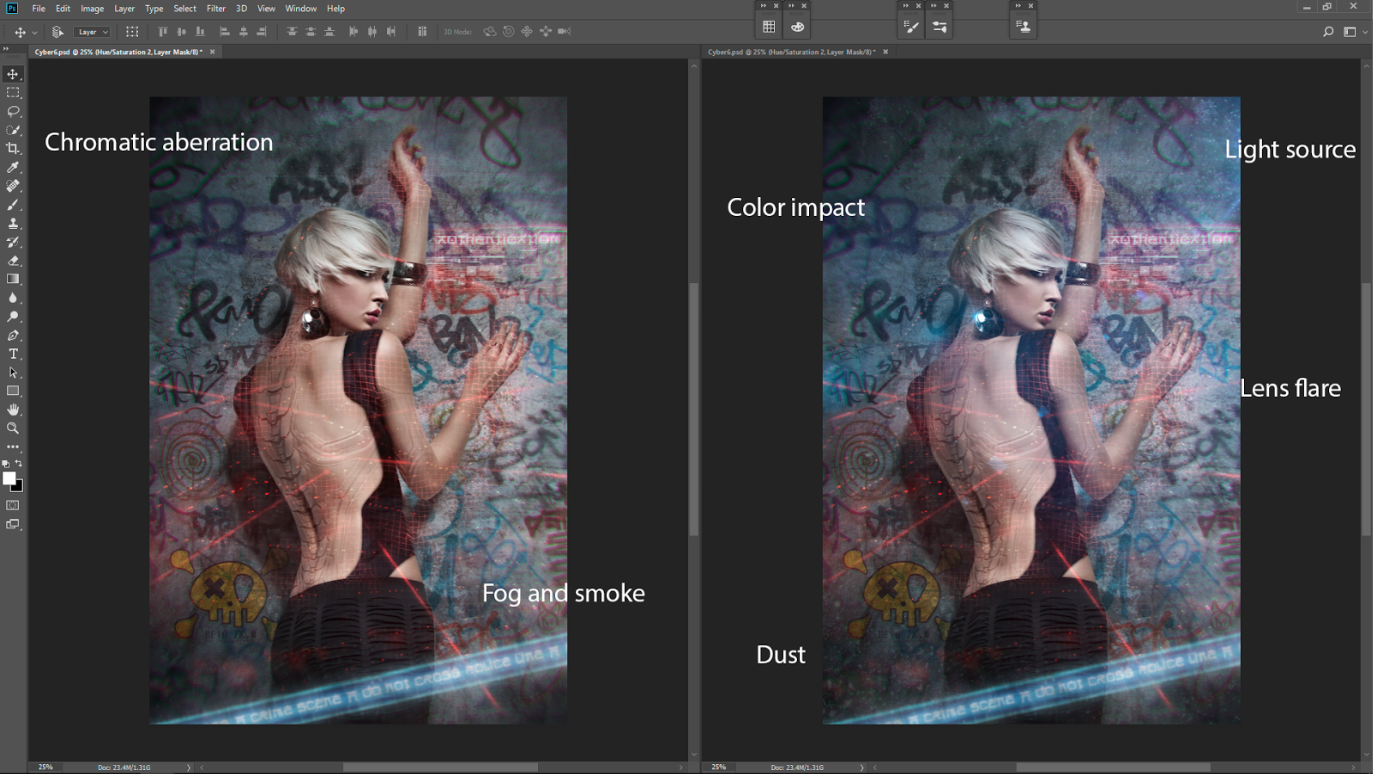
The final part of the work on any picture is always layered visual effects, toning, and sharpening. I leave this kind of work until the end since it sits on top of everything else. Here, I increase the blue color to make the artwork “colder” and enhance the tension of the mood and atmosphere. More dust and smoke helps to create additional detail. I then hint at another light source and create a more cinematic look by adding a few lens flare textures and a bit of chromatic aberration. A fast way to achieve this is to create a copy of the entire image on a new layer, blur it and turn off any color channel that you don’t want. Then apply a black mask and paint in any lights. You can also add several flares or bokeh textures, but that’s just a matter of taste and be careful not to overdo it.
For your next work, don’t be afraid to go beyond any software, style, or genre. But most importantly, do not hesitate to create!
Feel free to ask Maria anything about the project in the comments. You can also find more of her art on her ArtStation or Facebook pages.
Hi, Maria! I didn't have a chance until recently to read your article and look at some of your work! It's so cool! I love photo manipulation, just need more time to practice with it. By what I've seen of yours, I just get this feeling of fun and fantasy--I LOVE that! I'm just checking out a tutorial you made right now. :D Thanks for sharing your wisdom and this walkthrough, too!
qquitenameless ,
Thank you so much! I am very pleased to hear that!
Sometimes it's enough to dream a little, sometimes the idea comes by itself. Even a simple exercise can grow into a beautiful picture. Some of my ideas are realized in the process of work or from one idea I get a few completely different directions. Observation is my inspiration, as I mentioned in the article. Watching different things and nature, I find amazing, inspiring things.
Usually, I try to reduce the time for laying down each detail and move on to realization. I need to work with the realities: what I already have, what I need and how I can create it. In the process, I find worked things or a replacement for more original ones. This is still a very tedious job, but having spent time benefiting in the practical development, brings great benefits not only for one artwork but also for research into the future designs.
Each time, I try to realize idea/concept/design in full measure, down to the smallest details. If I want to use some specific technology, I must do this. If I found that some details interfere or are simply not needed, I get rid of it. Some ideas that seemed interesting at the beginning can be completely changed. At times, in search of a compromise between knowledge and a beautiful final result. Much comes through trial and error process. There is no ideal formula for each artwork. Each picture must have something new, which challenges and forces to leave the comfort zone. The main thing is to create and not limit yourself!
Nice work, Maria! I like this work and your other works in your portfolio on ArtStation. I especially like the compositions of your works.
Just curious, how do you come up with ideas for your works? I have a hard time coming up with ideas of what to create. How much of the idea is developed before the research phase and how much of the idea is developed as you create?