
We here at CGCookie have come across a number of various tips and tricks on what and how to import and export various game assets to be used in a game. This can range from basic prop models to fully rigged and animated characters. Importing and exporting is something you should be familiar with if you are looking to create games: after all, a game is really a series of assets all working together in a unique way. In this article we'll discuss the various import and export file types you'll most commonly use along with "gotchas" that might trip you up. While this information will be applicable to most game engines and software, for our purposes we'll focus on using Blender and Unity. So lets get started with file types.
3D File Types
FBX and OBJ files are going to be some of the most commonly used file types for 3d meshes. There are a handful of other file types we can use in Unity which can be found here: https://docs.unity3d.com/462/Documentation/Manual/3D-formats.html a few of which we'll cover later.
FBX
First lets discuss FBX files. I find this to be the most versatile type of file and very rarely do I use any other types. FBX is short for Filmbox which is where the file type originated from. It's now owned by Autodesk but this file type is pretty common across multiple software types. You'll also find this available when exporting from Blender:

I prefer using FBX files as it allows me to keep the same hierarchy of objects (child meshes) in one complete package. This is important if you're working with a mesh that has moving parts and/or needs specific parts that can be separated in game. Take a look at this rock exported from Blender:

Note the entire group can be used as one bigger prop, but we can also utilize the individual pieces of that same group for singular rocks. This is one of the big advantages of using an FBX file type. Another is that FBX can support animations. You can export out a rigged character with animations as an FBX file.
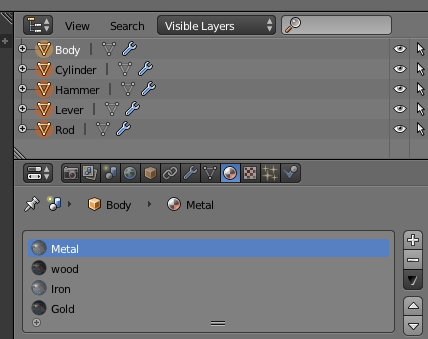
When importing FBX files you'll also see that Unity creates a material with the same name you gave it in Blender: *Note that materials that are not named in Blender will be given a "no name" material. We'll discuss this more in depth when we look at the import process later in the article.
OBJ
We've discussed a bit about FBX file types now lets take a look at another commonly used file for 3d models. OBJ, or Object File, was a file type created by Wavefront. To quote Wikipedia
The OBJ file format is a simple data-format that represents 3D geometry alone
This is one I don't use often as it doesn't really have any advantages over FBX. OBJ is typically used for static meshes, so hence they don't support animations. I should say they don't support animations in the traditional sense. You could use OBJs with animations, but you'd be exporting out an individual OBJ for each state which is way too much work. OBJ may be fine in instances where you want one big static mesh and don't care about any of the child elements. These would be props, big or small. Once again Blender supports this file type as well when exporting:

One of the main advantages of this is that you can keep everything in one main file without having to worry about multiple materials or child meshes. When you export an OBJ file you'll also get a MTL file, otherwise known as the Material Template Library. This file provides information about the materials used for that particular OBJ. When importing into Unity it's recommend you import this in as well. If you import the OBJ along Unity will create a default material for you, but this means you may lose any additional materials you had on that object. Here are examples of what I'm referring to: Missing MTL File on Import

Here you can see I'm importing the OBJ alone, but missing the MTL file so Unity only created on material and I can no longer use multiple materials on this object.

Here you can see that with the MTL file, Unity now knows that this mesh has multiple materials. It's still one mesh but each element that had it's own material is retained.
Proprietary File Types
These files are typically the files used for specific 3D programs. For Blender its the .blend. To import these just manually drag in the file into the project panel like any other type. It will work almost identical to an FBX when you import it. There are pros and cons to using these, personally I don't like to use them unless it's necessary. The main reason to use these is that it makes it easy to double click these files from Unity and open it up in the respective application, make changes, save, then return back to Unity with the changes now updated. This makes iteration and making changes very quick.
The pros to using these files are: - Easy to update assets quickly without having to import/export every time - Don't need to utilize special file formats
The cons: - Requires that the user has the application for that file type installed on their computer - Adds extra bloat since it imports everything within that file - Makes it harder to validate I'd say using these initially is great when you want to quickly see what the asset will look like in game without having to go back and forth. When you've finalized the asset I'd recommend exporting an FBX and importing that then removing the proprietary file type.
Exporting and Importing How-To
Well that's great, I know about these file types, but how do I actually do this myself? Glad you asked, below are going to be a few how to's on exporting from Blender and importing to Unity.
FBX
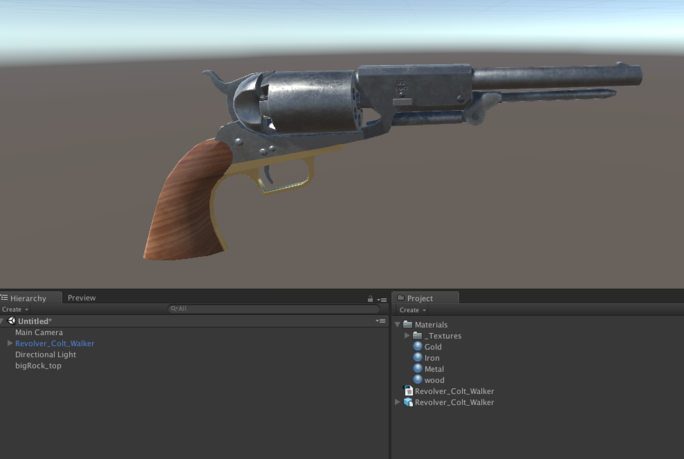
For the sake of simplicity we'll utilize the revolver shown in the above screenshots. This contains multiple pieces that can be animated in game and if you're curious of how this is done you can check out the Colt Walker Revolver resource: https://cgcookie.com/resource/colt-walker-revolver/. In Blender we want to ensure that our meshes have appropriately named materials and meshes. This is often overlooked and can cause frustration later on when you're trying to locate specific materials or meshes within Unity. This is also a great time to notice if any meshes are missing materials and/or if any meshes need to be combined. I prefer to keep meshes separate only if they will be moving, otherwise I combine them with bigger pieces.
For this particular model there are a variety of meshes on different layers, so I want to select everything within the current view then go to File > Export > FBX

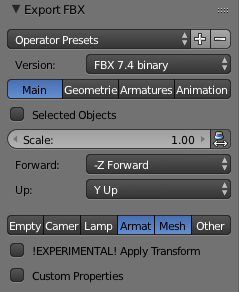
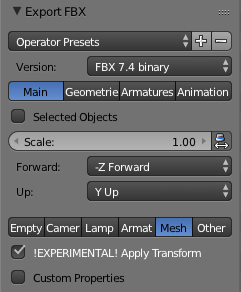
When you click on FBX you'll see a new window pop up with a place to save this FBX, but before you click on anything else you want to ensure you have the proper settings enabled. Since I only want to export what I have selected I have Selected Objects enabled.

*Note this is not always going to be the case. If you only have one object and one layer you don't need to check this.
I also have only Mesh selected to export. I don't need to export any empty, camera, lamp or other objects. Once you have all that selected you can then name the FBX what you want and click on export. Great now you have a FBX file ready to be imported into Unity.
Importing to Unity
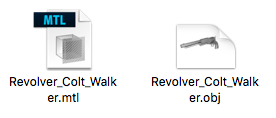
Locate where you saved your FBX file. This will be one single file which should look something like this:

With Unity open you want to drag and drop this file into the project panel. When you do that it should import into your project and it will create a materials folder with the names of the materials of that mesh:

So far great, but what about textures?
Whenever you import a model into Unity it will import the mesh and create materials but it will not import textures. You'll need to manually import these in the same manner by dragging and dropping the folder (or individual textures) into the project panel. You can then assign those textures to the appropriate materials:

The process for exporting an OBJ is going to be nearly identical so we won't repeat steps. Go to File>Export>Wavefront OBJ. The settings for OBJ are going to be quite different, but in this case we don't need to worry about changing anything.
*Note for this object I wanted to export meshes from a specific layer so I have "Selection Only" enabled here just like the FBX process.

Once again save this and then open up Unity. This time you'll be looking for both a obj file type along with the MTL file. Drag and drop both of these into Unity's project panel.
When you've imported these into Unity you should have something similar to before with the inclusion of the MTL file in the project panel:
We can utilize the same textures as the FBX file since it shares the same materials and UVs, the OBJ is just one complete mesh instead of separate pieces.
*Note you may need to adjust the material colors to full white in order to avoid colored tint on textures.
Exporting Rigged Characters with Animations
Exporting and importing general models like above is fine, but what is the process of exporting a rigged character with animations? The process for properly setting up a rigged character with animations can be a bit more complex than just importing a general asset. For one you have additional properties on top of the mesh and materials such as a rig and animations. When animating in Blender it's important to note that Unity won't support much if any constraints and using unique rigs in Blender can be a bit of a pain to work with in Unity. If you do use these try to bake them out. Animation is not my area of expertise but I do have experience working with rigged characters both humanoid and generic and what would be ideal for Unity.
Humanoid Characters
Here is a rigged character ready to be used in Unity. When building a humanoid character to be used in Unity you want to take advantage of the humanoid rigging system Unity utilizes. For this you'll need to ensure your rig has all the available bones Unity is looking for in regards to a humanoid skeletal rig.

The bones that have a dashed line are optional, those that don't have dashed lines are required. If you are missing that bone and/or Unity cannot properly find that bone due to bone structure or naming then this will also show up red. So why bother conforming to this rig structure? Well the main reason is retargeting. If you have a proper humanoid rig in Unity you can use any animations for any other humanoid rig with it.
This means that all your human characters can utilize all the same animations which gives you much more freedom and also makes it easier to quickly iterate these types of characters with different animations. It's also much easier to utilize some of the IK features Unity has available for humanoid characters that be used for tweaking animation movements or creating procedural movements in general. Be aware that Unity is creating it's own rig based off the rig you provide, so you'll need to ensure that what Unity builds is correct and true to what you have. This rig is used as a standard rig for humanoid characters and hence why we can use the same animations for all humanoid characters.
Exporting a Rigged Character from Blender
So with that said lets export out our character. Like mentioned above OBJ doesn't support the kind of animation we want (we don't need multiple meshes) so we'll go with the more versatile FBX file format.
In the export settings select Mesh and Armature. This will export out the mesh just like before but will also include the rig we need along with the animations. The export process for this is nearly identical otherwise.
Importing into Unity
The import process for this is identical as above. Locate the FBX file then drag it into the project panel. You'll find the materials are created for you and if you have any textures you can import and assign those as well. We're not done quite yet, this being a rigged character we need to understand how to properly set this up to work with Unity. By default Unity will detect this is a rigged character with animations and will import those for you. Click the mesh from the project panel and you'll see three buttons in the inspector panel: Model, Rig, Animations
Model gives us information about the mesh itself, rig allows us to configure what type of rig this character will use and animations will contain all the animation clips for that model. Since this is a humanoid character we need to select Humanoid from the rig drop down menu. Generally speaking you will only ever use two of these rig types; Generic and Humanoid.
Generic is used for any non-humanoid rig (vehicles/animals/etc) and humanoid is for any character that has a human like skeletal rig. Legacy comes from the older Unity animation system prior to Mecanim and may or may not be supported in the future. After Humanoid is selected, you then want to click configure which will prompt you to save your scene.

We won't go in depth with this as it has been covered here: https://cgcookie.com/lesson/humanoid-rig-setup/ but lets just take a quick glance at our rig. If everything is showing up green you're good to go (usually). If anything is red you need to locate that bone.
You also want to ensure that the proper bones are placed in the correct slots. It's not uncommon for Unity to assign improper bones and still show up as green. Also ensure that no bones are rotated erratically. Sometimes fingers or feet tend to rotate in odd ways which will cause issues later on. When everything is properly setup here, click Apply then Done.
The rig is now properly setup, lastly you want to take a look at the animations tab. Here you'll see all your animation clips. You just want to ensure your animations are playing properly.
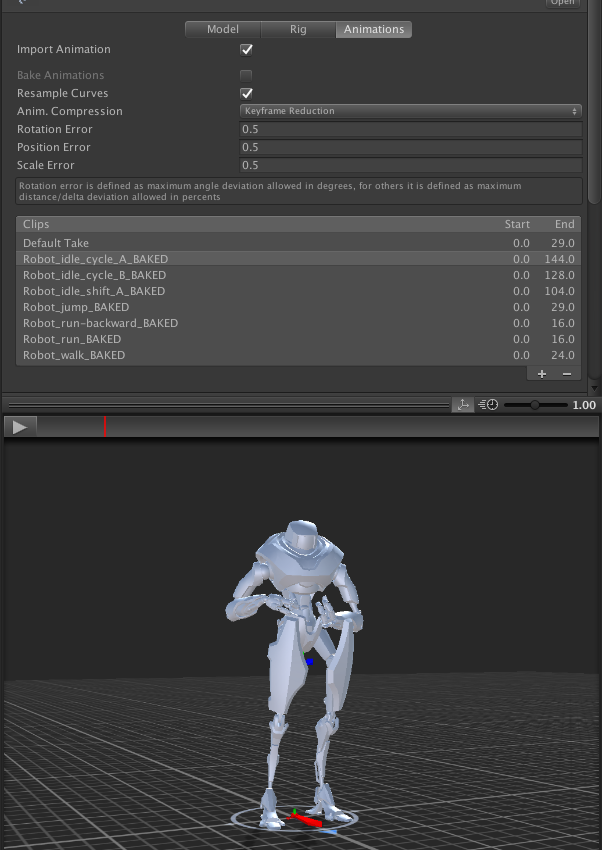
If you notice your character has a weird rotation or position to any of the bones during the animation preview, you may need to go back to the rig configuration to ensure nothing is improperly rotated. That's it, you now have a rigged character ready to be used in game.
If you'd like to know how to properly get them working in Unity with animations in game I'd recommend the Fundamentals of Rigged Animations course: https://cgcookie.com/course/fundamentals-of-rigged-animations/which goes more in-depth with everything that was discussed so far. For Generic rigs the process is a bit simpler since you won't need to configure a rig, it will just use the rig you have on the mesh directly, the rest of the process is identical.
Troubleshooting Issues
Lets take a look at some common "gotchas" that you might run into when importing/exporting assets.
Why is my mesh broken up erratically?
Unity has a limit of 65535 vertices per single mesh. This is another reason to avoid using OBJ files with dense meshes. If you exceed that amount Unity will display the message
Meshes may not have more than 65534 vertices or triangles at the moment.
along with how many parts your mesh will be cut up into which can result in something like this:
To avoid that, ensure that you are not using more vertices than necessary to achieve the look you want. Split up meshes into parts yourself if necessary. This is one of the fundamental things you'll need to learn for building performant meshes for your game.
Why is my mesh rotated differently in Unity?
Unity and Blender utilize different coordinate systems. Blender uses the Z axis upward while Unity uses the Y axis. While Unity does tend to do a good job of converting this there may be times when this just won't work properly. If need be you can rotate it in Blender and/or try the export settings. You can also utilize an empty game object as a parent in Unity to get the proper orientation.

Up above is a cone exported from Blender which as you can see has the Z axis pointing up while the red Unity cube has the Y axis pointing up. There is a relatively quick fix for this in Blender which is still "experimental" as the name implies.
On Export check the !Experimental! Apply Transform checkbox.
This will now orientate the cone to the proper orientation for Unity:

Why is my mesh is massive and/or tiny in Unity?
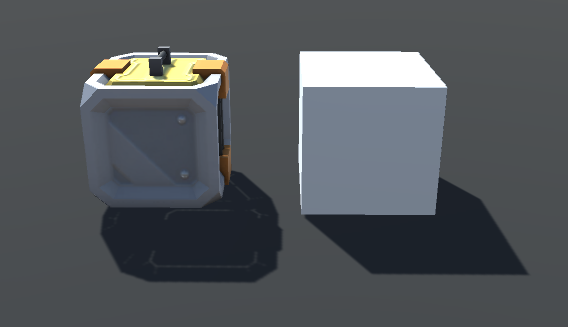
Once again this is due to the differences in default sizes between Unity and Blender. Here we have the default size of a cube alongside Suzanne from Blender.The red cube is the default size of a cube in Unity:
In Unity the default cube is 1x1x1 which is set in meters. Blender can also utilize meters, but the default cube in Blender is actually 2x2x2 meters and something you should be aware of if you're looking for precise measurements. There have been times when assets come in with a scale of 100x100x100 in Unity. Take a look at this same reference with a model from Blender of a crate and the default Unity cube. While they look similar in scale, the crate is actually scaled up by 100x100x100.

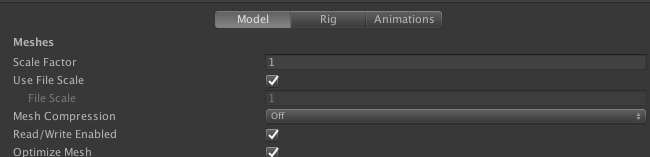
Ideally this is something that would be fixed before you even continue using these assets in Unity, but a quick fix can be done in this case. When you import a model into Unity you will see some settings for that model. You can see for this model we're using a File Scale of .01.
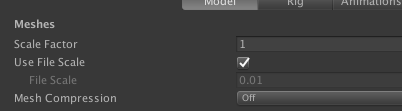
Uncheck that checkbox and hit apply. When you initially do this you'll see your asset get massive and that's because it's now using the proper Unity scale and it currently has a scale of 100 along each axis. Set it down to down 1x1x1 and now our crate should now be back to the default size of the cube.
Improper scale of this kind can be frustrating to work with, so set this up initially before you start creating prefabs or anything of that sort.
Why does Unity ignore my mesh when baking lights?
When you import a model you need to enable Generate Lightmap UVs.

This will generate UVs to be used with lightmapping of that mesh. Unity will utilize the UV2 channel in order to generate these if it is present otherwise it'll use the primary UVs. It is possible to create these yourself, but Unity does a good job of creating these and all you have to do is enable it.
Wrap Up
Hopefully this has given you great insight into the various import and export processes required for game asset development. There are a number of things that can be confusing and frustrating. If there's something you feel should be added into the article and or have a better way of doing anything mentioned leave a comment!
https://drift-hunters.co game is a racing game with unllimited money. You can free to buy all the items on the shop. This game will be easy for you. Enjoy the game!
I’ve always stuck with FBX by habit, but your explanation of when OBJ can still be useful (and the reminder about MTL files) really clicked for me. Also appreciate the troubleshooting tips, especially the scale and rotation fixes, those always trip me up. Thanks for making this so clear at https://chi-nese.com and https://cgcookie.com/
Thanks jgonzalez . If the Blender object scales are 1/1/1, and the Blender dimensions show up as expected, everything seems to work easily.
Nice article.
I also prefer .fbx for Blender export to Unity. I found that working with Blender scene units set to centimeters lets me export .fbx, import into Unity, and everything is the right size automatically. All the scale settings on both ends are quite confusing.