
It feels like Blender 3.0 was released just yesterday, but Blender 4.0 is already around the corner! In the meantime, Blender 3.5 is here with a slew of bug fixes, a few big speedups, and a fun set of new features for you to enjoy if you choose to upgrade.
Compatibility
Blender 3.5 has new minimum requirements for Mac and Linux. On Intel macOS devices you’ll need to be running at least Catalina, and on Apple Silicon devices you’ll need Big Sur. For Linux, you’ll need a distribution with glibc 2.28, which includes Ubuntu 18.10, Debian 10, Fedora 29, or RHEL 8.
Assets
The asset library now has an ‘All’ category, which combines all of your asset catalogs into one. I have been switching between libraries pretty often (between my own and PolyHaven’s, for example), so this is definitely a welcome addition!
The user interface for adding asset libraries in Preferences is also much cleaner and now includes a default import method.
A new default asset library, called Essentials, now ships with Blender. For now, it consists of a number of helpful hair adjustment groups for geometry nodes, but it also opens the door for Blender to ship with a wide variety of default assets in the future.

To go along with the new node based hair assets, geometry node groups can now be dragged and dropped onto objects in the 3D view and a geometry nodes modifier with that setup will be applied. It’s a big time saver!

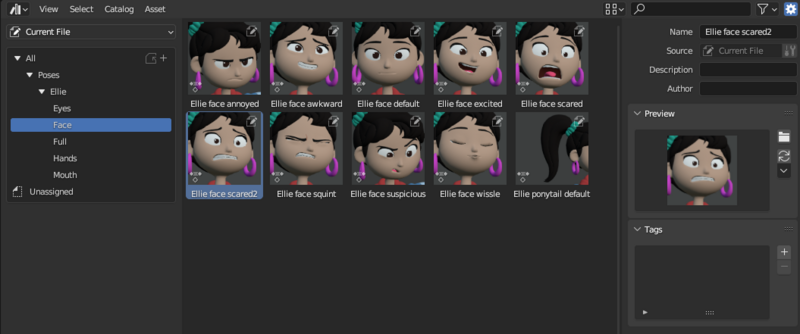
Pose assets were slightly redesigned to better align with other asset types, and the pose options were moved to a new menu called Asset.
Modeling
Geometry Nodes may have introduced us to the idea of storing custom attributes on geometry components, but that structure is slowly making its way throughout all of Blender. In Edit Mode, you can now use the Mesh / Set Attribute operator to manually set any attribute of your selection to a fixed value.
In the Face menu, under Face Data, there’s a new operator called Flip Quad Tessellation. This gives you complete control over whether a bent quad is interpreted as concave or convex, which can be really important in low-poly modeling.

Editing a dense mesh with many attributes in Edit Mode has now been significantly sped up in many cases, because the conversion from Edit Mode’s BMesh to the evaluated mesh used by the modifiers and Object Mode has been multithreaded. In extreme cases, the conversion is over twice as fast. That’s incredible! It’s optimizations like this that don’t get much press but are crucial for Blender’s long term success.
UV Editing
An interesting feature that I did not expect to see is that UV’s can now be copy and pasted between meshes of the same topology. It works between uv channels, objects, and even .blend files! The usual Ctrl+C and Ctrl+V hotkeys don’t work in this case, but you can easily find the commands in the UV menu of the UV Editor.

Sphere and Cylinder projection have a new method for handling the poles, called Fan, that reduces stretching and is now the default.
Constrain to Image Bounds, which locks the UV’s to the space inside of the UDIM tile, received a few fixes and now works properly with all UV Editor operators. Some other fixes include bringing back the UV overlay in Texture Paint Mode, UV Select Similar now supports selecting by similar objects and similar orientations, and the basic UV Unwrap was improved to better handle edge cases.
Sculpting
Blender’s sculpting brushes now support vector displacement maps (VDMs), which means that any shape, even one with insets and overhangs, can be turned into a brush. This approach is really popular in ZBrush and Mudbox, so there are hundreds of VDM textures you can find online, and now all those same textures can be used in Blender as well!

The above example is a free brush from OctopusVDM.
The Box and Lasso Trim tools got a new Extrude Mode option, which allows you to set whether or not the depth of the new shape is tapered by the viewport’s perspective or not.
The hotkeys for defining remesh and dynamic topology density in sculpt mode have been changed from Shift+R and Shift+D to simply R, which better aligns with the rest of Blender.
Nodes
One small change worth celebrating is that the Geometry Nodes modifier received some layout improvements and now supports checkboxes for boolean values. The visual difference between inputs that support attributes and those that don’t is still a bit weird, but at least now all the values line up!

The modifier also has a new operator under the dropdown arrow called Move to Nodes, which pushes the modifier’s nodes into a new node group.
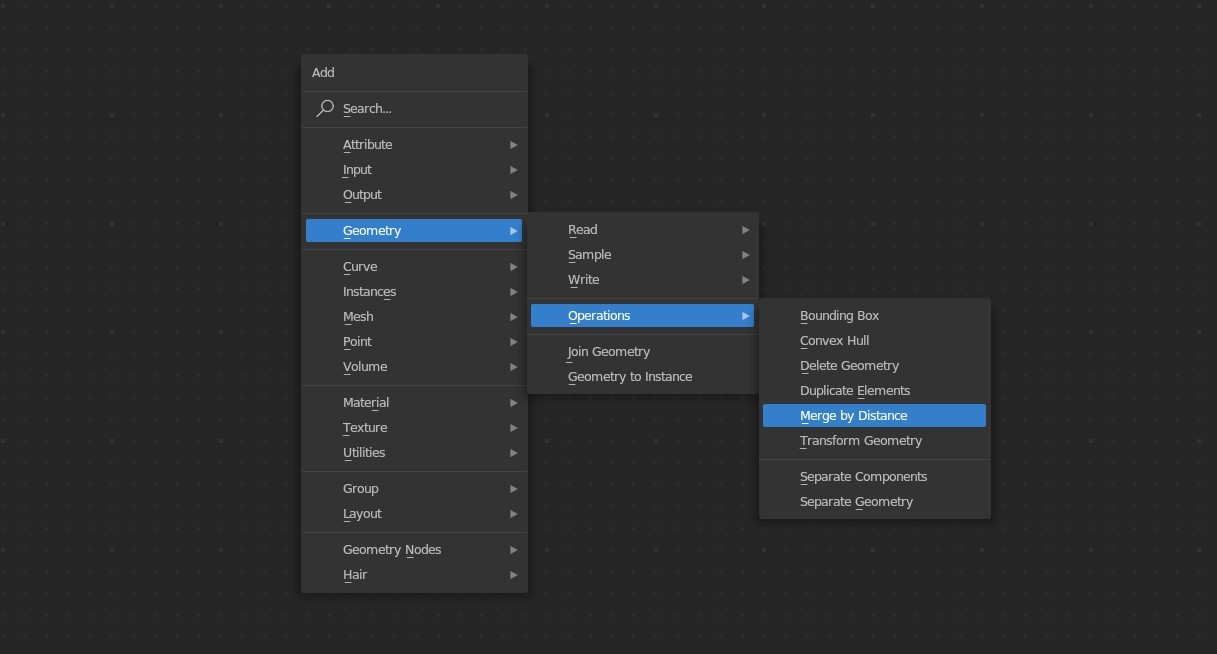
You’ll also notice that the right-click context menu and the add menu have been reorganized. The new add menu does take an extra click to get to most nodes because of the sub-grouping, but it also makes it much more manageable to navigate the sheer number of nodes, which will only increase from here. Remember, you can always add nodes by dragging out from any socket, and that’s usually faster than the add menu anyway.
Speaking of interaction, dragging a link to a socket that already has a link will now replace that link rather than swap the inputs around. If you liked that behavior, you can still get it back by holding Alt while dropping the link on the new socket.
While testing this out, I also noticed that holding Alt while dragging on a node will rip it from its connections and also prevent it from being auto attached when dropped.
The new nodes for this release include Image input and Image Info nodes. Being able to pass a reference to an image inside of a node group is hugely helpful, and something that I hope comes to the Shader Editor sometime soon! It would make my work with Scattershot a heck of a lot easier.

What the shader editor did get from geometry nodes, however, is a new Mirror extension type.

A new Interpolate Curves node can be used to generate child curves if given a set of parent curves to interpolate between and a set of points for the new curves to start from.
For meshes, the new Edges to Face Groups node selects all faces within the boundary of the given edges - the exact opposite of the Face Group Boundaries node.
The other misc. Geometry Node improvements include:
- a new selection input for the Trim Curves Node
- a UV Map output for mesh primitives
- a 5x speedup for minor curve edits
- a 2-3x speedup for displaying instances in the viewport
- a 2x speedup for the Split Edges node
- the option to store 2D vectors with the Store Named Attribute node
- a boolean Exists output for the Named Attribute node
Physics
There’s only one physics update, but it’s definitely worth mentioning. Cloth simulations with lots of self-collisions were optimized to be up to 25% faster!

Grease Pencil
The Build Modifier, which is great for making drawing timelapses or whiteboard videos, has a new Natural Drawing Speed mode. It uses the recorded speed at which the stylus was moving when reproducing the strokes, which results in a much more natural looking animation.

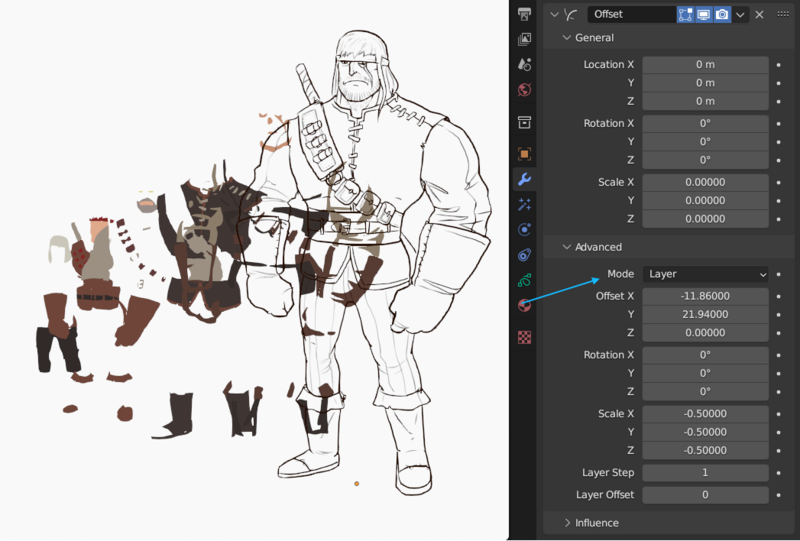
The Offset Modifier can now add an additional offset for each Layer, Stroke, or Material.
Grease Pencil sculpt Auto-masking is now a global setting and can be found in a popover in the header. There’s also a new Auto-masking pie menu when you press Shift+Alt+A.

You can now adjust the Vertex Opacity in the Overlay panel in Sculpt Mode, and enable or disable the brush size cursor in Draw Mode.
The Material popover in Draw Mode now lets you change the Fill color for materials that have Fill enabled. Maybe one day we’ll get all the important material settings there, since switching to the Material tab of the Properties Editor can sometimes be cumbersome.

Interpolate Sequence can now use all different keyframe types, and can optionally exclude breakdown keyframes like it used to.
Copy & Paste now works in Multiframe mode.
Animation & Rigging
The old (pre-Blender 3.0) pose library has been completely removed, and older poses are now imported as Actions with named markers, which can be converted into pose assets via the Action Editor’s Pose Library panel.
You can now drag to the left while blending a pose to subtract it and apply the opposite of the transformation. While blending, you can also hold Ctrl to flip the pose or press E to extrapolate a pose past 100%.

The frame range for Motion Paths can now be set to manual, so that Blender won’t update the range automatically.
A new Ease operator in the Graph Editor can align keyframes along an exponential curve.

Armature bone animation channels can now be pinned in the Dope Sheet.
You can now add modifiers to multiple FCurves at once via the FCurve channel context menu and the Channel menu in the Graph Editor.
The Propogate Pose operator’s Next Keyframe and Last Keyframe options have been updated so that all keys are now copied over correctly.
Select Linked (Ctrl+L) now works in Weight Paint mode.
Rendering
Cycles has a new feature in the Sampling panel under Lights, called Light Tree, which reduces noise in scenes with large numbers of lights and physically correct settings. This change also introduces an Emission Sampling option for materials, which can help further reduce noise for single sided or closed meshes when set to Front, meaning that it will prioritize the light that gets emitted from the front face. The Light Tree does not currently work on AMD GUPs, but support for those should be added in the next release.

(CC-BY scene from Amazon Lumberyard)
One of the reasons I never took OSL (the shader scripting language) in Blender very seriously is that the custom nodes generated with it could only be rendered on the CPU and in Cycles. That’s a huge drawback! Well, in Blender 3.5, OSL can also be rendered on the GPU in Cycles if it’s using NVIDIA OptiX. That means it still won’t work for everyone across the board or with Eevee, which means it still may not be worth spending a lot of time making custom procedural patterns (which Blender is sorely in need of), but at least more productions will be able to utilize it.
Adaptive Sampling in Cycles has been improved for scenes with higher light values, which is fantastic for when using physically based lights. The devs recommend using the Exposure setting under the Film panel rather than the Color Management panel so that Cycles can correctly account for it, but I will likely continue ignoring that advice until Eevee has that setting as well.

Speaking of lights, Cycles Spot lights were fixed so that their gizmo matches the rendered result when scaled non-uniformly, and Cycles Area lights with ellipse shapes now produce less noise.
Rough anisotropic materials using the Beckmann method were fixed and now look similar to the GGX method.
Rendering the viewport on MacOS is now significantly faster thanks to proper Metal integration from Apple. In some extreme cases, like the Wanderer test scene, it more than doubles the playback FPS! As compared to OpenGL on Mac.
Compositing
I bet you didn’t expect one of the most exciting new features of Blender 3.5 to be related to the Compositor, but it’s true! Compositing nodes can now be applied to the 3D View when the Viewport Shading is set to Rendered and the Compositor is set to Camera or Always in the popover. Not all nodes are supported, so you can’t add procedural textures or masks or use render layers just yet, but you can blur, color correct, or alpha over to your heart’s content.

Motion Tracking
When motion tracking, the optical center is now preserved when changing the clip resolution.
Over in the Video Sequence Editor, the Transform Filter can be set to Subsampling (3x3), which is similar to Nearest but with a 3x3 subsample of each pixel.
As its name implies, the new Update Scene Strip Frame Range operator in the Sequencer will update a Scene strip’s underlying frame range.
Drivers are now copied to new strips when they are duplicated or pasted.
Scripting
A few changes were made to Blender’s Python API, so not all add-ons will be automatically compatible with Blender 3.5. Changed areas include the BGL OpenGL module, virtual node sockets, the Armature Modifier, the Data Transfer modifier, and the internal mesh data structure.
On a more positive note, add-ons can now directly access the USD, OpenVDB, OpenImageIO, OpenColorIO, and MaterialX libraries via new Python bindings.
That's all for this release!
Which updates are you most excited about? Will you update right away, or wait for an inevitable 3.5.1?
What I noticed first was the *huge* speed-up of Eevee on my M2 Mac Mini: what took 10 minutes plus on 3.4 (both on this computer and on its Intel/AMD predecessor) takes under a minute now. I wish the same was true of Cycles, but—not yet. Still wrapping my mind around all these hair assets and hair node groups though: the documentation is rather sketchy and *very* terse, and no practically usable tutorials are to be found yet (and by ‘practically usable’ I mean, the ones that *don’t* involve, for example, downloading the files from the Charge open movie project, and then copy/pasting stuff without understanding anything about what’s happening).
Amazing summary, Jonathan! You do an excellent job of explaining these exciting new features. Thank you for sharing!