Hey Blenderites,
Does anyone know if it's possible to offset animation on multiple collection instances from the same master collection?
I've searched the web for hours with no luck.
-Scott
Hi Scott,
If I understand you correctly (of which I am not sure) and I am not mistaken: no, not like that.
If there is Animation on the Objects of the Master Collection, then the Collection Instance doesn't have any Animation Data on it's Objects.
There are probably ways to get the result you want, but you'll have to take a different route to get there.
Hi Martin,
Thanks for responding! I have an animated contraption in a collection that I need to duplicate around an environment. They are all identical contraptions, but I want to offset the animation so they appear to be different in that respect. I could duplicate them, but they are a bit heavy and I can't afford to spend days rendering each frame. So it's mainly a performance thing. I also tried to export Alembic files and re-import them, but soon discovered that they don't save material information. Though I could reassign the materials after import, but that's a lot of work. Other file options either don't support animation or materials. This appears to be a highly requested Blender feature that hasn't happened yet - the ability to enable an animation offset for multiple collection instances. Again, Alembic can do the offset, but it doesn't support materials. My only thought at this point is to duplicate a few of the contraptions (maybe 5) and then instance the rest, (13 in total) so it gives the impression that each one is unique. Any ideas?
Thanks!
-Scott
Yes, your solution is what I would do. Kent does hat on a couple of tutorials as well. He makes 3 versions of the same thing and uses it 20 times, trying to hide the fact they are the same. He might flip them, offset the a bit, place them apart, etc. Try to make as many variations as you can, enough to hide the fact they are copies.
While it isn't collection instances, I have a solution for your problem. In 3D animation we link objects and then use a library override to animate. If it's the same animation then you can just use the same action or multiple actions and just offset it in the NLA editor.
First part is prepping the device for linking. Create a Blend file with just the Device pieces in a collection. You can just copy the blend file you have if you really want to, but everything else will just make the blend file larger.
Second part, open you scene blend file. Click file menu or press F4 then click link. Go to the device blend double click it then click collections folder, then select your device collection. Move the linked object(technically an empty right now) to replace a collection instances. Continue until you have all instances replaced with linked ones. Note: you may be able to shift+d to duplicate them, but I've always linked each one individually.
Third override them. Select all the linked devices and click object menu->library overrides->make.
Fourth, this is the part that is going to take awhile depending on how many objects you have animated. Select first animated object goto NLA and put it's action on NLA. If the linked file has the animation already then you can just push it down to the NLA(I believe it's a snowflake icon) then you can adjust the offset by selecting strip and pressing g then number of frames offset then enter. You will have to do this for each animated object. This is why I prefer rigs(armature). Only one object with animation.
Hi Dwayne,
Thanks for your response! I've never tried using the NLA editor, and barely know what it can do. But I will try your suggestion. The animated contraption has an armature with a bone hierarchy bound to the geometry. Most of it is keyframed, but a small part of it uses constraints. Does the fact that I'm using an armature affect your NLA workflow on this?
Thanks,
-Scott
I should be home in about an hour if you want to meet up on CG Cookies Discord for any additional help
Hi Dwayne - sorry I didn't respond until now. I was out figure painting the whole day yesterday and wiped out when I got home. I'll hit you up on Discord if I have any issues with the NLA. Thanks for your expertise and suggestions with this! -Scott
Hi Dwayne,
I followed your directions for the NLA workflow and it seems to be working great! Thanks so much for that information. I guess the NLA is used extensively in character animation, right? I'm also hoping that the performance will be better than straight duplicates, even though with the linked file I'm seeing the entire object hierarchy in the outliner, compared to only one object when it's instanced.
One more question: I'd like to have one element of my animated contraption be a different color in each of the linked duplicates. It's just a simple Principled BSDF shader - nothing complicated. Is this possible with Library Override? Or Node Groups?
Finally, I joined the CG Cookie Discord if that would be more efficient communication.
Thanks!
-Scott
Hi Omar and Dwayne,
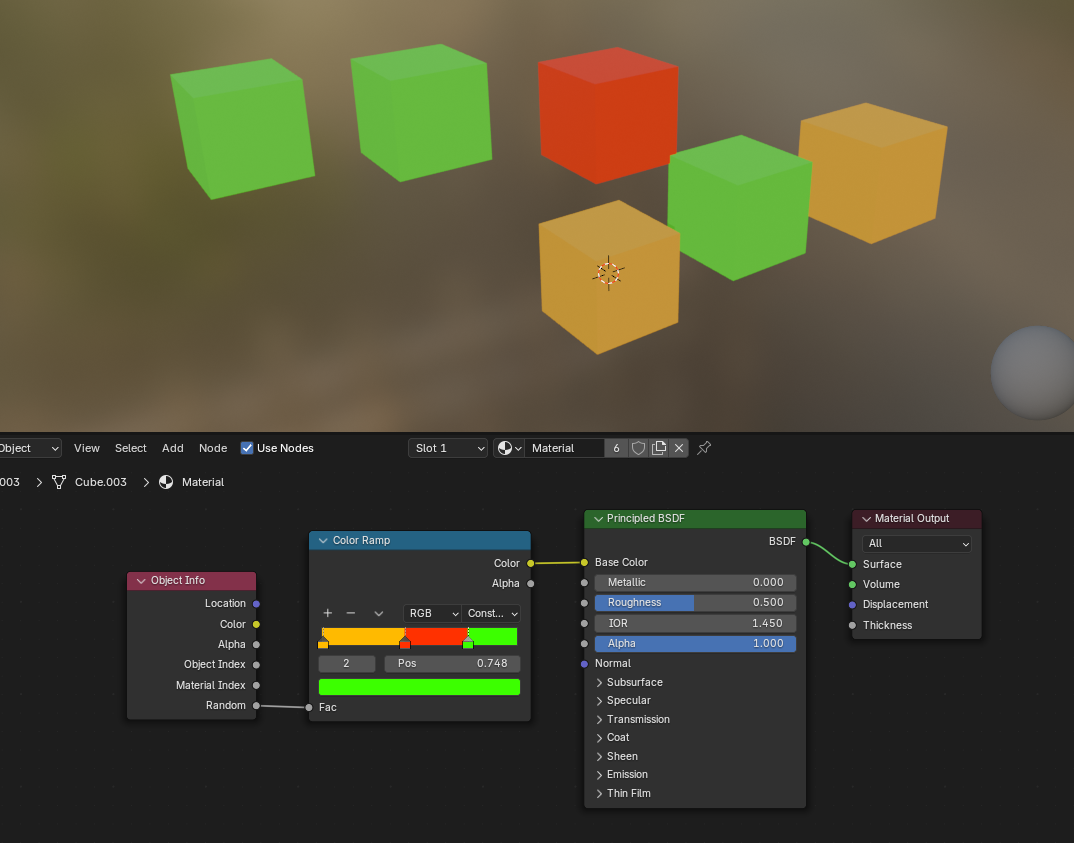
Thanks for your suggestions. I tried Omar's approach, but couldn't figure out how to change the color, other than sliding the Color Ramp sliders around, but then there are only three options there. I imagine I could create more color ramp slots, but is that the way it's supposed to work?
Also, once I link the contraption file to the scene file, and the updated object has the new shader, the shader is not editable in the linked collection, even after I create the Library Override.
Obviously I'm missing something here!
Thanks for the help.
-Scott
If it's just the color then an easy way to do it is thru object color.
Setup the original device file:
1. In the shader editor add the Object info node. Then connect color to the base color input of the principle BSDF shader.
2. Go to object tab of the properties editor. Go down to Viewport Display panel. Change the color setting under that to the main color. This is the color that is sent to the object info node's color.
3. Save the file.
Making changes in the Linking file:
1. Select the object or objects you want to change the color.
2. Go to object tab of the properties editor.
3. Where the object name is at the top right click->Library Override->Make.(This has to be done so you can override the color)
4. Go to the viewport display panel and change the color.
5. Save the file.
Side note: If you start working with linked libraries like this there are a few things that can help.
1. add Library override->Make to quick favorites.
2. Thru extensions: Install Edit Link Library. This adds a panel to the items tab. When you select a linked object it will have a button that will(By default) save your blend file then open the linked file. Once you finish editing it click the return to original file button to go back. This is very helpful. At least to me it helps. If you use another instance of Blender option just note that the linked object may not update right away.
Yeah Material overrides in Blender is a little buggy. In the outliner you have to expand the object. Then on the mesh data you have to right click->Library override->Make. Then you can expand that and then select the material and right click->Library override->Make. Also some material changes don't always save. Just to let you know I'm on discord under Buddy hangout 1.
Hey Dwayne and Omar,
Dwayne's latest suggestion worked perfectly! (But Omar, thanks for your suggestions as well. Looks like it's a team effort with this.) So far the materials are saving fine when I save the file and reopen it again. Thanks so much. It's strange with all the internet searching I've done, I never found a video explaining how to do these things. Probably didn't have the exact search terms.
Also, I'm able to just duplicate the Linked Collection and the new duplicate retains all the options for offsetting the animation in the NLA, plus the door color. So I don't have to go through the linking process every time I create a new linked collection.
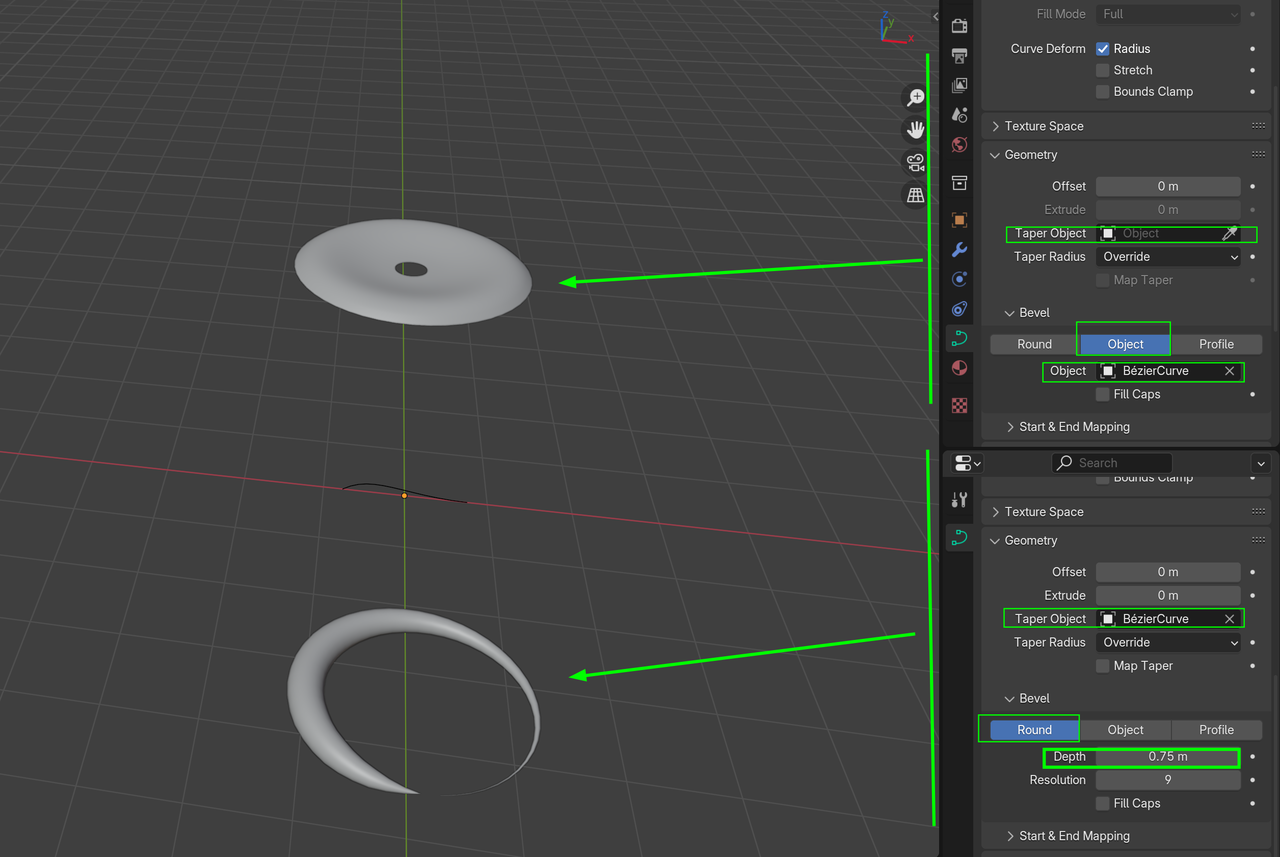
I have one more question for you that's not related at all. I'm trying to do a simple Bevel extrusion using a Bezier curve and a profile curve to create a curving rail. The result is a flattened extrusion - not reflecting the shape of the profile. I've tried rotating the profile curve, which has worked in the past, but no luck today. See the attached image. Hopefully you can see the profile curve next to the axis gizmo.
One last thing: I tried to get onto Discord but couldn't find "Buddy hangout 1" in the contacts area. Also, it said I don't have permission to send a message in this channel. Sorry - kind of dumb when it comes to Discord!
-Scott

Modeling is my week area so I'm not sure on the curve. On the discord you have to go to guidelines channel and there is a check box you have to click. Once you do that you'll have more access
Check the basics of your curve and profile. Make sure scale is all 1 and location on the profile is all 0. I don't know if rotation affects the profile or not.
Hi Dwayne,
I checked all that stuff - still no luck. But I found a couple curves from an older file that worked. I don't know what was going on with the newer curves, because I tried everything. Oh well - problem solved. Thanks for helping out!
-Scott
Thanks Martin. I figured out the bevel problem. But here's a new question:
I'm trying to attach a cube to a path with a follow path constraint. For some reason when I choose the Target object (a Bezier Curve) the cube jumps in the -X and -Y. It animates along the path, but it's offset in those negative axes for some reason. I applied all transforms before adding the constraint, just to rule that out.
I can't figure out how to attach a blend file, but here's a jpeg before adding the target object (Bezier Curve):

And after adding the Target Object: