This is an on-going thread documenting my progress through the 2021 Collab Project.
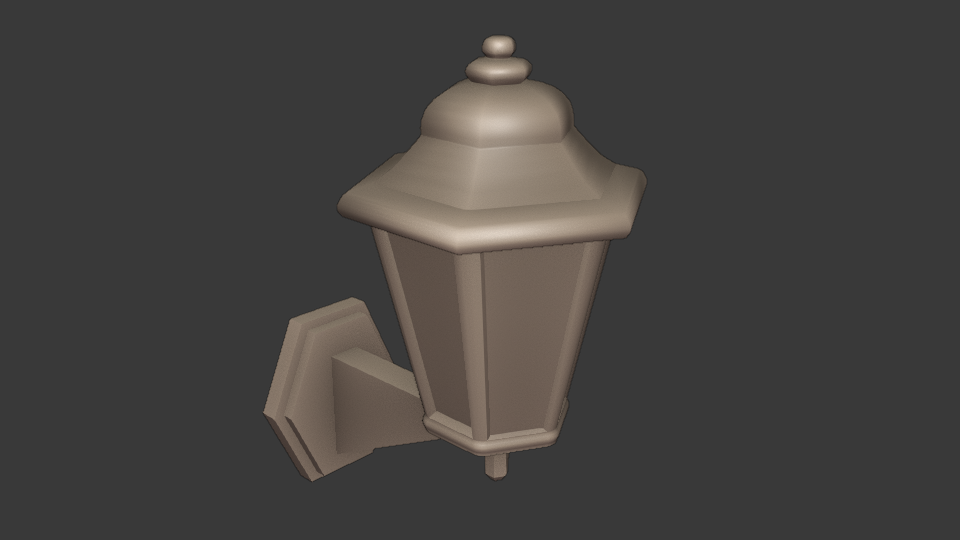
Week 1 - Wip - Lanterns -First Day
I'm not quite happy yet.Some changes still needed
I am also not sure if the wall-supporter (don´t know the name) is one piece or a curved one.
But this is such a tiny piece. I guess it is useful to keep it simple and do not use more vertices than necessary.
Also it seems the proportion of the lantern is a litte bit longer.
Have to lock at this with fresh eyes in the morning;)
Or are here are people with a better artist-eye?
Looking good. Maybe make some different variations, put them next to each other and decide which one to go with.
This is great! I think you might be right about the proportions. As lucky said make a variation, duplicate it and lengthen the body of the lantern a little bit. I don't think you're far off.
Thanks for the feedback.
You are right, I also was thinking about some variations for a better comparison.
This was a try to fit the artwork, it is hardly to see. But this version doesn`t speak to me, there is no character for my feeling.
Not really a low-poly, stylized character.
So, today I will try another way. Maybe using the Lattice Modifier to play with proportions.
Week1- Wip-Lanterns- Day 2
Left Version Day 01
more rounded, more density overall, perhaps proportion not exactly like the artwork
and a little bit boring, I think
Middle and Right are the same object
I changed the shape of the body (middle-part) with a lattice modifier
less geometry, more squarr edged
I also changed these wall-supporter thingie, little bit curved now
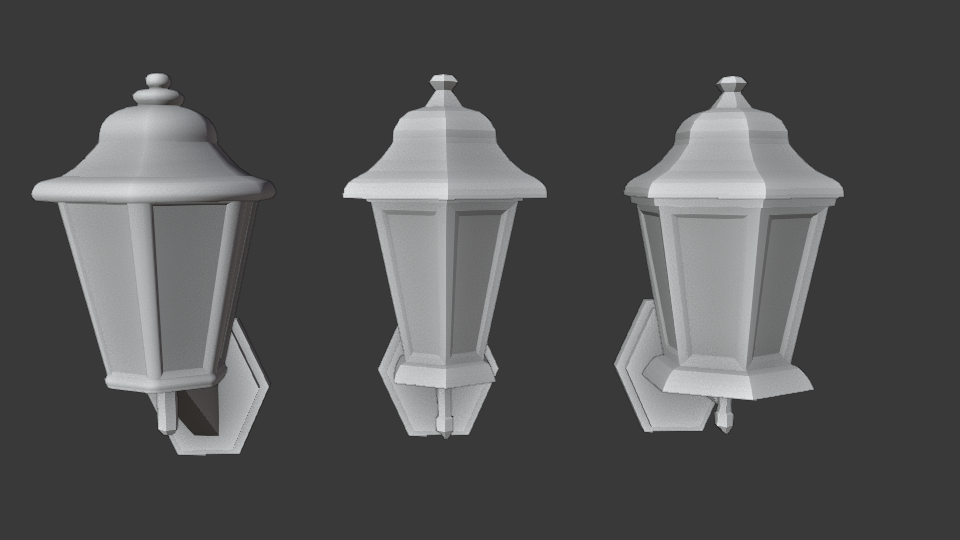
I am not sure about these versions yet. Maybe I`ll get another idea over night ;)
Just discovered some mistakes. Some clean-ups are needed. Also I am thinking about some e.g screws. Not sure how detailed I should go with the lanterns.
Street lights also could be useful for the saveness of the ways.... (just mumble to myself)
nice work on them , they look great. as for the details i have no clue myself since its low poly , for that the Teamleaders or Kent will be better ;-)
mmonaloren screws can baked as normal maps later.
Like shown here for instance:
https://cgcookie.com/tutorial/workflow-for-creating-normal-map-decals-in-blender
Think of your lantern as being completely black (flat shaded, so no lighting information). That way you only see the contours. That should be your low poly model. Adding detail that doesn't change the contour should be done with normal maps.
At least that is how I understand it, but I am pretty new to this style ;)
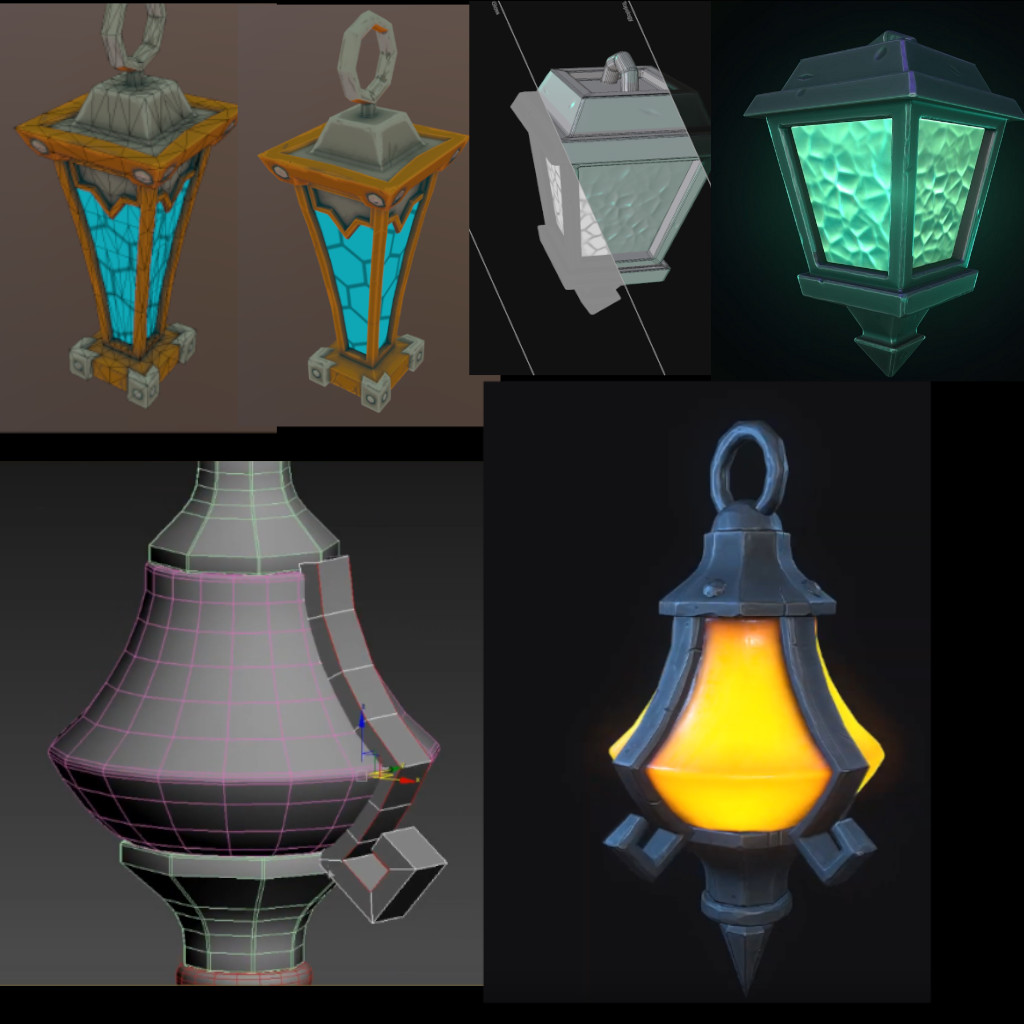
Nice example ![]() spikeyxxx . I had something like this in mind.I guess as well there is a difference between low-poly and stylized style.
spikeyxxx . I had something like this in mind.I guess as well there is a difference between low-poly and stylized style.
In the artwork, the lantern appears very round. (I had a little trouble with the top part). However, it is also very small.
I think there are still too many loops on the top for low poly. I made the bottom with less loops, just to try.
I have little experience with the workflow sculpting and normal map. In addition to screws and dents, can edges etc. look more rounded due to a normal map? I assume it will work for the body, but the top shape is nearly a half-sphere.
I will have to try it;)
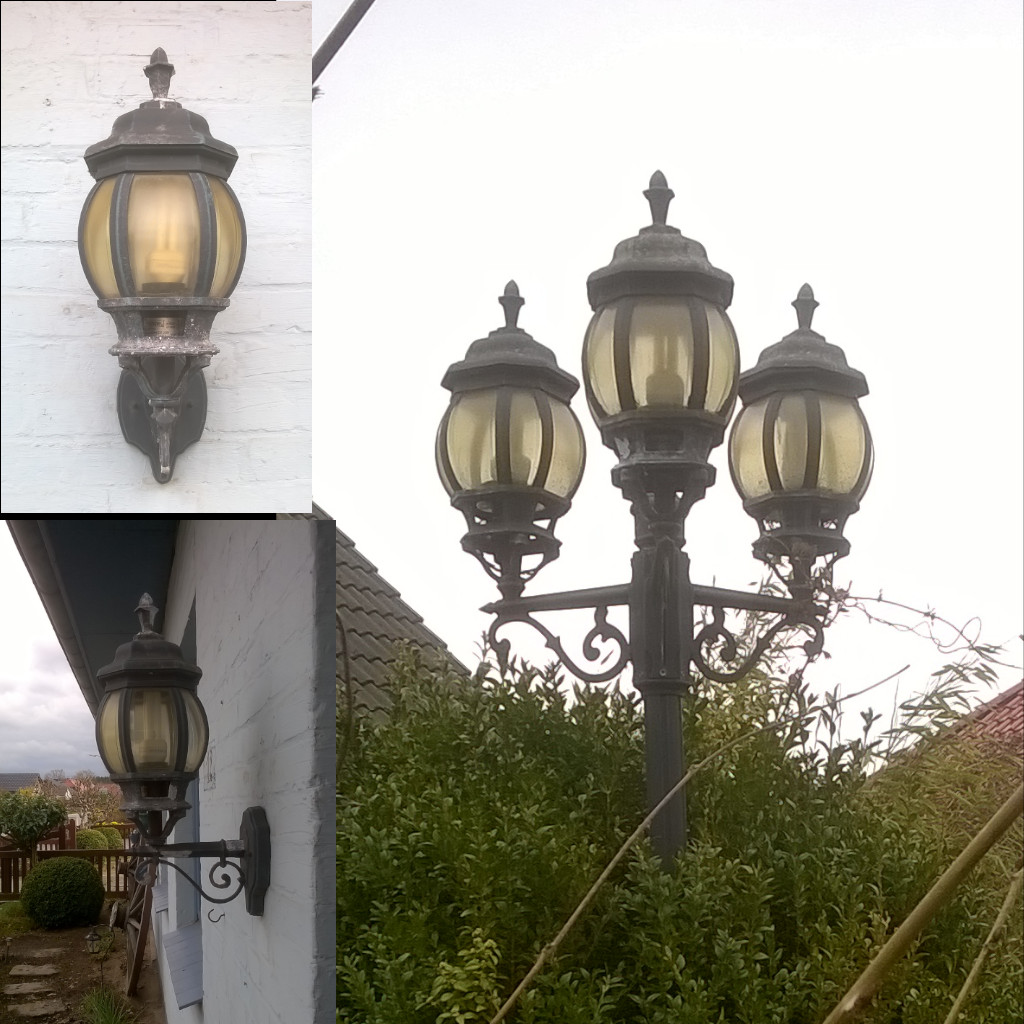
I`ve found references for stylized laterns, but mostly square ones.But it seems, that it is usual to use a bevel.
Just some examples. And the other img shows our own lantern. At the wall and in the garden.(btw. also with blue light ;) ) There are also the body rounded.
I will have a look at the normal map course on CG cookie for some hints.
At the end - learning by doing;)
In a few weeks time, you will be an expert on low poly modeling and Normal Map Baking ;)
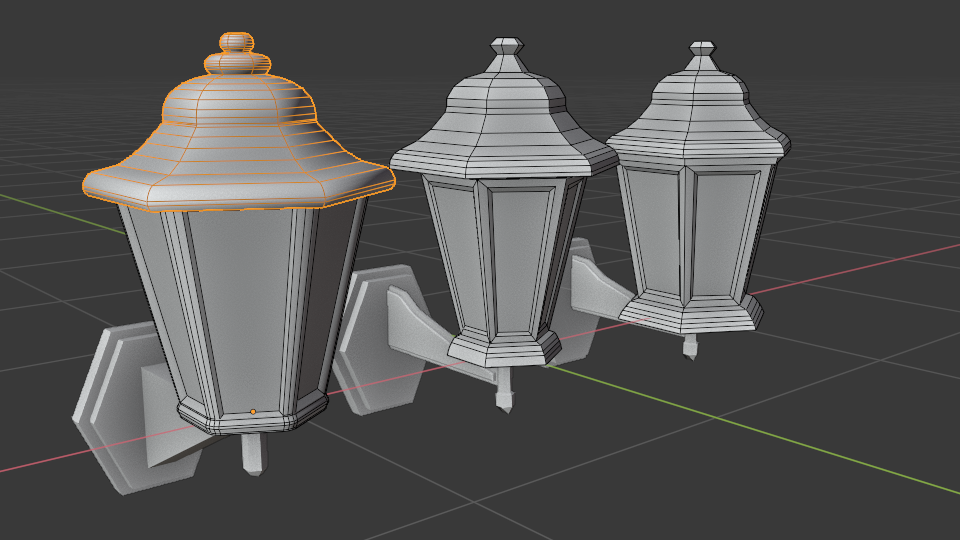
Homework Submission - Week 1 - lantern
@theluthier
After trying a few verions I decided for another one as my final for week 01.
At the artwork it looks like it is a 8-sided lantern and very rounded. However, I used 6-sides for my version.
I guess after working forward with normal mapping etc. it will look like a rounded one from the camera perspektiv,
because the lanterns are not so huge.
At the moment there are separate parts: body,top, bottom and the wall-support.
So there are still a few vertices and faces who can be reduced.
For the body and top I used a lattice modifier so I´m still flexible with the shape.
about 532 Vertices/ 1043 Tris
Great block out Mona. Awesome idea with the latice. Working smarter not harder. Keep it up, looking forward to next week.
Excellent WIP thread mmonaloren! Great result too, especially considering how little reference you have to go on (low resolution in the art). You've easily earned full points this week 👍
My only note is there seems to be an imbalance of polygons. Some areas have too few polys while others have too many. If you don't mind, I'd like to use your lantern to explain during the stream tomorrow. If that's OK can you upload your .blend file to this directory within the project files? SPICE-VENDORS-HOUSE/SCENES/MODELS/TEMP
@theluthier
thank you for the feedback. I really appreciate that you provide detailed feedback to everyone. Especially with the high number of participants in the project .
Some areas have too few polys while others have too many
Caught me ;) I noticed it too later after looking again and again at the lantern that the polycount is not really constant.
In the meantime I changed some areas. I was really often not sure how many are necessary and altered the model often.
It is okay if you like to use this as an example.
I am new to google-drive, so I am not sure if I got it right with the settings to give access.
I right-clicked and got some settings, not very self-explanatory. Hope it works.
Directory:SPICE-VENDORS-HOUSE/SCENES/MODELS/TEMP
Name:House_Accessories_lantern_Temp_monaloren
Btw. I used a lot more refernces to work with to get an idea of stylized-style of lanterns.
Often they are more in a phantasy-style. I tend to use too much references and getting confused on the way.
I really have to find a golden middle-way to make my decisions.
mmonaloren This has been a great read. I love what you are doing and the results are marvelous!
week2 - day 1 : GoogleDrive Day
At least I was able to persuade GoogleDrive to syn.--Check
My way for troubleshooting if sync won´t work:
-Click on the TrayIcon (Back-Up-Sync GoogleDrive)
- Find the Settings on the upper right side
- Exit BackUp&Sync and Re-Start
then it began to work immediately
Now I have to figure out how to these folders&files to work with
Do we have a info.txt or something with notes about how we have to named our files
and the rules how to work with the folders & files?
This would be very helpful.
My understanding is for the first step:
We are each working with our own Wip file
directory: Spice-Vendors-House/SCENES/MODELS/WIP/ACCESSORES_ACC_House
file: WIPP_acc_lantern_monaloren_xx.blend
this will go later to an corresponding " xxxxx.master.blend"
the collection of each master.blend would be linked to a "xxxxmaster.assembly"
So far I have only to take care of my "xxxx Wip-file"
Hopefully this is the right way.
Sadly it takes me a lot of time, so no Blender work today for me.
But had more than one look to the recommended courses.
I`m learning far more than just Blender in this Collab :)
(one of them is patience with setting up and working with various tools and to handle these in two languages :))
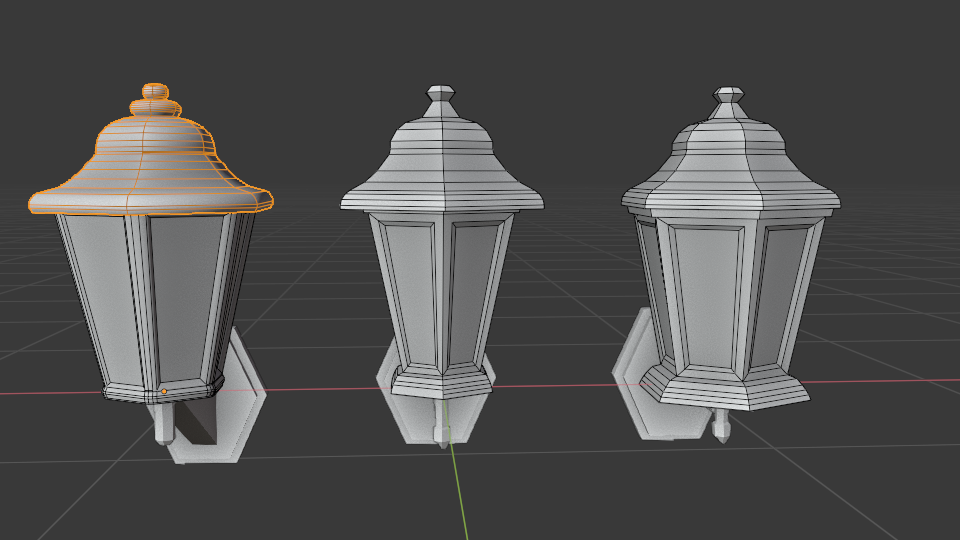
week 2- day 2 Redone Homework Submission week1
clean-up the model of week 1 and made a Low-Poly Version - according to Submission feedback and lifestream
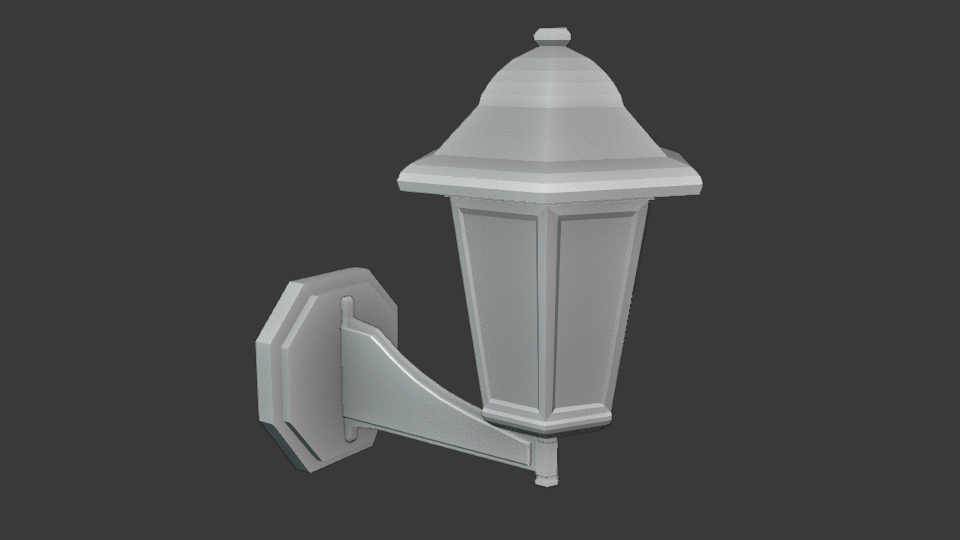
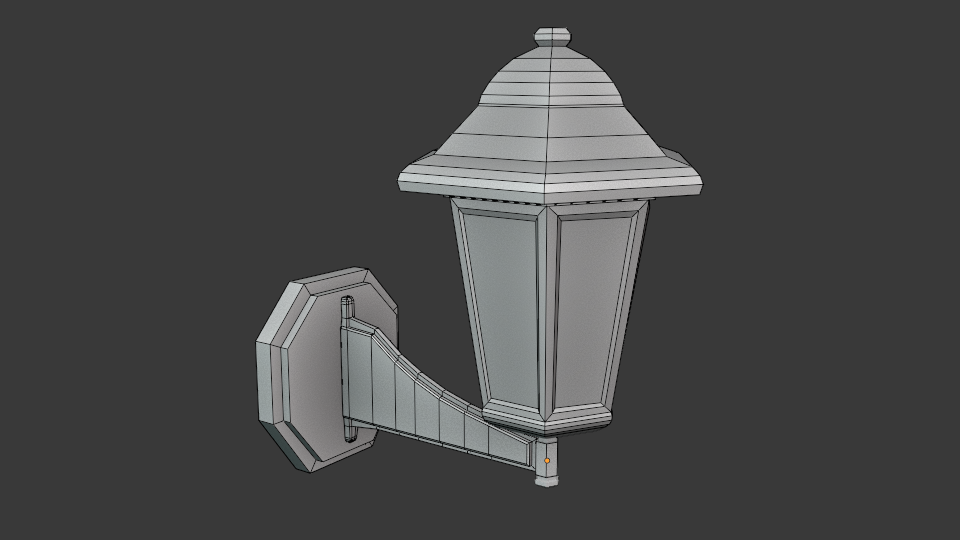
Version 1 - Left side - Version according to the lifestream
Verson 2 - Right side- My Changes
Changes
1.Reduce the distance between the wall and the lamp-body. For a more realistic proportion.
2. Removed the top edge from the body. I found there is no additional edge necessary and there wasn't one at the bottom at all.
The parts can also be connected to one another in this way
3. Change the Bottom of the body
I honestly like it more this way. The Connection and so the silhouette looks much more smoother and pleasing for my taste
I also changed the part underneath so there is a better connection and deleted some edges.
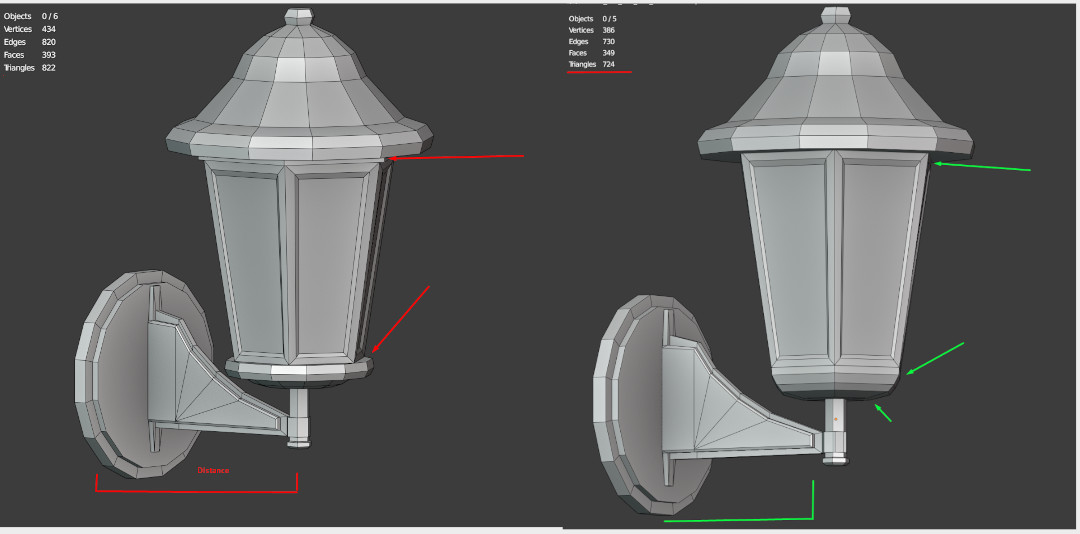

Overall I was able so save some more Vertices.
But I will try another version:
Vadim mentioned during the Lifestream that the top of the lantern was not supposed to be so rounded
rather as an octagon with faces.
Because of the conceptart I already thought it could be a 8-sided one.
So I`ll model another Low-Poly version according to Vadims inspiration.
Great effort you put in writing everything down. Also nice improvements on the lamp.