Announcement #6: Final Presentation Premiere!
Announcement #5: Conceptualizing the Final Animation
Announcement #4: Closing Post
Announcement #3: Blog, Syncing Saga & More
Announcement #2: Updates & Loose Ends!
Announcement #1: Collab2021 has officially begun!
#Collab2021 is focused on stylized, low-poly, fantasy environment creation! Specifically this gorgeous illustration by Vadim Zaitsev:

You can find more from Vadim on artstation.
Through April we will be creating a comprehensive 3D version of this environment and we need a committed team to make it a reality! If you’re not sure what this Collab format is all about, check out the blog article first. If you know what you’re getting into, continue reading about how to register and what the schedule will look like.
Collabs are open to all Citizen members (membership is required to participate). You need to be subscribed by April 5th and remain subscribed through May 4. You're welcome to subscribe earlier so you can access the recommended courses listed below. This option could be helpful for focusing on learning from content before the collab begins at which point you can focus primarily on applying what you've learned.
Collabs don’t have an official web page or system built into our site. Instead it’s facilitated through the Forum, Live Streams, and Google Docs. Fill out this form to register for the Collab. This will give us insight into how many people are interested, the skill levels involved, and some other info that’s helpful before we get underway.
The last day for registration is April 5th. After April 5th the team will be closed! [evil laughs]
As with any production, one can only plan so much before unanticpated things come up. That’s to say we will be at the mercy of the project and the content could change as needed. Schedule should remain the same though.
Goal: Since we’re working within a low-poly, stylized (simplified) genre I think we could finish all the modeling in the first week. For most assets in the scene the modeling is straight forward. For trees and bushes it’s a little different. I highly recommend using the Sapling Addon included with Blender) as taught in the stylized forest course. Similarly clouds will be a unique asset to tackle; something we will need to brainstorm as a team.
Stream 1: April 6th @ 1pm US central time
Helpful Content:
Week 1 Homework Due: April 11th by midnight
Goal: It’s possible that sculpting will be the next step for some assets (ex: rocks) and not for others (ex: trees). If your asset doesn’t need sculpting then your task this week is UV layout and texture painting a color map. If your asset needs sculpted detail, you can do that in addition to the UV layout and texture painting. By the end of the week we all should have our completed model painted with a color map and sculpting done if applicable.
Stream 2: April 13 @ 1pm US central time
Helpful Content:
Week 2 Homework Due: April 18th by midnight
Goal: This should be an easier week than the first two. Since the style is simplistic, the material can also be simplistic. It can also be more complex if one is so inclined. Things like procedural texture accents, procedural water, randomization of the same material across multiple objects, etc. Additionally we will dip our toes into lighting. At the very least we need to implement lighting in a way that informs our material qualities. At the most I want us to light our asset in a standalone presentation, as if you were presenting it to a supervisor for approval.
Stream 3: April 20 @ 1pm US central time
Helpful Content:
Week 3 Homework Due: April 25th by midnight
Goal: As with most productions, the last stretch is the most unpredictable and often results in a lot of problem solving. I expect this week to be a smorgasbord of tasks from catching up / putting final touches on assets, assembling the final environment together, polishing lighting and atmosphere, and who knows what else.
Stream 4: April 27 @ 1pm US central time
Helpful Content:
Week 4 Homework Due: May 2nd by midnight
With the project officially complete, this stream is meant to be a celebratory bookend. We will revel in our hard work and discuss a post-mortem: What worked well, what could be improved next time.
Of course communication is key for effective teamwork. To facilitate this we will utilize a network of forum threads.
Discord: Our resourceful Team Leads have setup a discord server for us! The server features channels for each team including audio + video capability.
Discord is best for LOW LEVEL communication since it’s the easiest, quickest way to communicate. By “low level” I mean casual, small-consequence discussion. The main negative of persistent chat is its brief nature; comments appear and then immediately get buried. This is fine for the majority of our discussions (let’s say 75%) but we want to avoid important info getting buried.
HIGH LEVEL communication is the important stuff that shouldn’t get lost in a persistent chat. Please keep high level discussion like protocols, announcements, lengthy troubleshooting and idea pitches on the forum threads listed below.
HQ Forum Thread: This thread is the foundation of our communication structure as denoted with "HQ" in the title. Discussion here should be broader in context; having to do with the project as a whole. It's the place I will be posting important announcements for everyone involved. It's also ideal for general questions about the project and light-hearted "water-cooler talk" for the team. Things like encouragement, inspirational info / artwork, relevant memes. I love memes.
It's NOT ideal for *specific* things like questions pertaining to a certain part of the environment, WIP of individual parts, or person-to-person discourse.
Team Threads: If more than 30 members register for this project we will divide into sub-teams. Each sub-team will collectively tackle a group of related assets and will be lead by a member (most likely contributors from #collab2020). Each team will have a dedicated forum thread for specific discourse pertaining to their parts. Same guidelines as the Central Thread but with a specified topic.
Individual Homework Threads: Each contributor is required to create a thread for themselves for posting homework confirmation at minimum. This is also where any discourse about your specific part happens. You're encouraged to treat it as a work-in-progress (WIP) thread, posting updates about your work as you go.
Direct Contact: Tagging is ideal for directly contacting me or anyone involved with the project. Tag me (@theluthier) with questions or advice in any of these threads. I guarantee I will be checking my notifications regularly every Monday-Thursday throughout the duration of the project.
Of course the more people that register the less accessible I will become for direct / lengthy conversation. This is where sub-team leaders will be invaluable. If we break into sub-teams please contact your leader first, then me second.
Livestream Chat: The realtime interactivity of streams is another great way to communicate. Taggin works there as well along with an additional tool: Typing "[Q]" in the chat adds a blue "question" label to your post. This makes it easier for me to spot direct questions for me to answer while streaming.
DISCLAIMER: These guidelines are only intended to streamline the challenging task of communicating globally across the internet. They're not meant to create a tense atmosphere of rules! We're a relaxed, reasonable bunch of Blender heads. If you don't know where you're supposed to ask a question, go ahead an ask somewhere and you'll be answered or kindly directed to the right place if applicable.
Everyone working from the same project directory is important for a production like this. From linking models back and forth to sharing texture maps, it's a must for a smooth working experience. Further protocol like file naming conventions and saving files in the right place is necessary to avoid a confusing mess.
The following instructions are depending on you syncing the project's Google Drive folder to your local computer. If you haven't done that yet, please check the Announcement 2 post for instructions.
For this project I want to make the process as simple as possible for participants. To achieve this I've come up with a "plug-n-play" system. Basically I will save a placeholder .blend file in both the WIP and MODELS folder for each participant by including their username in the filename. Once the placeholder is present, each participant saves their work into the MASTER collection within the scene and that's it! I take it from there.
I covered this concept in the Week 2 stream but here's a set up step-by-step instructions as well:
How much time am I expected to commit to this project?
We stress commitment because it's the best to ensure A) the project succeeds and B) lasting skills are learned. We only expect you to commit as much time as you can. DO NOT commit full-time hours to this project (8 hrs a day). As the instructor, I should be the only one doing this.
Everyone else (sub-team leads and contributors) shouldn't need to apply more than 2 hrs per day to the project. It's all relative depending on your availability and skill level. If you can't afford 2 hrs per day you can pick a simpler asset. If you have more time to contribute then perhaps choose a more complex asset. It's up to your discretion.
If you only have 2 weeks available in April, that's OK! Just let me or your sub-team lead know and it's all good.
How do I tag someone?
Like twitter and instagram you simple type "@username" to tag someone. Tagging fires a notification to this person. Everyone's username is either A) in parentheses beside their display name or B) substituted if they don't specify a display name:

What service do we use for syncing files as a team?
We used Google Drive last year and it worked pretty well. Syncing our files to the cloud proved to be a crucial way for everyone to stay up-to-date conveniently. Since we lean heavily on library linking, it's imperative that we all be up-to-date. Google Drive is very accessible too; most people have an account anyway.
If you don't have one, sign up to get 15GB of storage for free. That should be plenty of storage for our project.
I know people are hesitant to sign up with Google but a burner account just for this project isn't too invasive, right? Otherwise Mega drive could be a good alternative since it offers 50 GB for free.
What if I'm not available at the time livestreams are broadcast?
Unfortunately the stream time can't be ideal for everyone. If you're not able to watch the stream live, I will post the recording within 24 hours of broadcast.
When is homework due exactly?
Homework is due every Sunday @ midnight each week. This means whenver your midnight is; relative to your timezone. This gives me each Monday to review homework internally before streaming on Tuesday. Please adhere to this deadline as late submissions can really stunt the flow of the schedule.
Can multiple people volunteer for and build the same part?
Yes! Early volunteers will have the best chance at picking a unique part but eventually parts will be assigned to multiple people. Of course we can't feature multiple of the same part for the final scene so the best execution of each part will end up in the final.
Are we bound to also 1 asset or if there is spare time can we even go for a second or third piece?
You're not limited to 1 asset. I'd love to see contributors challenge themselves with multiple assets, as several did last year. This gives contributors the ability to define their own scope of participation: If someone is newer to Blender they can choose one asset. If someone is more experienced they can choose multiple assets.
Who “owns” the final project?
Technically CG Cookie owns the project but the final project will be released freely as Creative Commons (CC-BY-4.0).
Can I feature my work from Collab2021 in my online portfolio and / or demo reel?
100% yes! Contributors are welcome to use/share visuals from the project to social media accounts, online galleries / portfolios, and featured in demo reels.
@theluthier Just wanted to make sure that I'm in the collab I did sign up the day the video was on youtube but just needed to make sure since I'm new to the site.
@theluthier Here's a (somewhat) similar collab project I've seen: https://www.youtube.com/watch?v=EdCvwmebWN0
Not as "educational" but similar vibe.
Hi @theluthier, I am the guy that forgot to fill google registration and asked if I can jump in the colabb.
If there is a team that needs one guy with basic to advanced modeling skills that would be great?
If there isn't, no problem.
@theluthier Am I registered? I filled out the registration form last month, but I am not sure if I am on your list.
Maybe a Mallet, that is also used for smashing spices. So it really burns, when you get hit
Just thinking out loud but it would be a good idea to BOOKMARK your personal WIP forum and Team Forum. It will make it easy to navigate through all of the others.
Ugh,
Really missing "Undo" on the sapling modifier.
If you have something you're starting to be happy with I'd save it quickly rather than trying to "finalize" it.
You can always go back and save a different preset and/or overwrite the original save with a more refined version.
If you lose your modifier window, I think you've lost the ability to save that preset and have to start over.
I agree with ![]() beefkeef that the lighting is the defining difference between the concept art vs render example. If you just spread their color palettes out in front of you it would be extremely apparent.
beefkeef that the lighting is the defining difference between the concept art vs render example. If you just spread their color palettes out in front of you it would be extremely apparent.
The colors you get out of the concept were very deliberately chosen, and would look beautiful as swatches sitting next to one another. There's a selection of vibrant saturated colors as well as more muted desaturated tones, and theyre used to make the objects in the scene pop.
The 3D version is relatively desaturated across the board, diffuse, no gradient. Whats interesting to me is that it actually looks like the 3d version eyedroppered some of the concept colors, but due to the lighting and materials, you don't get great color depth.
The sky and lamps lend color depth to everything in the concept, with varying levels of specularity / roughness -- and that is completely absent in the 3d. That color variation in the original art even helps frame your attention, with the warm colors in the sand pulling your eye in.
Colors are so GD important. And people that use them well blow my mind.
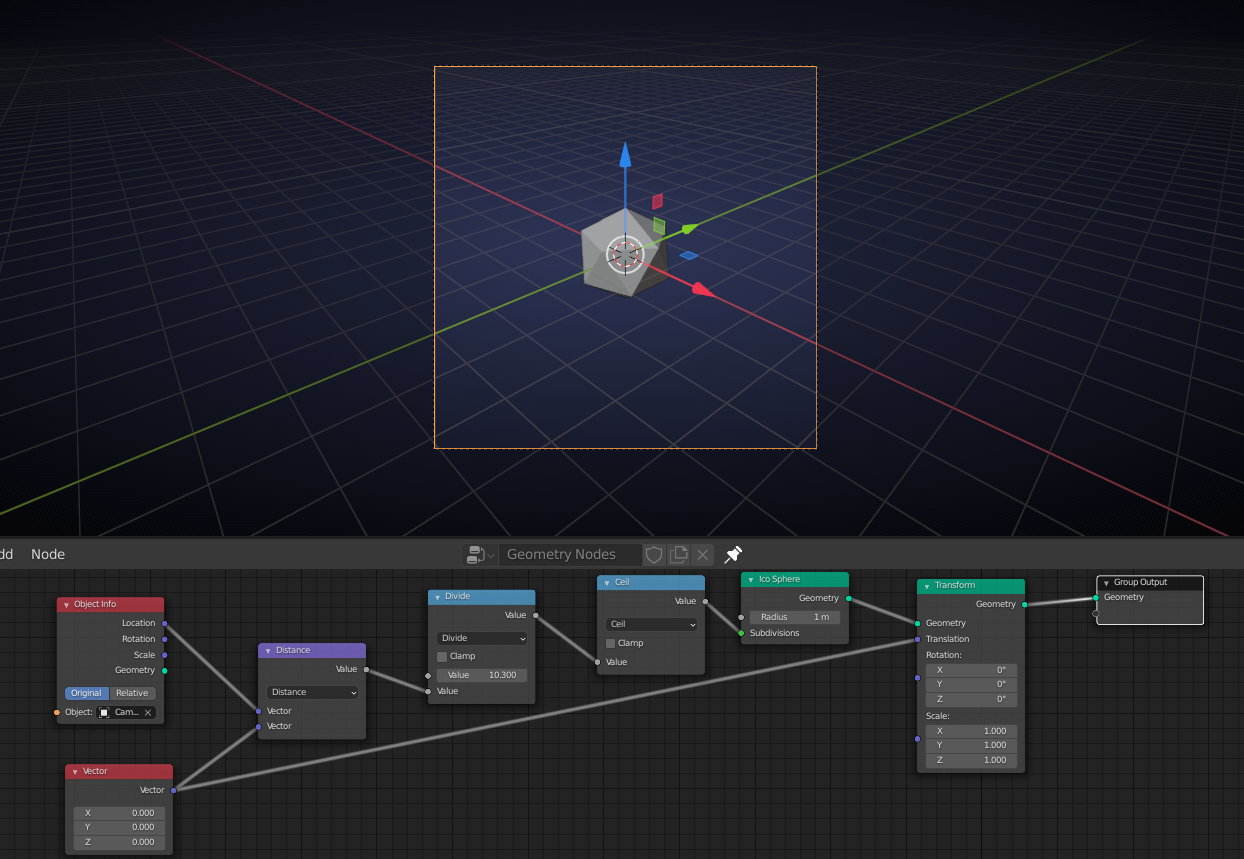
![]() spikeyxxx I am trying to duplicate your geometry nodes. This is my first experience with it. I look at this as a great opportunity to learn!
spikeyxxx I am trying to duplicate your geometry nodes. This is my first experience with it. I look at this as a great opportunity to learn!
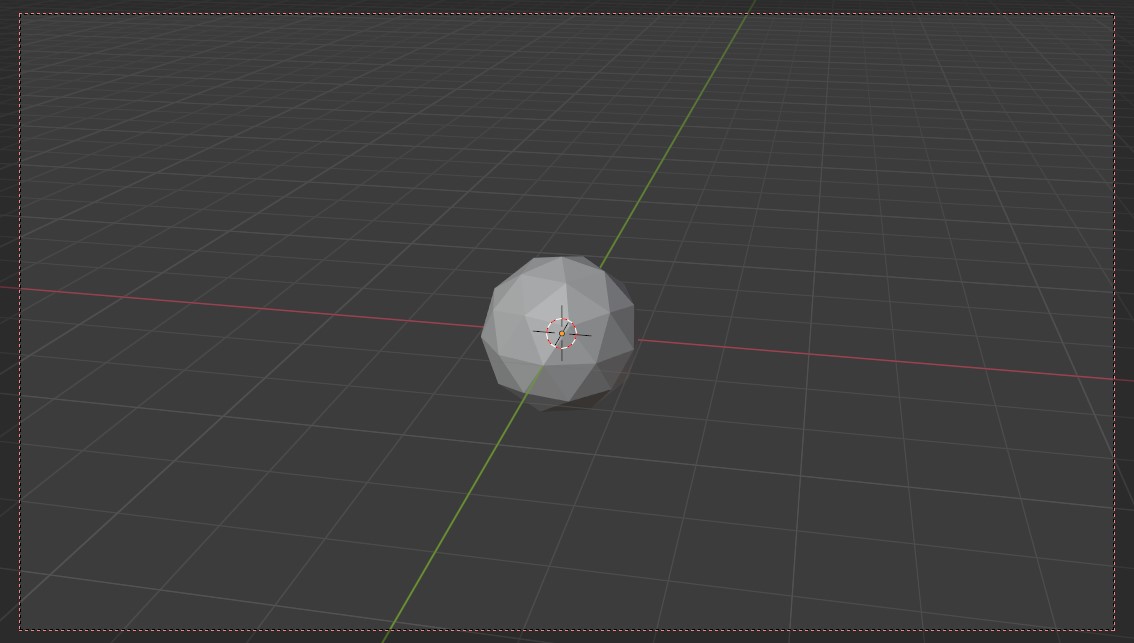
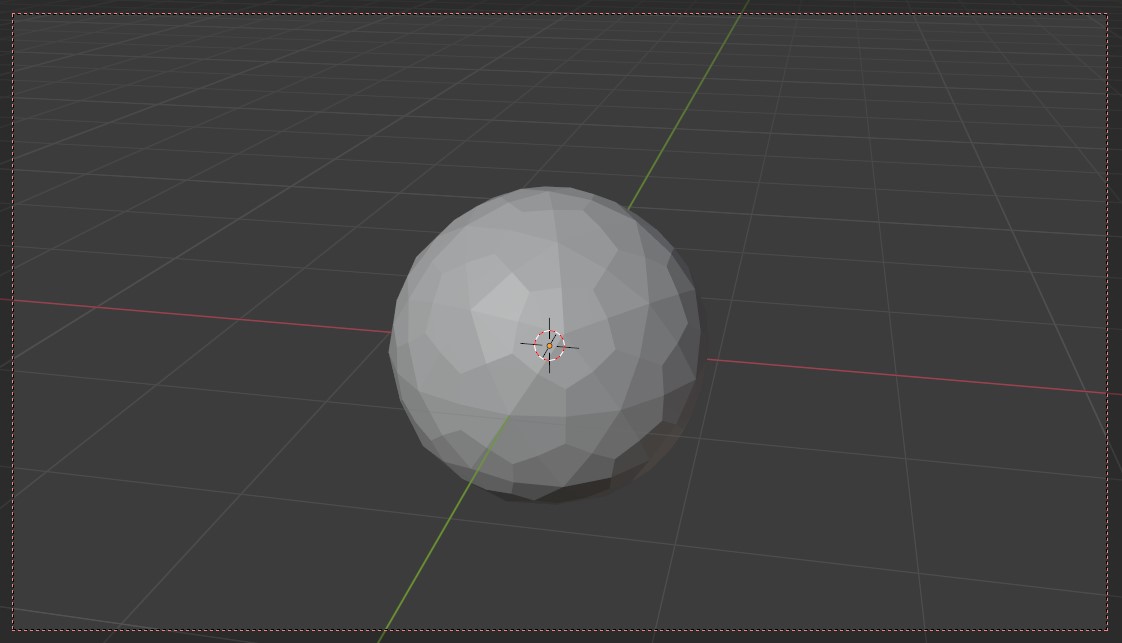
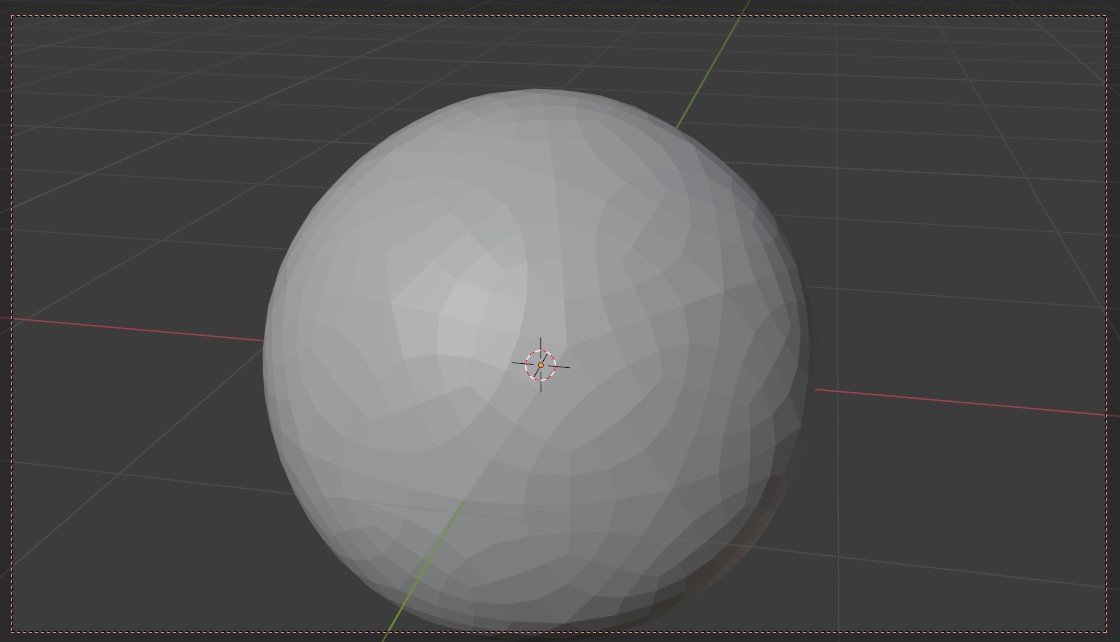
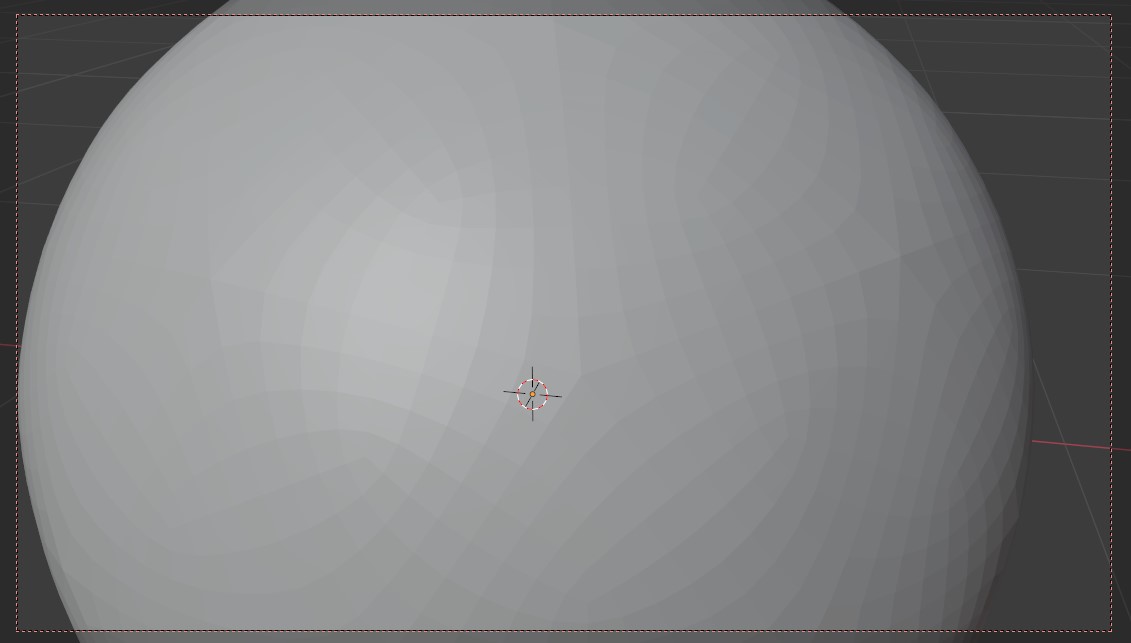
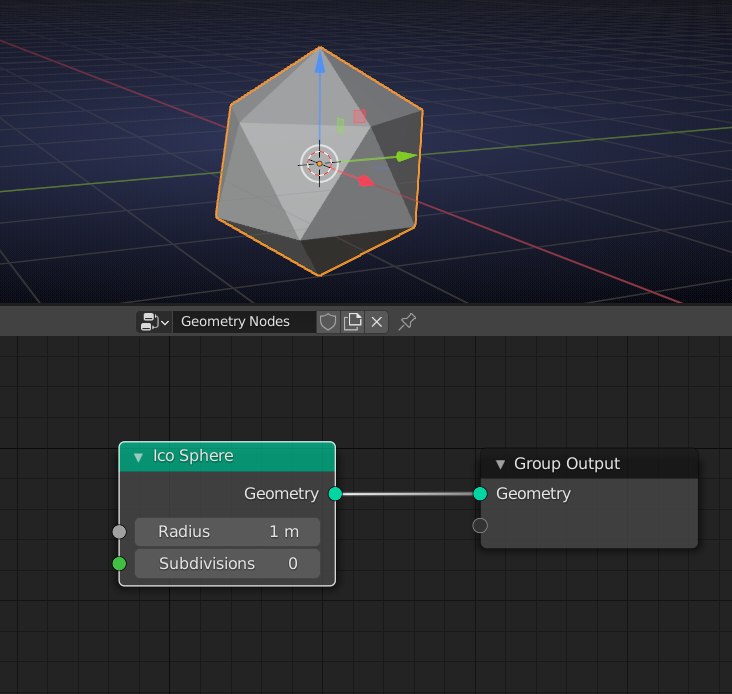
1) Please confirm my understanding of the end goal: As you zoom in closer the subdivisions increase on the Ico Sphere (wunderbar!).
For those following at home, here is what I did. Used a split screen like using a Shader workflow. Top is the 3D Viewport and the bottom is a Geometry Node Editor. Added an Ico Sphere to my 3D viewer. In the Geo Node Editor, pressed the New button and removed the Group Input node. Added and hooked up the nodes to duplicate your configuration. Except...
2) I can't find the "Ico Sphere" node - where do I get it? I have looked at (I believe) every single node available via Shift-A, but it has eluded me. Also, in the Geo Node world, is this considered a "shader" node (e.g., it has green connections)?
Cheers
Splat
Ad 2) ![]() splat21 sorry for the confusion: that is 2.93. Geometry Nodes develops really fast these days. This was just a fast demonstration of the principle, so I cheated and used a version 'from the future'.
splat21 sorry for the confusion: that is 2.93. Geometry Nodes develops really fast these days. This was just a fast demonstration of the principle, so I cheated and used a version 'from the future'.
Of course, for the COLLAB we will stick to 2.92, but there are enough Nodes there to make something like this work.
And you do not need to delete the Group Input Node; I just left it unconnected (it was a Plane and I didn't want to show it here...) The GN Tree needs to be connected to an Object. A bit like a Particle System, where you can decide to not show the Emitter.
In 2.92 you could just use an Icosphere and add the GN Modifier (Node Tree) to that!
in the Geo Node world, is this considered a "shader" node (e.g., it has green connections)?
absolutely not!
Those colors are independent from Shader Editor Colors.
Although Purple still means Vector and yellow color, but Grey means float(ing point number).Turquoise/green is used for Geometry and green for integers. Then there is white for a Collection, pink for a Boolean and blue for a String:
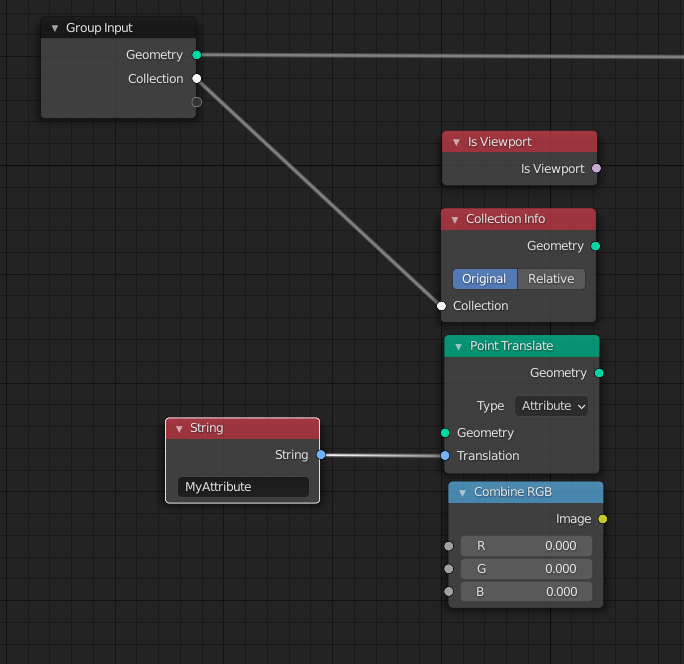
But these color may still change, as this is in early development.
If you want to learn more about GN look for Erindale on YT. He has some wonderful tutorials for beginners.
He also made this (only modeled a few leaves for the flowers, the rest is GN):

![]() spikeyxxx Thanks for your reply. You have inspired me to peek into the future and take a look at 2.93. Your simple proof of concept is very cool. If you pursue this further, I'd be interested in seeing how you implement this in 2.92. I already have a Erindale Youtube intro to GN's queued up to view.
spikeyxxx Thanks for your reply. You have inspired me to peek into the future and take a look at 2.93. Your simple proof of concept is very cool. If you pursue this further, I'd be interested in seeing how you implement this in 2.92. I already have a Erindale Youtube intro to GN's queued up to view.
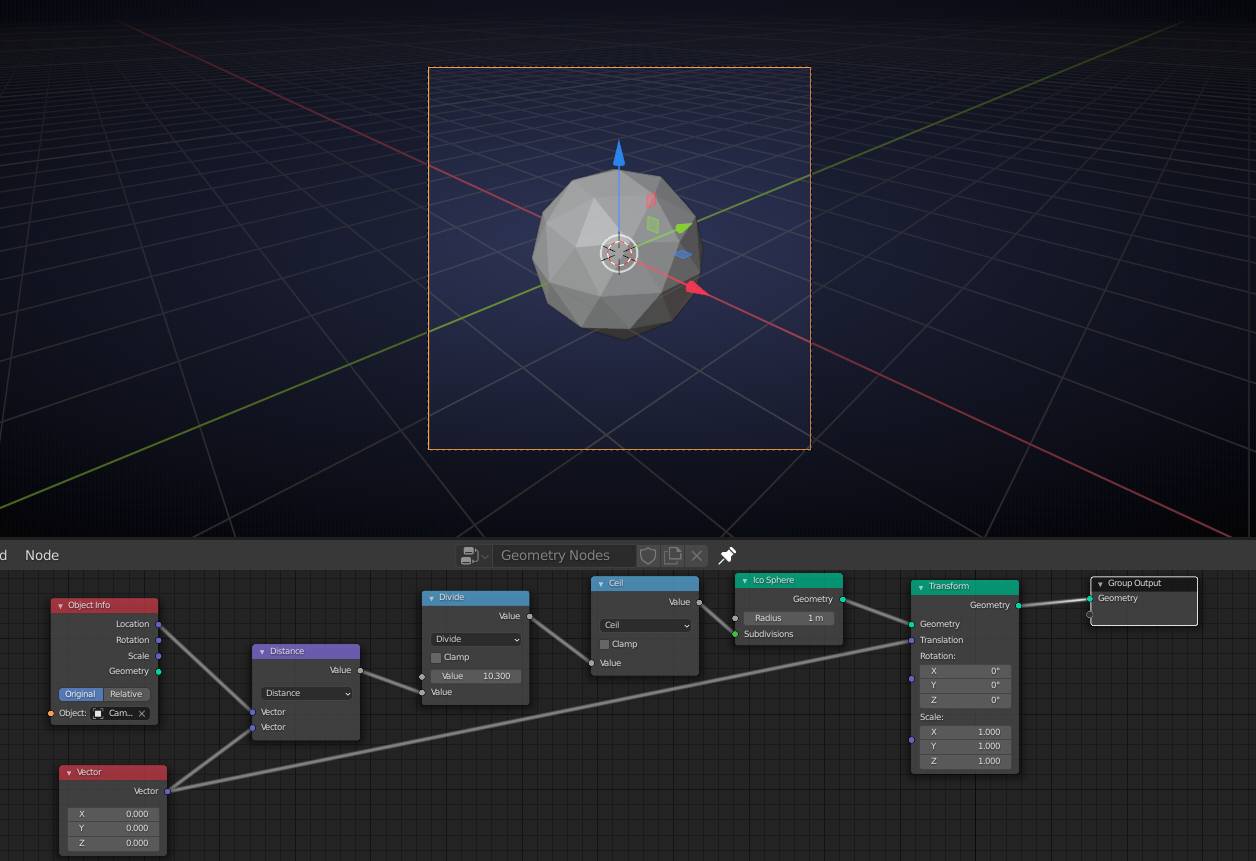
![]() spikeyxxx I played around with this a little more in 2.92 and got it to work.
spikeyxxx I played around with this a little more in 2.92 and got it to work.
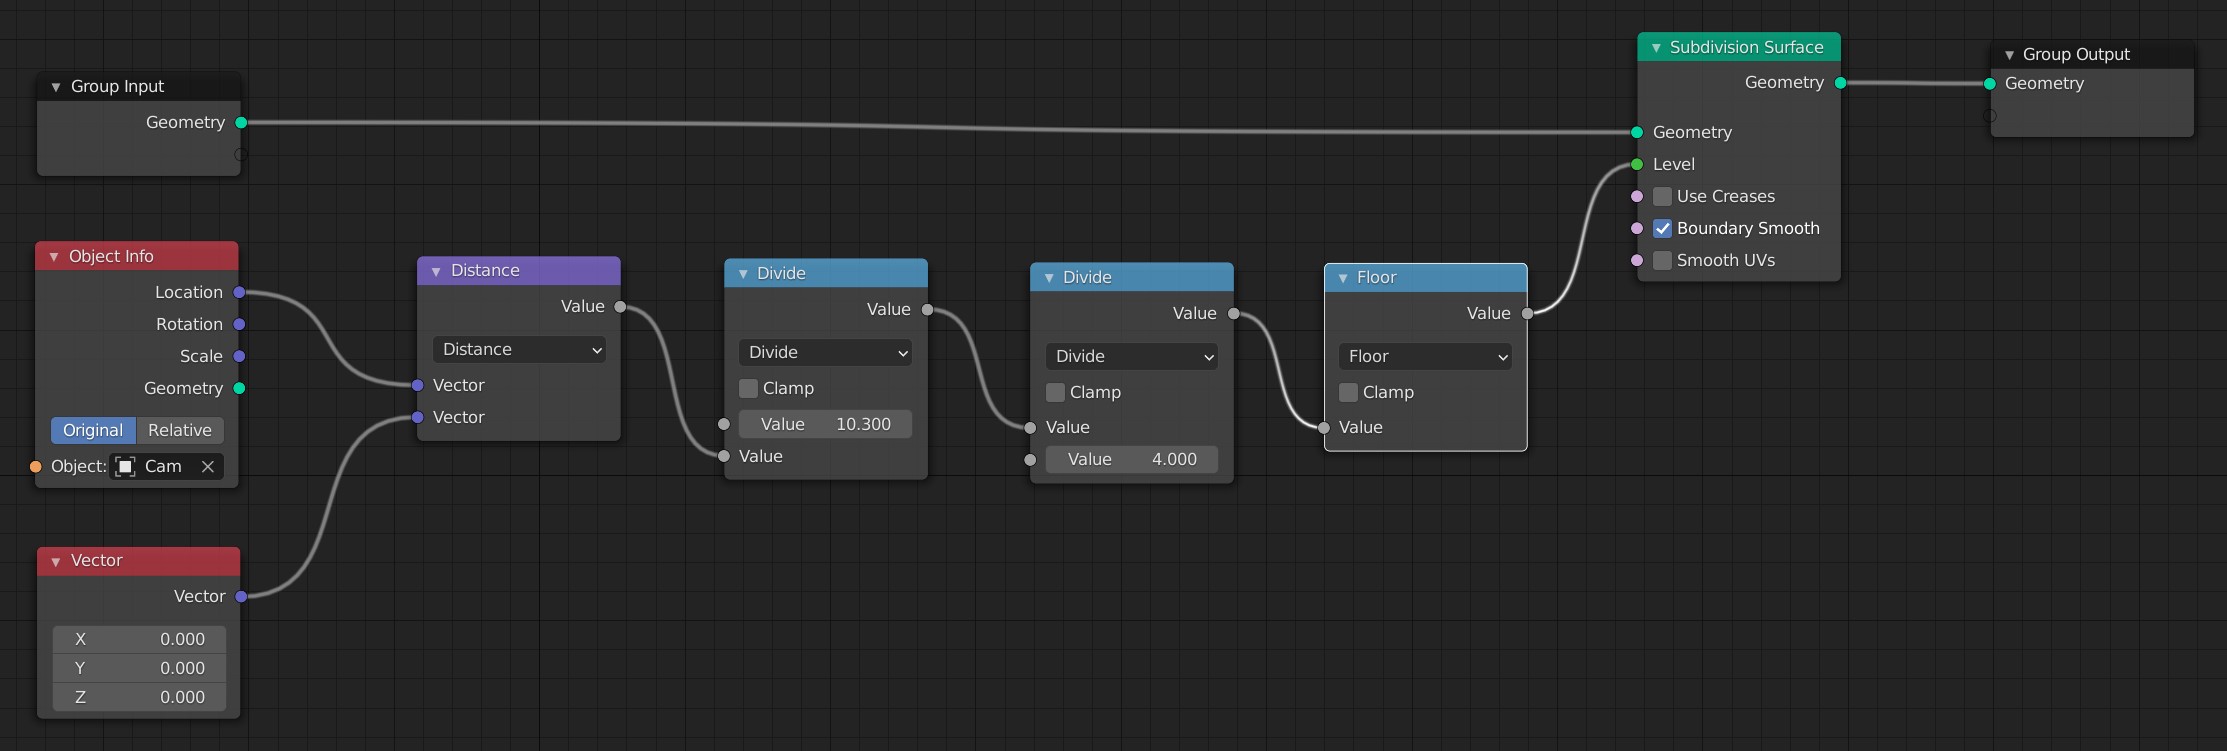
I used a Floor instead of your Ceiling as I wanted the subdivision Level value to be 0 when the camera is furthest away. The 2nd Divide function was to dial in a little more granularity - it's value would need to be tweaked per the actual application. Here are my camera zooms at different locations.
1) Can you please tell my why you used the value of 10.3 when you divided it by the distance vector? What is magical about 10.3?
2) Is this how you would have approached this problem in 2.92? Specifically, using the Mesh Subdivision Surface node. Is there a better way?
3) It would be helpful to be able to monitor the output value of the math nodes. Kind of like a debugger that monitors floating point, integer and Boolean variables. Are you aware of any provisions to display such information within Blender? Sorry, I have not looked into the future at 2.93 to see if there is that kind of a node there.
Again, thanks for your assistance in helping me to learn this.
Ad 1) there's nothing magical about it just a more or less random value that gave an exaggerated effect. So in stead of using two Divide Nodes, you can use one with a different value.
Ad 2) i don't think there is a better way to make this example....
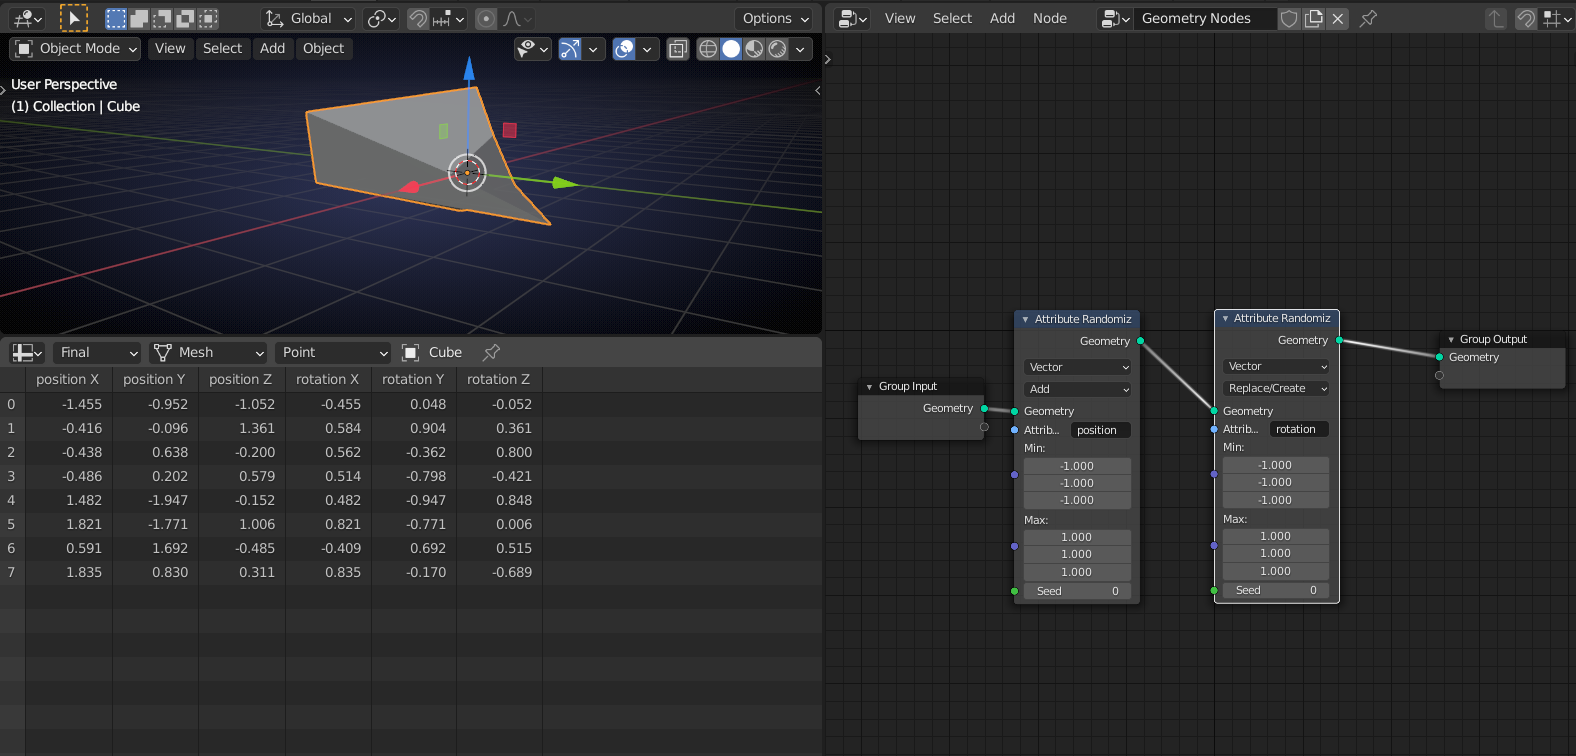
Ad 3) in 2.93 there is a Spreadsheet:
And I used Ceiling in my example, because the Primitive Icosphere in 2.93 doesn't have a zero Subdivisions (at least, it is the same as 1 Subdivision):
I think some people signed up on the cgart cafe yesterday https://discord.gg/FcWsrSx
If they did please talk to Morten Fjellheim for access to the cg cookie only discussions (talking out loud chat is available for everyone)
If you decide to make a new discord I'd definitely join for this project ![]() blanchsb
blanchsb