Blender Beginner Project: How to Model a Low-Polygon Style Halloween Pumpkin
Oct 3rd 2020
Model a low-polygon style Halloween pumpkin in Blender
Halloween is nearing again! Join CG Cookie in this beginner-level tutorial, modeling a low-polygon Jack-O-Lantern pumpkin inside our favorite 3D editor. Blender 2.8 or a higher version is all you need, no external add-ons will be used.
01: Establishing the pumpkin basis
Start Blender. The standard cube is selected by default. Press the ‘X’ or Delete key to delete the cube.
On your numeric keypad, press ‘5’ to switch to orthographic view mode, then press ‘1’ to switch to the front view.
💡 If you don’t own a keyboard with a numeric keypad, be sure you activate Preferences ➔ Input ➔ Keyboard ➔ Emulate Numpad, to set view navigation modes with the default number keys.
Press Shift + A ➔ Mesh ➔ UV Sphere to add a sphere with polar topology.

Click on ‘Add UV Sphere’ in the lower-left corner of the viewport to unfold the sphere options dialog. Change the number of Segments to 30.

Press Tab to go into Edit Mode, so we can start modifying the sphere.
In Edit Mode, activate Edge Select mode by pressing the button in the top left corner of the 3D view.
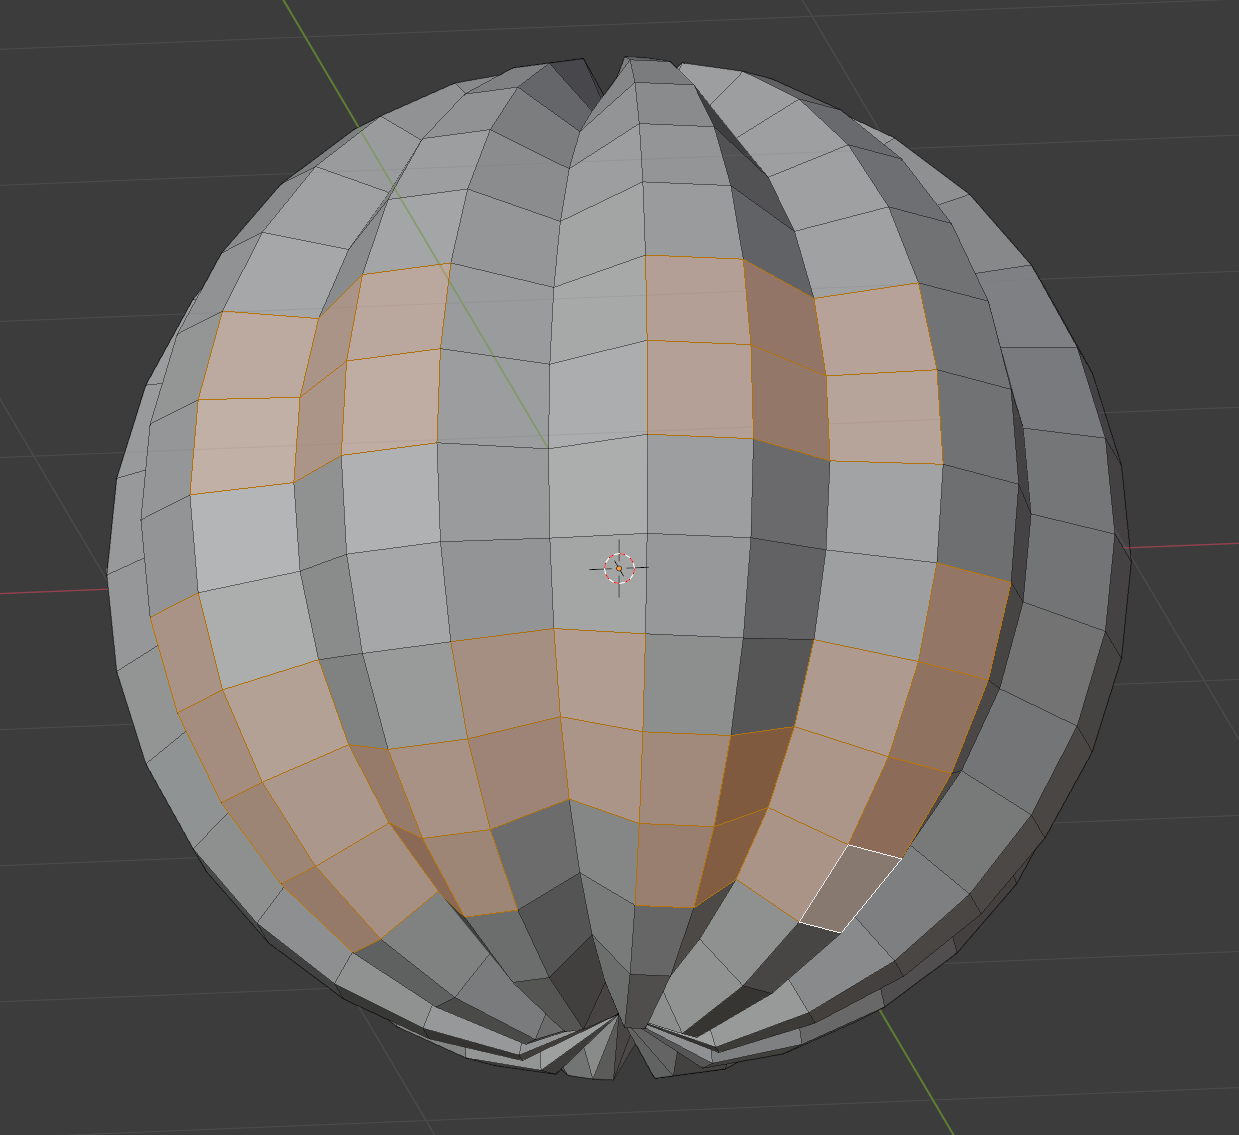
Now, hold the Alt key and click on a vertical edge loop of the sphere.
Skip two vertical edge loops and Shift + Alt + click to add the vertical edge loop that follows to the selection. Continue this selection pattern until you’ve returned to the first selected edge loop.

Now press Alt + S to activate Shrink / Fatten mode, and move your mouse or pen slightly down to shrink the selected edge loops into pumpkin notches. Optionally, hold down Shift to slow down the shrinking while you move the mouse/pen. Alternatively, you can enter a numeric value of -0.1 in the options dialog.

Now switch to Vertex Select mode in the top left viewport corner, and select the vertex at the very top, then hold Shift and also select the vertex at the very bottom of the pumpkin-to-be.

Activate Proportional Editing by pressing the button with the concentric circles at the top of the viewport. Then press the ‘S’ key to activate Scale mode, press ‘Z’ to constrain scaling to the Z-axis, type in 0.75 and press Enter to confirm.

Press the Proportional Editing button again to deactivate the mode, and press the third button at the top left of the viewport to enter Face Select mode.
02: Making the pumpkin face cut-outs
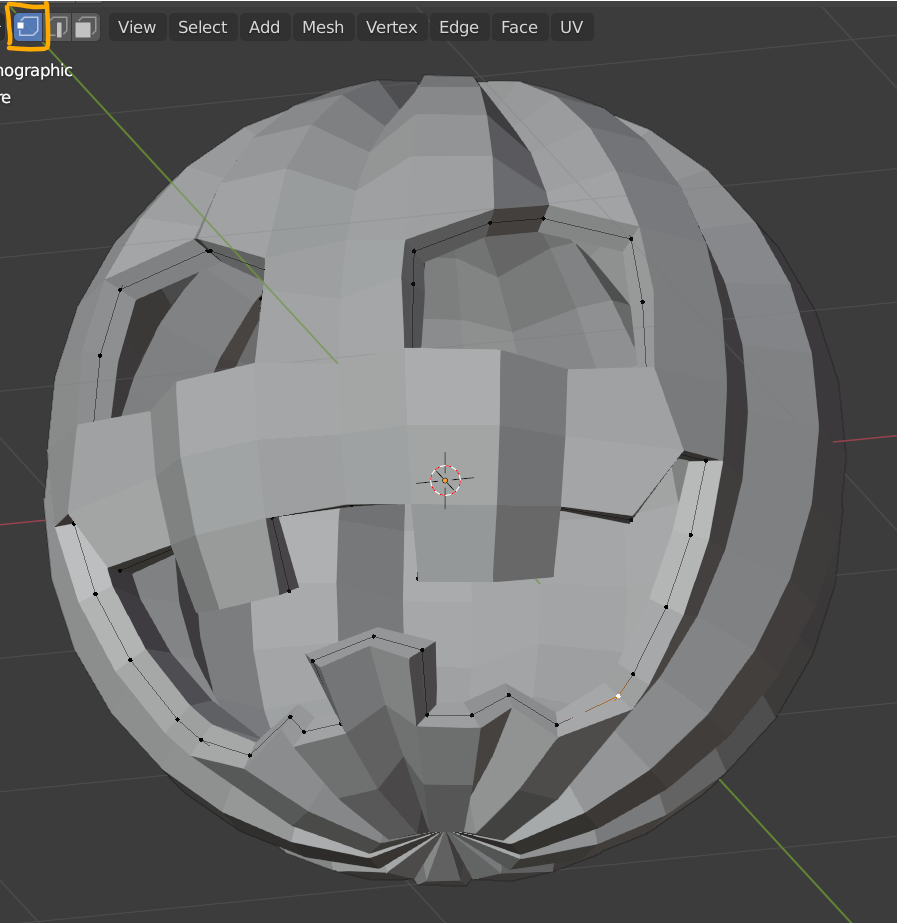
With Face Select mode activated, start selecting appropriate faces that will be deleted to make the Jack-O-Lantern face cut-outs. The rectangular polygons are perfect for leaving a few teeth outside the selection.
Press ‘X’ and select Faces from the menu that appears, to delete the selected faces.
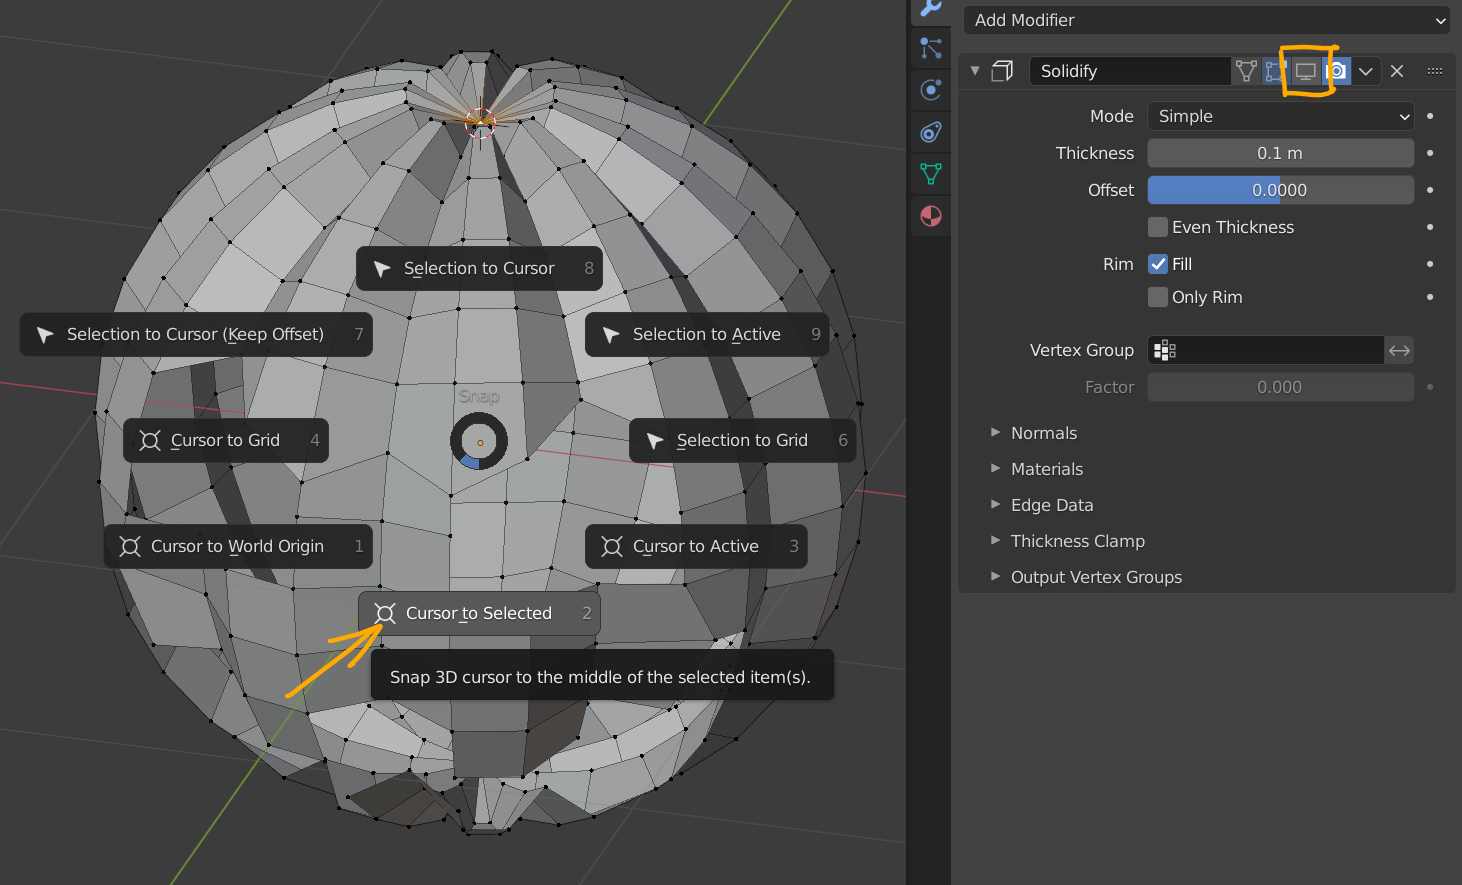
Now add thickness to the pumpkin skin by adding a Solidify modifier in the Modifier tab of the Properties column at the right side of the Blender interface. Set the Thickness value to 0.1, and the Offset to 0.

If you’d like to refine the blocky shapes, such as the eyes and the mouth corners, you can activate Vertex Select mode, then select a vertex, press G twice to constrain vertex movement to a connected edge and start moving the vertex along a connected edge. When you’re done moving a vertex, left-click to exit move mode, select a different vertex, press G twice again and continue the tweaking process. The double-G workflow ensures you will not deform the pumpkin ridges while tweaking the cut-outs.
03: Creating the stem
To start creating the stem, switch off the Solidify modifier’s viewport display button (see screenshot), then select the pumpkin’s top center vertex (in the cavity), press Shift + S, and from the appearing pie menu choose Cursor To Selected. This repositions the 3D cursor at the right location for the creation of the stem.
Press Tab to go from Edit Mode to Object Mode. Reactivate the Solidify modifier to show the pumpkin’s thickness again. Then press Shift + A and choose a Cylinder.

Change the Cylinder settings to:
• Vertices: 12
• Radius: 0.1
• Depth: 1

Press Tab to go into Edit Mode again. Activate Edge Select mode, then press Control + R while hovering your pointer over the cylinder. Click once, and move the resulting edge loop a bit higher.

Now activate Face Select mode, hold Alt, and click on a vertical edge between the two created edge loops. This selects the ring of faces between the edges.
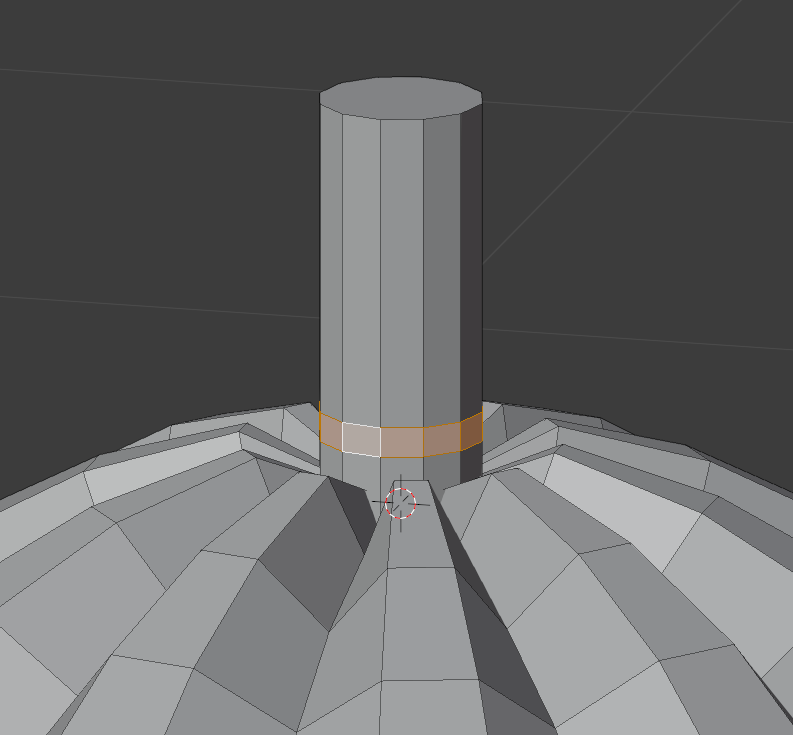
Next, press Alt + E and select Extrude Faces Along Normals in the appearing menu. Move your mouse/pen to extrude the face ring into the base of the stem. Then press G and Z to move the result a bit lower in the Z-axis.

Go back to Edge Select mode, add some more edge loops in the stem, select a loop by Alt + clicking on it, and use ‘S’ (Scale), ‘G’ (Grab) and ‘R’ (Rotate) to manipulate the loops, giving more shape to the stem. Don’t forget to move up the protruding lower half of the stem’s cylinder shape, or that will be visible through the eyes from certain angles.
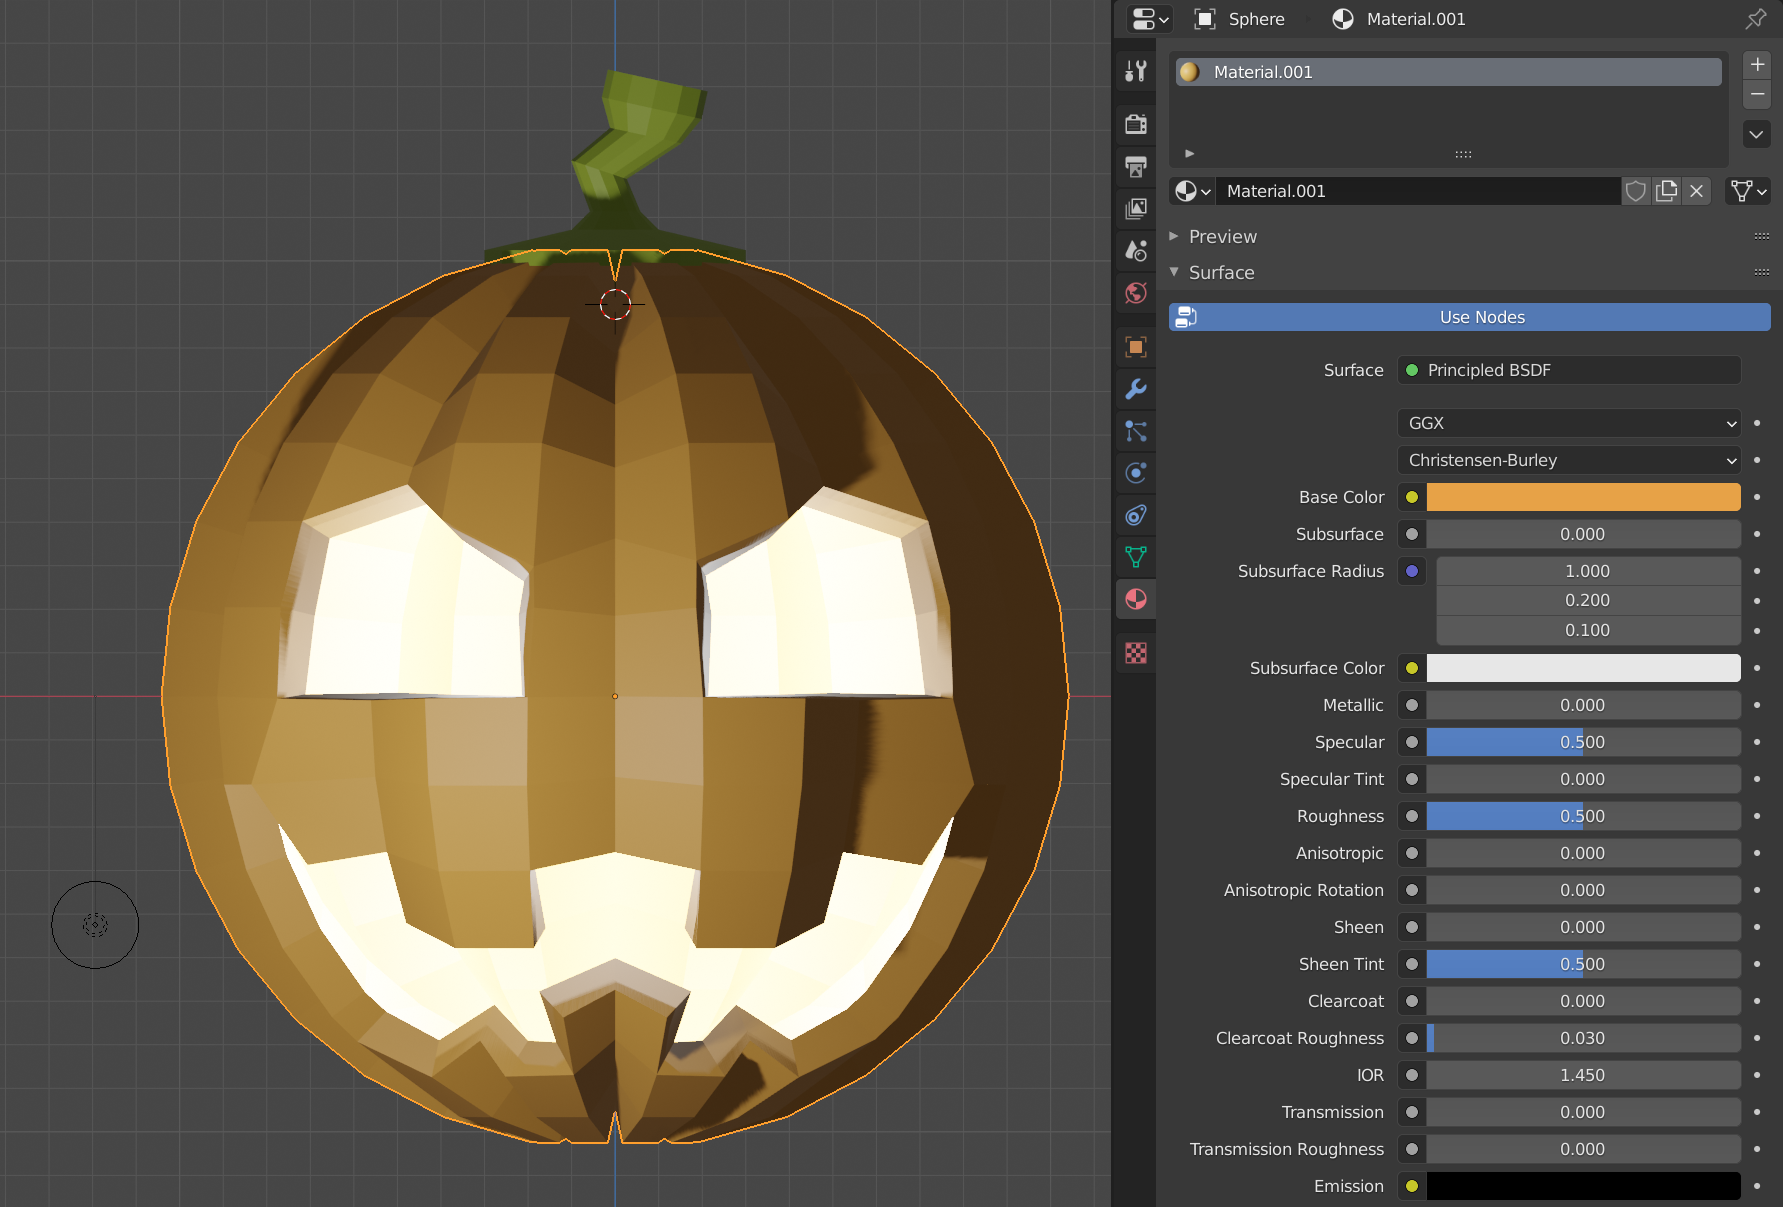
04: Adding light and color
Switchback from Edit Mode to Object Mode. Now hold down the Z key and switch to Rendered mode. Select the scene’s default light and move it to the center of the pumpkin, duplicate the light and place that light near the front of the pumpkin.
Adjust the strength of the lights to your satisfaction.
Your low-polygon style pumpkin should now look something like this:

Select the stem, click on the Material Properties tab at the right side of the Blender interface, and click on the ‘New’ button. Next, change the material’s Base Color to a greenish pumpkin stem color.
Select the pumpkin, and give that a pumpkin orange material.
If you want to render the pumpkin without the viewport grid, press F12. You will probably need to adjust the camera position and rotation to establish a viewpoint to your liking.
Some tips for a nice final rendering
💡 If you change the Solidify modifier’s Material Offset and Rim values to something else than 0, you can assign a multi-material to the pumpkin’s rim and inner/outer side.
💡 Add a floor plane for a nice cast light/shadow pattern from the pumpkin on the floor. Have a look at this tutorial’s header image for inspiration.
Happy Halloween and Happy Blending! 🎃🐵
Metin Seven
Feels good to get back into it - this was a perfect serving.
This was a lot of fun and fast to do.