Visual Scripting in Bolt - Quick Start Guide
May 9th 2019
Visual Scripting is popular among artists and programmers alike. The choice between traditional programming and visual scripting often comes down to personal preference, as well as how complex you intend your game projects to be.
While Unity is currently working on a native visual scripting system similar to their Shader Graph and VFX Graph systems, we can still use visual scripting within Unity and we have quite a few packages to choose from. I've used Playmaker and a few others but eventually, I've made Bolt my go-to. This quick start guide will focus on Bolt, though a lot of the terminology and rules are similar in other packages.
Why Visual Scripting?
Visual scripting gets a bad rep from programmers for "not being as customizable" as traditional programming in the sense that you're limited to what is available to use right out of the box. And truth be told, those who learned to programme "the right way" let their ego get into the debate and insist that there is no other way.
But let's be real: traditional programming is difficult to learn and not everybody is ready to put in the effort and time.

The good news is: you don't need to know programming to build a game, you just need to understand the game logic.
Regardless of what path you choose, you'll still need to understand the underlying mechanics.
The best part is that visual scripting makes this process much easier as you can see connections between nodes. These can help you visualize what happens when a player animation starts, or when an enemy character has detected something odd running around in the distance.
When writing out code, over time, you will see these connections in your head, but for beginners, this may take some time. Visual scripting creates connections are created for you.
As a bonus, you don't have to worry about proper syntax and typos, you just need to know which nodes to use and how to connect them to others.
Visual Scripting in Bolt 101
Let's take a look at some common concepts of visual scripting, terminology and a general overview using Bolt. Other visual scripting systems may share similar features, but this is specific to using Bolt.
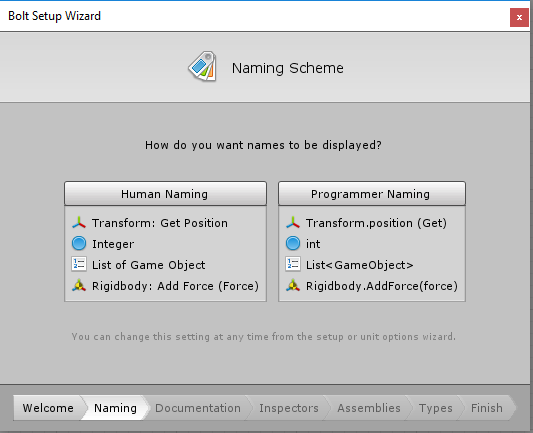
When you first install Bolt it is recommended to stick with Human Naming. If you're a programmer and you're used to writing things out, you can go with the Programmer Naming. For beginners, Human Naming will make it much easier to understand and to find nodes (units).
Instead of adding a script to an object we start off by adding a Flow Machine. This is a component, so you'll need to look for it with the Add Component button. Flow Machines take in a Macro, which is essentially what will control everything. Think of the Macro as the script that requires a Flow Machine to work properly.
For the sake of keeping things simple, utilize a traditional Macro and not the Embed type. You can reuse this Macro for other objects as well which is incredibly useful if you create generic mechanics that can be used with multiple objects.
When you create the Flow Machine you'll also see a Variables component that gets added. These are for Object Variables. These variables will be shared across the entire object, which means if you have multiple Macros attached to this object, they can all utilize the same object variables.
This also works similar to public variables in traditional programming. You would typically use these if you want to assign something to them from the inspector.
After you create the flow graph and macro you can click to edit the graph. Jumping into full screen will give you more options to see all the various variable types you can use. We'll just focus on three of them in this article: Graph, Object and Scene variables.

Graph variables are essentially private and can only be accessed by this graph. These would include any variables that you would not modify manually but instead use the graph to change the value. An example of this would be "hard coding" a time value or setting the default max health of a character.
Object variables as we've discussed can be accessed through any macro on the object and can also be assigned to in the inspector. These would be things like accessing the animator attached to another object or adding variables to assign specific audio clips from your project panel. Note that in order to see these in the full-screen mode you need to have the object selected in the Hierarchy. If you don't, these will be grayed out.
Scene variables are essentially global variables that any object in that specific scene can access. You would use this for things like a game manager or event system that can all reference a single scene variable. Think of the in game time that everything must listen to, I could reference the scene variable for the time in game.
Game Logic 101
When you first open a graph you'll see two nodes (aka Units in Bolt), the Start and Update Unit. These are typically known as methods in C# programming for Unity. It's important to note how these operate as these are "built-in" Units that Unity calls automatically at different times.

Start gets called once the game starts and only gets called once. You would use this to set starting values for health, get a reference to a specific position or rotation upon starting the game or reference other objects that were created in game at run time.
Update gets called multiple times per second. This can be abused and used in an ineffective manner, so you must be wary of using this often. Typically you would use this to check for a change in input such as a player pressing a key or button. You could also use this for updating a value in game over time like a health bar depleting or even a game timer, although there are better ways of doing so.
Let's start with a simple of example of how these would work together to display a message to the console. The console is your best friend for determining if you made a mistake in your game logic, whether that be a typo or in the case of visual scripting, you forgot to connect value to a node. This will also notify you if you connected nodes improperly.
We can use this to display a message which is something I'd often use in traditional programming to quickly test if something is working as intended.
We'll do this from the Start unit, right click next to start in the open graph area and you'll get the option to Add Unit, from there you'll get a menu displaying all sorts of units we can use. Type in Debug Log. This will create a new Unit that allows us to connect this to Start.
The green arrows should be connected together. By connecting the green arrow of Start to the green arrow of the Debug Unit, we are saying that Start should then perform the action of what the Debug unit should do. In this case, it just displays a message in the console. Since this is the Start unit, it will display a message once and then no longer do anything afterward.
Currently, we don't have a way to modify the message of the Debug unit, but below that, we can provide a String value. A string is essentially a collection of letters which help us form words and sentences in a programming sense. We can create a unit for the message by left-clicking next to the orange dot (string type) and releasing in the graph area.
You'll see the same menu appear for units to select, but now it's specific to the type of input the Debug unit can use for that specific part of the unit. Locate String and hit enter. Now, this unit is connected. From here you'll need to type in a sentence into the empty box. I'll say "Hello World". not very creative but it'll work.
Once you've typed that out, hit play in Unity and you'll see a message appear in the bottom left of the Unity editor. It'll be displayed in white and if you click on the message you'll open up the console to see that this message has only appeared once. Since this was attached to the Start event only one message will be displayed when we hit play. If we attach that to the Update event this will update multiple times per second resulting in hundreds of repeat messages appearing in the console.
Detecting Objects
In order to detect objects, we need a couple of things, a rigidbody and a collider. If two objects hit each other this is known as a collision and we can detect collisions by using an OnCollisionEnter unit. Both of these objects must have a collider component of some kind in order to detect each other and at least one of these must have a rigidbody.
We'll demonstrate this by using a ball bouncing onto the floor. The sphere game object has a rigidbody, collider and a bouncy physic material to make it easy to bounce. Upon hitting the ground I also want to play a cartoon smoke ring to mimic dust from the impact.
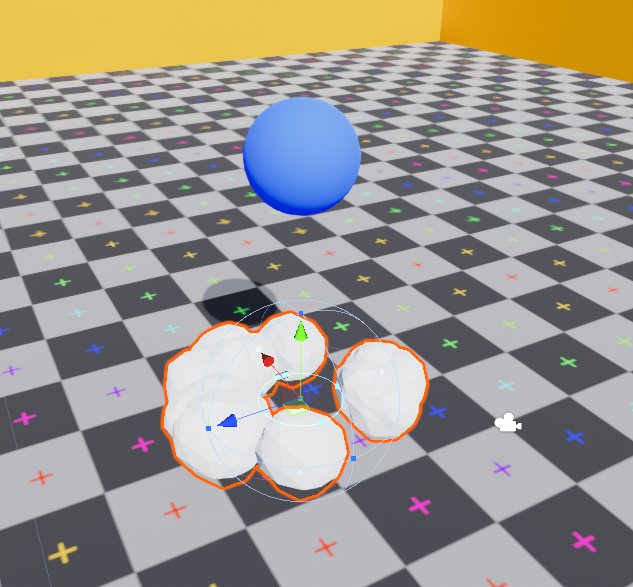
We need the ball to detect the collision with the ground and the smoke ring will be a particle system that will just reside on the ground at the exact point where the ball would hit the ground. Ideally, you'd have the smoke ring move with the sphere and play at the point of impact, but to keep things simple we're keeping it where it's at.
Since the particle effect is not attached directly to the sphere we'll need a variable specifically to play the smoke particle system. In order to play a particle system, we'll use a Particle System Play unit, which will be attached to the OnCollisionEnter.
Since OnCollisionEnter gets called automatically on impact with an object, we will then have the output of that unit play the smoke ring particle system. Here is the end result:
That works great for general collisions but what happens if I wanted to detect a specific object? Let's say we have a spike ball hovering above a sheep character and that spike ball happens to land on him.
Should the spike ball bounce? or should the sheep turn into a smoke puff and disappear from view? I think the latter makes more sense, unless the sheep character suddenly grew Kevlar.
In order to detect a specific object on collision, we first check a collision, then start to narrow things down.
Think of it as a funnel. First we check if we hit something, then check to see if what we hit also has a tag we specify. Since we're using a Sheep character the tag will also be named Sheep and that will be applied in the inspector panel of the Sheep character.

Also note that this character also has a collider which we'll need in order to detect the sheep. With both of these added on, we now have the ability to specifically detect this object based off a tag called Sheep. Once we detect this object then we want to do a couple of things.
This may be a bit more complex but lets walk through each of these steps. First we need a way to detect the sheep character based off a tag, for that we'll use a Compare Tag unit. Making sure that we update the tag we are looking for by typing in the string value Sheep, this is case sensitive.
We connect this directly after the OnCollisionEnter unit. Since we're checking for a tag, we need to use a Branch unit, which acts as a if statement which will be directly connected to both outputs of the Compare Tag unit. The second output of this unit is a pink circle, which denotes a bool type value either being true or false.

If we detected the tag specified then we want to Instantiate a particle effect at the point of impact using the position and rotation of the sheep character. This will allow me to create a smoke puff effect at the exact position and rotation of the sheep, then afterward we will destroy the sheep character game object. To do all of these we'll need quite a few more units.
We need the Instantiate unit, and with that we need a Get Position and Get Rotation unit to determine where this particle system will be created along with the actual smoke puff we'll be creating based off a prefab which will be a GameObject variable.
We get the position and rotation from the collider output of the OnCollisionEnter since we're basing it off the position and rotation of the sheep.
After we instantiate this object, we then add in a GameObject Destroy unit. Since we're destroying the sheep, we need to ensure that we also get the game object from the OnCollisionEnter by using a Get GameObject unit from the collider output. Here is the end result of all those connections.

Take a look below to see how all of these work together. Take a look at the values changing in the connections in real time.
Note that we only instantiate and destroy this object if the Branch output of True is used. If the output is false, we do nothing. You'll see how this works when we destroy the sheep then subsequently hit the plane (floor) object. It does not destroy this object as it does not have a tag of Sheep.
We only covered using OnCollisionEnter here, but the same concepts can be applied to Trigger zones as well. For that you would use OnTriggerEnter for the unit, and perform similar checks. This requires the use of a collider with Is Trigger enabled on the collider component to work. Give it a shot!
Playing Animations
There are a few different ways of playing animations through visual scripting. Animations in general tend to be fairly simple to play through traditional written scripts or visual scripting. Shown below are two common examples of playing animations.
At the top you'll see a On Button Input unit which directly connects into a Animator Set Trigger unit. The first unit is an event based unit which means that upon pressing the specified Input, in this case Jump, and more specifically I'm looking for a press Down on the button.
We use a Set Trigger unit since the parameter to play an animation is a Trigger type. A trigger is essentially a bool that can reset itself. A jumping animation is a great example of when you'd want to use this.
Note that the Animator symbol says Self next to the Animator symbol in the unit. The Animator is directly attached to the game object that has this flow machine so we can tell the Animator unit that the Animator component is located on self, otherwise we need to specify where this Animator component is located and attach it to this unit.
The second node setup is somewhat similar, but is more commonly used when you'd move a player around using a Vertical or Horizontal axis input. We're using this axis input because this will allow us to get a float value from it. When I press the Up arrow or the W key on my keyboard this value increases from a default of 0 to a value of 1.
Whenever this value is set to above 0.1, the running animation will play. When it goes below this value we return back to an idle state. When I am not actively pressing a button, the axis value returns to 0.
By connecting the Vertical Input Get Axis value to the Animator Set Float it will update in real time, so you can see it go from 0 to 1 and vice versa. With these two simple unit connections we can play animations based off a simple button press, or move a character based off a button input being held down or released.
Here is a close up look at the connections between the units:

Top section will allow the player to jump when pressing the Jump input, and the bottom section updates the value of Running (which is an Animator parameter) to the current value of the Vertical axis input. This allows us to dynamically change this value whenever we press the up arrow or the W key.
UI Images and Text
UI is a common thing within games and knowing how to properly update UI elements is important. The two main things you'd update with the UI are images and text.
Images will come in the form of a dynamic fill for things like a health bar or experience level meter. Text is usually a compliment to those images but can also display relevant information such as time in game or points accumulated so far.
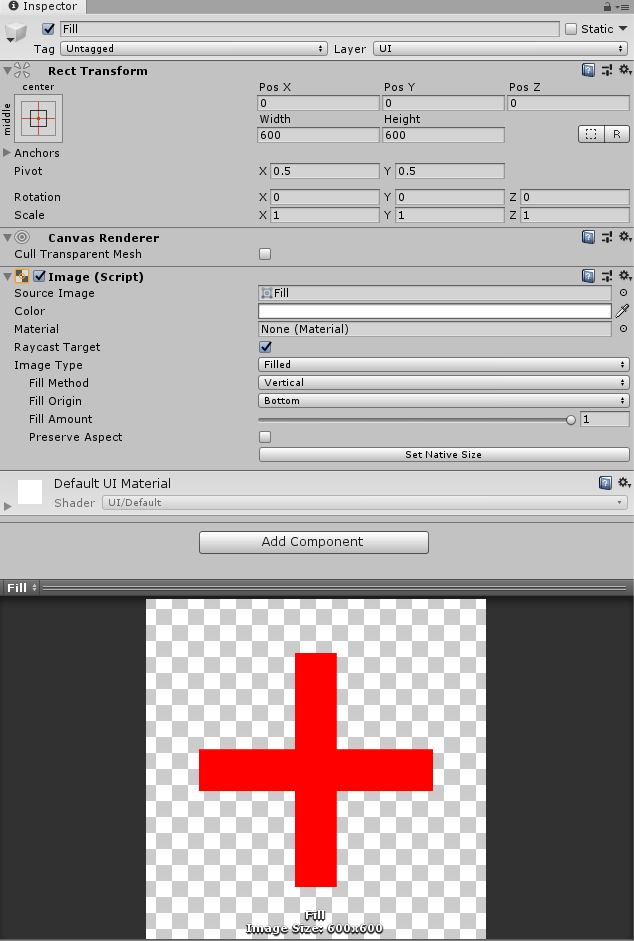
Lets take a look at an example of a health bar shown in the Game Programming Bootcamp Exercise. This utilizes a white border with a dynamic red fill.
For the example we'll have the health bar deplete over time smoothly until it reaches zero. In the original exercise we used a Coroutine which allows us to wait a specific amount of time and loop through using a while loop. This can be done using an Update unit as well, but for this we'll use the Start unit and set it to be used as a Coroutine by clicking the checkbox in full screen mode as such.

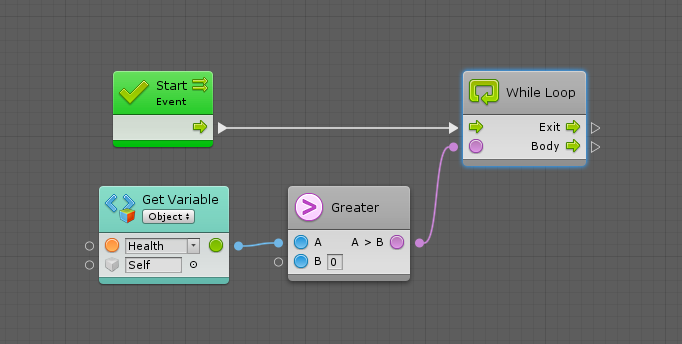
You'll see two straight green arrows appear on this unit once you enable this. If you forget to enable this as a coroutine you will see an error appear when you play the game. We will use the Start unit to automatically go into a While Loop unit. This While loop requires a condition in order to work.
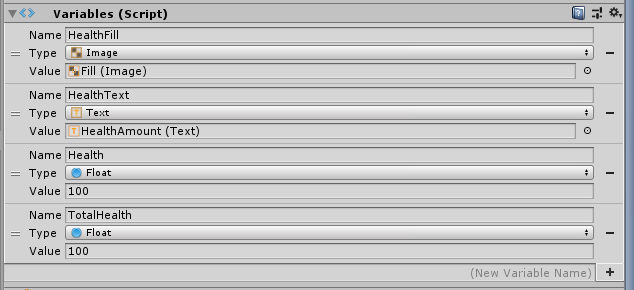
We can say "while the health is above 0 we can perform an action". So we need a health variable, and we'll utilize it as a float. While we're adding variables, lets add in a few more that we'll need. We need the red fill image as an Image type called HealthFill, the text to display the actual health called HealthText and two floats, one for the current health called Health and one for the total amount of health called Total Health.
These will be added as object variables which should reside right above your flow machine component.
We use two float values as we'll be using this with the fill amount of the image which has a range between 0 and 1. By using Health divided by TotalHealth we can then turn our health value into a fraction allow us to utilize that directly with the fill amount. An example of this would be if Health (50) over Total Health (100) resulting in 50/100, giving us a value of 0.5 which is the halfway point for the fill amount of the image, representing half our health depleted.
That said, lets take a look at how we would use all these variables to create a health "bar" that depletes over time. First lets check to see if the Health value is greater than 0 with a Greater (than) unit, which means we can start deducting health using the While loop.
If we are in the while loop we deduct our health over time, using the Get Time Delta Time unit. This unit will count up based off the in game time and since it's a float value as well we can use this to deduct from our Health value and get incremental changes. We will subtract the time from the Health variable using a Subtract unit. Since we are going to use this Health value later, we also need to ensure we set the new value for the same Health variable. Take the output of the Subtract unit and connect it back to the Set Health unit.

We need to also update the Health fill image to display the changes in the health value in a visual format, otherwise all of this will happen in the background without us noticing. So lets plug in the value of Health divided by the TotalHealth and assign that to the fill amount value of the image.
Use the Set Fill Amount unit which will take in a float input and an image input. The image input will connect to the HealthFill variable while the float will be based off the output of a Divide unit that is connected to Health (top input) over TotalHealth (bottom input).

Currently if we played this, the value of Health would drop down to zero almost instantly resulting in the fill amount looking like it pops away and that's because we're not telling the While loop to wait between each subsequent loop. We only need to wait for the end of the frame in order to loop back through, so lets add that in last.
It's because of this Wait For End of Frame unit, that we need to utilize a Coroutine with the Start unit. This will wait a very brief moment, then loop through again, assuming that Health is still above 0.

Here is what this looks like when you add that in. You'll notice the value of health going down slowly when we subtract the time from it.
Lastly lets implement the text that says 100 so that it's always updated. Since the Health value is a float, we cannot directly use it with the text. Instead we need to convert it to a string then we can use it directly.
There are a few caveats we need to be aware of though, since we're changing the value of Health incrementally using a float value, we just want to display the health as a whole number, or an Integer.
So first lets use a Get Health unit, this will be a float value so we'll need to convert it to a string. Since we only want to utilize the float as a whole number, we essentially need to discard everything past the decimal point. That said we'll use the Float to String unit that has the Format option available.
The format "code" well use is F0 which means we won't utilize anything other than a whole number.
F1 for example would be one number after the decimal, F2 two numbers and so on. F0 will allow us to use the float as an integer which is useful for our health. We can connect these before the End of Frame unit and after the Set Fill Amount unit.

We also need to ensure that this new string value gets passed on to the text element, and for that we'll use the Set Text unit of which we'll assign the HealthText variable as the text element to use. The connection below it will be connected to the output of the Float to String unit. Play once again and you should have both the image fill and the text elements updating in real time.
When the health reaches 0, the while loop condition is no longer true and will stop looping.
Note that the health is essentially reduced by 1 every second because we're subtracting it from the in game time. If you multiplied the output of the Time Delta Time unit by say 2 you would deplete the health bar twice as fast. So there you have it, a health bar that can deplete over time dynamically using an image and text.
Conclusion
These are just simple examples to get you started with visual scripting. There's quite a bit more to learn, but now you have some references to use for a big part of any game which is UI, Animations and Detecting Objects. Interested in learning more about visual scripting with Bolt? Let us know!
En https://tonybet.com/cl encontré el lugar perfecto para disfrutar del deporte y la diversión. La calidad es impresionante, la comunidad es muy activa y siempre hay algo interesante pasando. Se nota el profesionalismo en cada detalle. Si te gusta vivir la pasión deportiva al máximo, esta es tu plataforma. Regístrate y descubre todo lo que tienen preparado para ti. ¡Excelente experiencia garantizada!
cool!
Health-based logic using a current and total value works well for controlling state-driven actions like blocking input when Health <= 0.
Separating Health, TotalHealth, and UI elements like HealthFill and HealthText keeps the system flexible for animations and scaling.
Additional context on UV light applications in health-related treatments can be found at https://uvtreat.com/treat-toenail-fungus-with-uv-light/ which shows how light-based systems are used in practical recovery scenarios.
Hi there, the link to the Bolt app isn't actually linking to it anymore. Does the tool still exist?
This really work, I'm going to have a look at Bolt. Thanks for sharing !
rr2nielpha You can follow along with it if you have Bolt in Unity. It's meant more as a quick overview to get started with visual scripting and to also gauge whether or not this is a topic worth pursuing more in depth.
Hi! One question.
Is this guide just a "readme" thing or is it expected to be followed actually doing it in Unity?
I ask this because of the assets used in this guide. I mean, I not sure if I'm expected to reproduce them or what.
Thanks
kkrislee Bolt is well established at this point and typically Unity tends to purchase assets like that an include them as their own, and/or heavily reference a system like Bolt for their own. Shader Graph is currently out which is a built in system by Unity, but other shader editors like Amplify are still vastly superior due to the amount of features and training available for them. That said, the Unity visual scripting system is still a bit of a ways out from what I've seen. If you're looking to jump into visual scripting now this is what we can use and I'd say most of what you'd learn with any of these systems will transfer over to a built in tool.
What happens to Bolt once Unity's built-in visual scripting is released? Why learn Bolt when Unity will ship its own system for this in a version or two from now? After all, you have to buy Bolt. You don't have to buy Unity's own VS system.
Wow! I'm so glad you posted this. You have no idea how much effort this will save me on my project. Thank you!!!