Texturing and Rendering a Cute Robin Hood 3D Character in Blender 2.81
Jan 6th 2020
This is Part II of the Robin Hood Blender tutorial series. To learn how to model the 3D character, check out part 1!
Skill level: This is a beginner-to-intermediate tutorial. (If you're just getting started, check out Your First Week in Blender Playlist to learn Blender fast.)
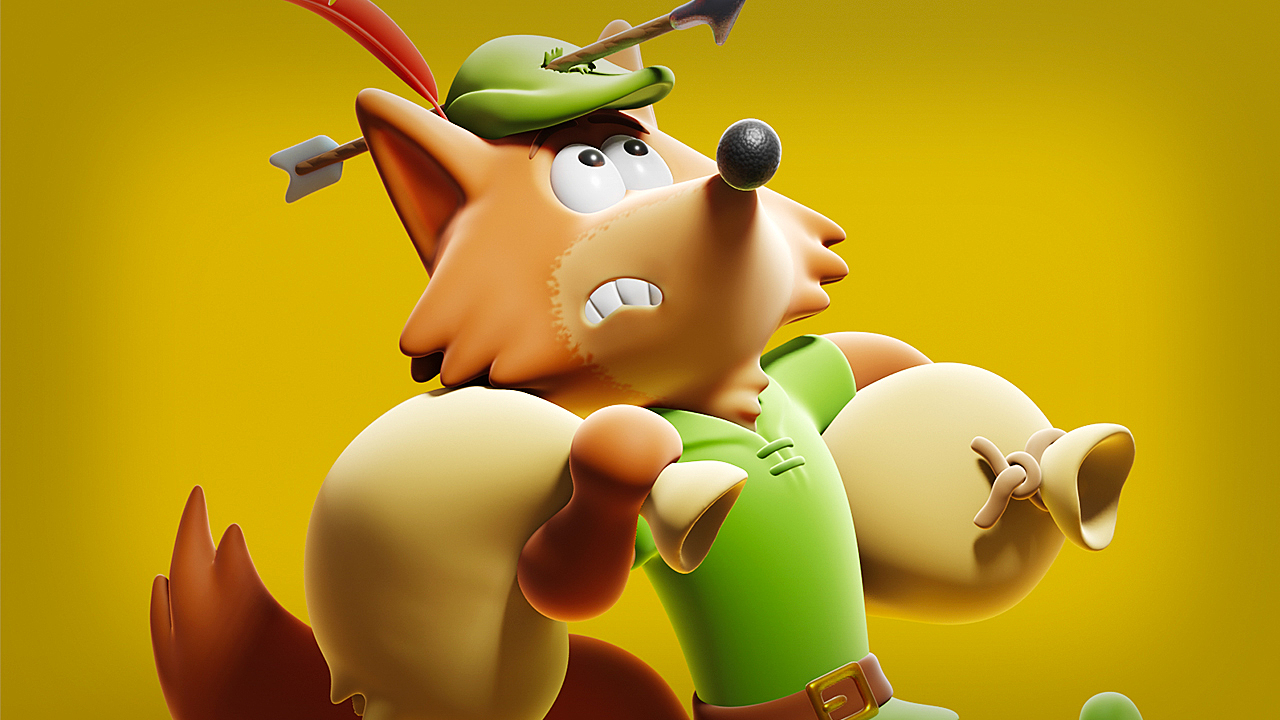
The Japanese art director Riki Fuhrmann reimagined Disney’s classic Robin Hood fox character in a cute, contemporary style. I decided to translate this concept to a 3D model using Blender 2.81.

Riki Fuhrmann’s ‘kawaii’ version of Disney’s famous Robin Hood fox character
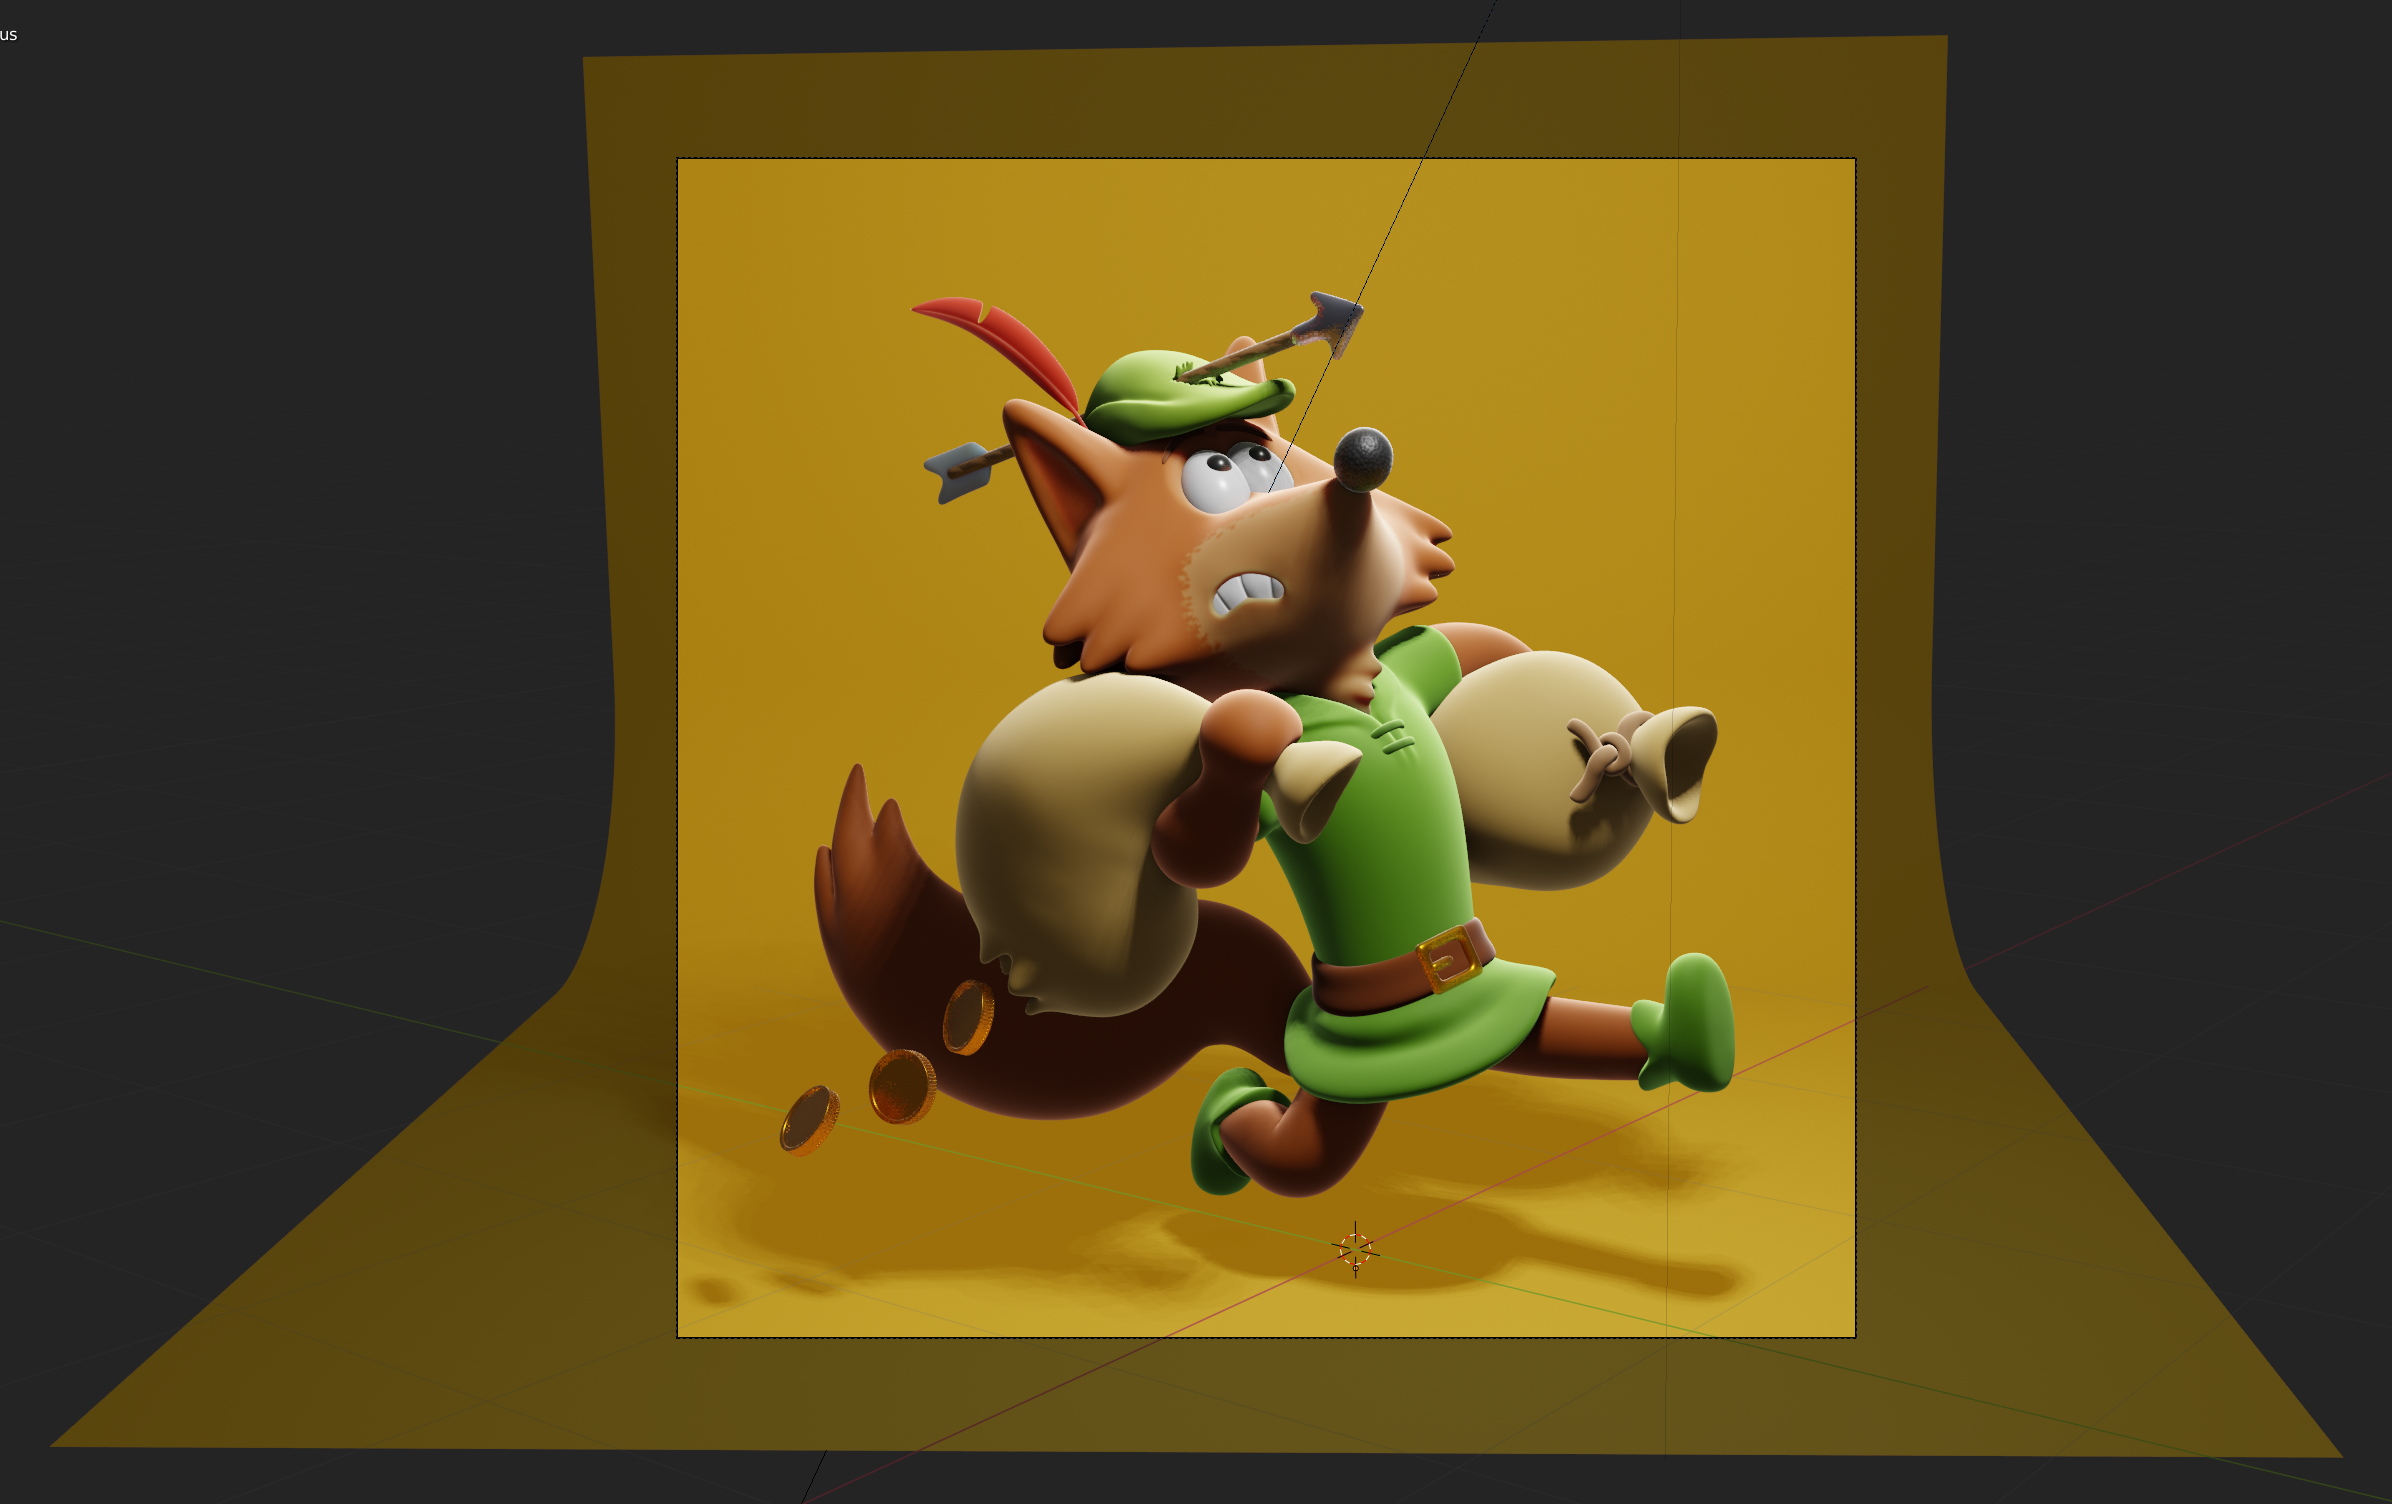
So far we’ve got the finished model of the kawaii incarnation of Disney’s Robin Hood fox character. The first part of this 2-part Blender tutorial covers the modeling procedure. Please follow that part first if you haven’t already done that.

The finished fox character model
1. Painting the Parts of our Model
It’s time to add some color to our pale little fox!
Generally, I try to keep parts that should get individual colors/materials as separate objects, if possible. This is useful for easy material assignment, UV mapping and tweaking.
When it comes to painting a model, I prefer vertex painting whenever possible. It’s more straightforward than having to UV map your model first, and you are not bothered by stretched UV coordinates, visible UV seams and texture image files.
But as vertex painting is topology-based you need sufficient polygon detail in your model, unless you’re only adding pure colors on separate parts and/or clearly defined areas.
Select a part you’d like to color first, then enter Vertex Paint mode by pressing Control + Tab and selecting the Vertex Paint menu item.
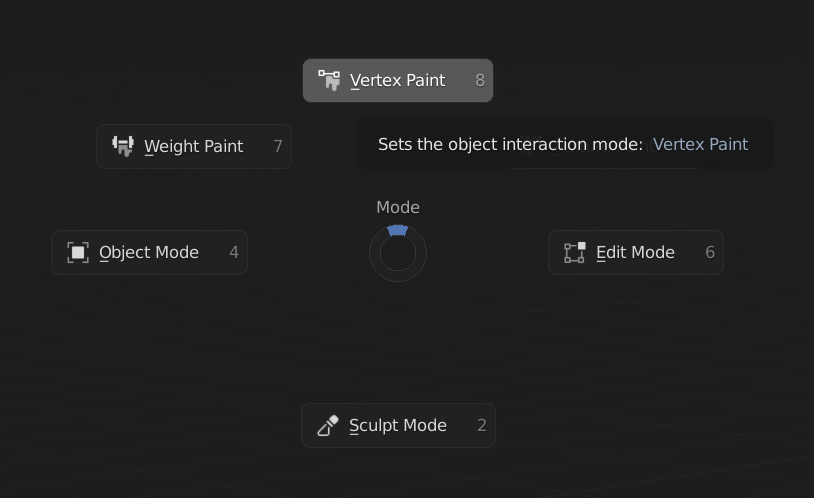
Activating Vertex Paint mode by pressing Control + Tab
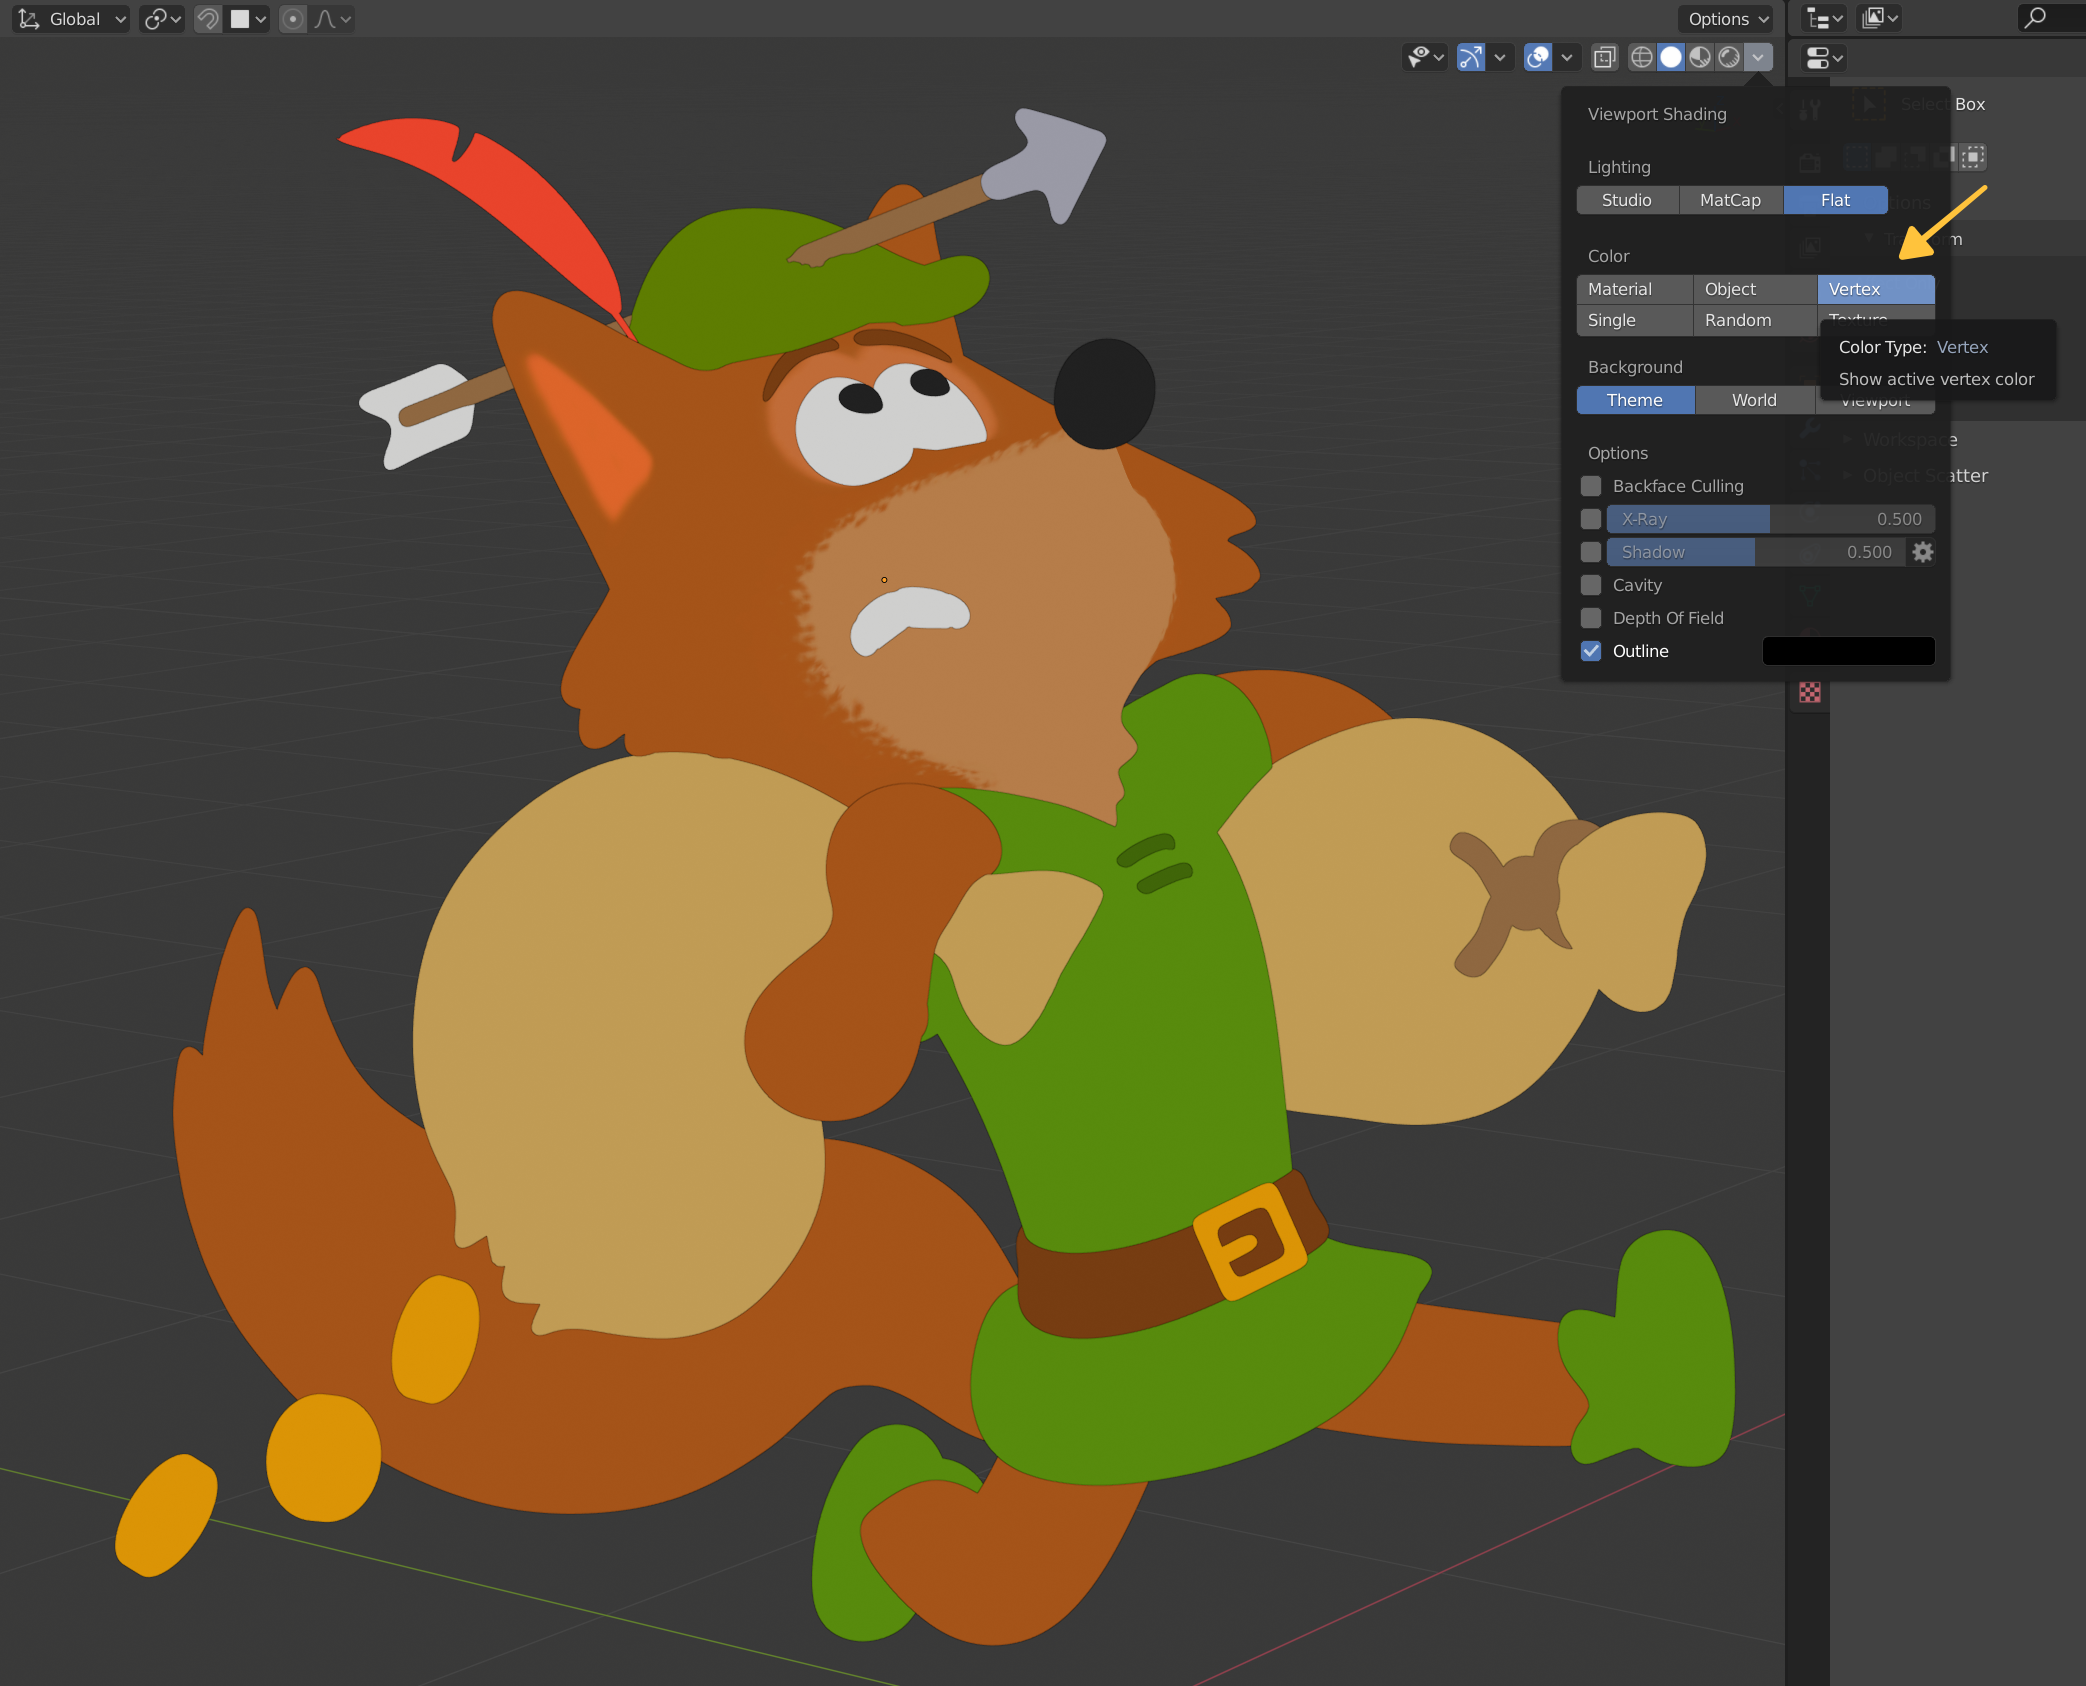
After activating Vertex Paint mode, I usually switch the Viewport Shading to Flat, in order to have a clear, plain view of the colors, but also to easily pick colors from the viewport without shading getting in the way.
Pick a color for the currently selected object, and press Shift + K to fill the object with the color.

Setting the viewport shading to flat for color clarity
Repeat this procedure for the other parts:
- Switch to Object Mode (Control + Tab).
- Select a new object.
- Return to Vertex Paint mode.
- Pick a new color.
- Fill with Shift + K.
2. Painting the Face of our Model
The original artwork is executed in a slightly impressionistic style, in which Robin Hood’s face shows a rough color transition that suggests fur tufts.
You could go for a particle fur approach, but there are two downsides to that:
- First of all, getting the particle fur’s properties just right can be a time-consuming process (amount of hair strands, different flow directions, thickness, materials, etcetera).
- Then there’s the risk of losing the model’s dynamic, cartoony shapes because the fluffy fur layer can make shapes bloated.
So we will try to imitate the furry roughness of the concept artwork’s color transition on the model’s face.
- Select the head object and enter Vertex Paint mode (Control + Tab).
- Pick the head’s main brown fur color and press Shift + K to fill the head.
- Now set the active color to the lighter brown / beige color of the snout area.
- Paint the snout area with the Draw tool from the left side toolbar.
- In the Active Tool settings tab, open the Stroke rollout, select the Dots stroke type, and increase the Jitter value.
- Set the brush Radius value to a small size and start spraying paint dots across the snout color border.
- Alternate between the snout area’s beige color and the head’s brown fur color, to establish more variation in the paint dot shapes.
- Experiment with the brush settings for different effects, until the result is satisfactory.
Now switch back to a smooth paint brush, and add a pinkish-red color to the inner area of the ears, and a light brown color around the eyes. Voilá, your fox head is done.

Activating Dots and Jitter Stroke settings to prepare for spraying dots
Once you return to Object Mode, the vertex colors become invisible. Simply activate Viewport Shading ➔ Colors ➔ Vertex to view all vertex colors.
Activating Vertex viewport shading mode to see all vertex colors in Object Mode
3. Creating Materials for Robin Hood
In Object Mode, select the shirt of the Fox, and press Shift + H to hide all other model parts.
Press the Z key and choose Material Preview to see shading on your vertex-painted shirt. Then split the viewport into two sections on top of each other by moving your pointer to a corner of the main view and dragging up or down when the cursor changes to a cross shape.
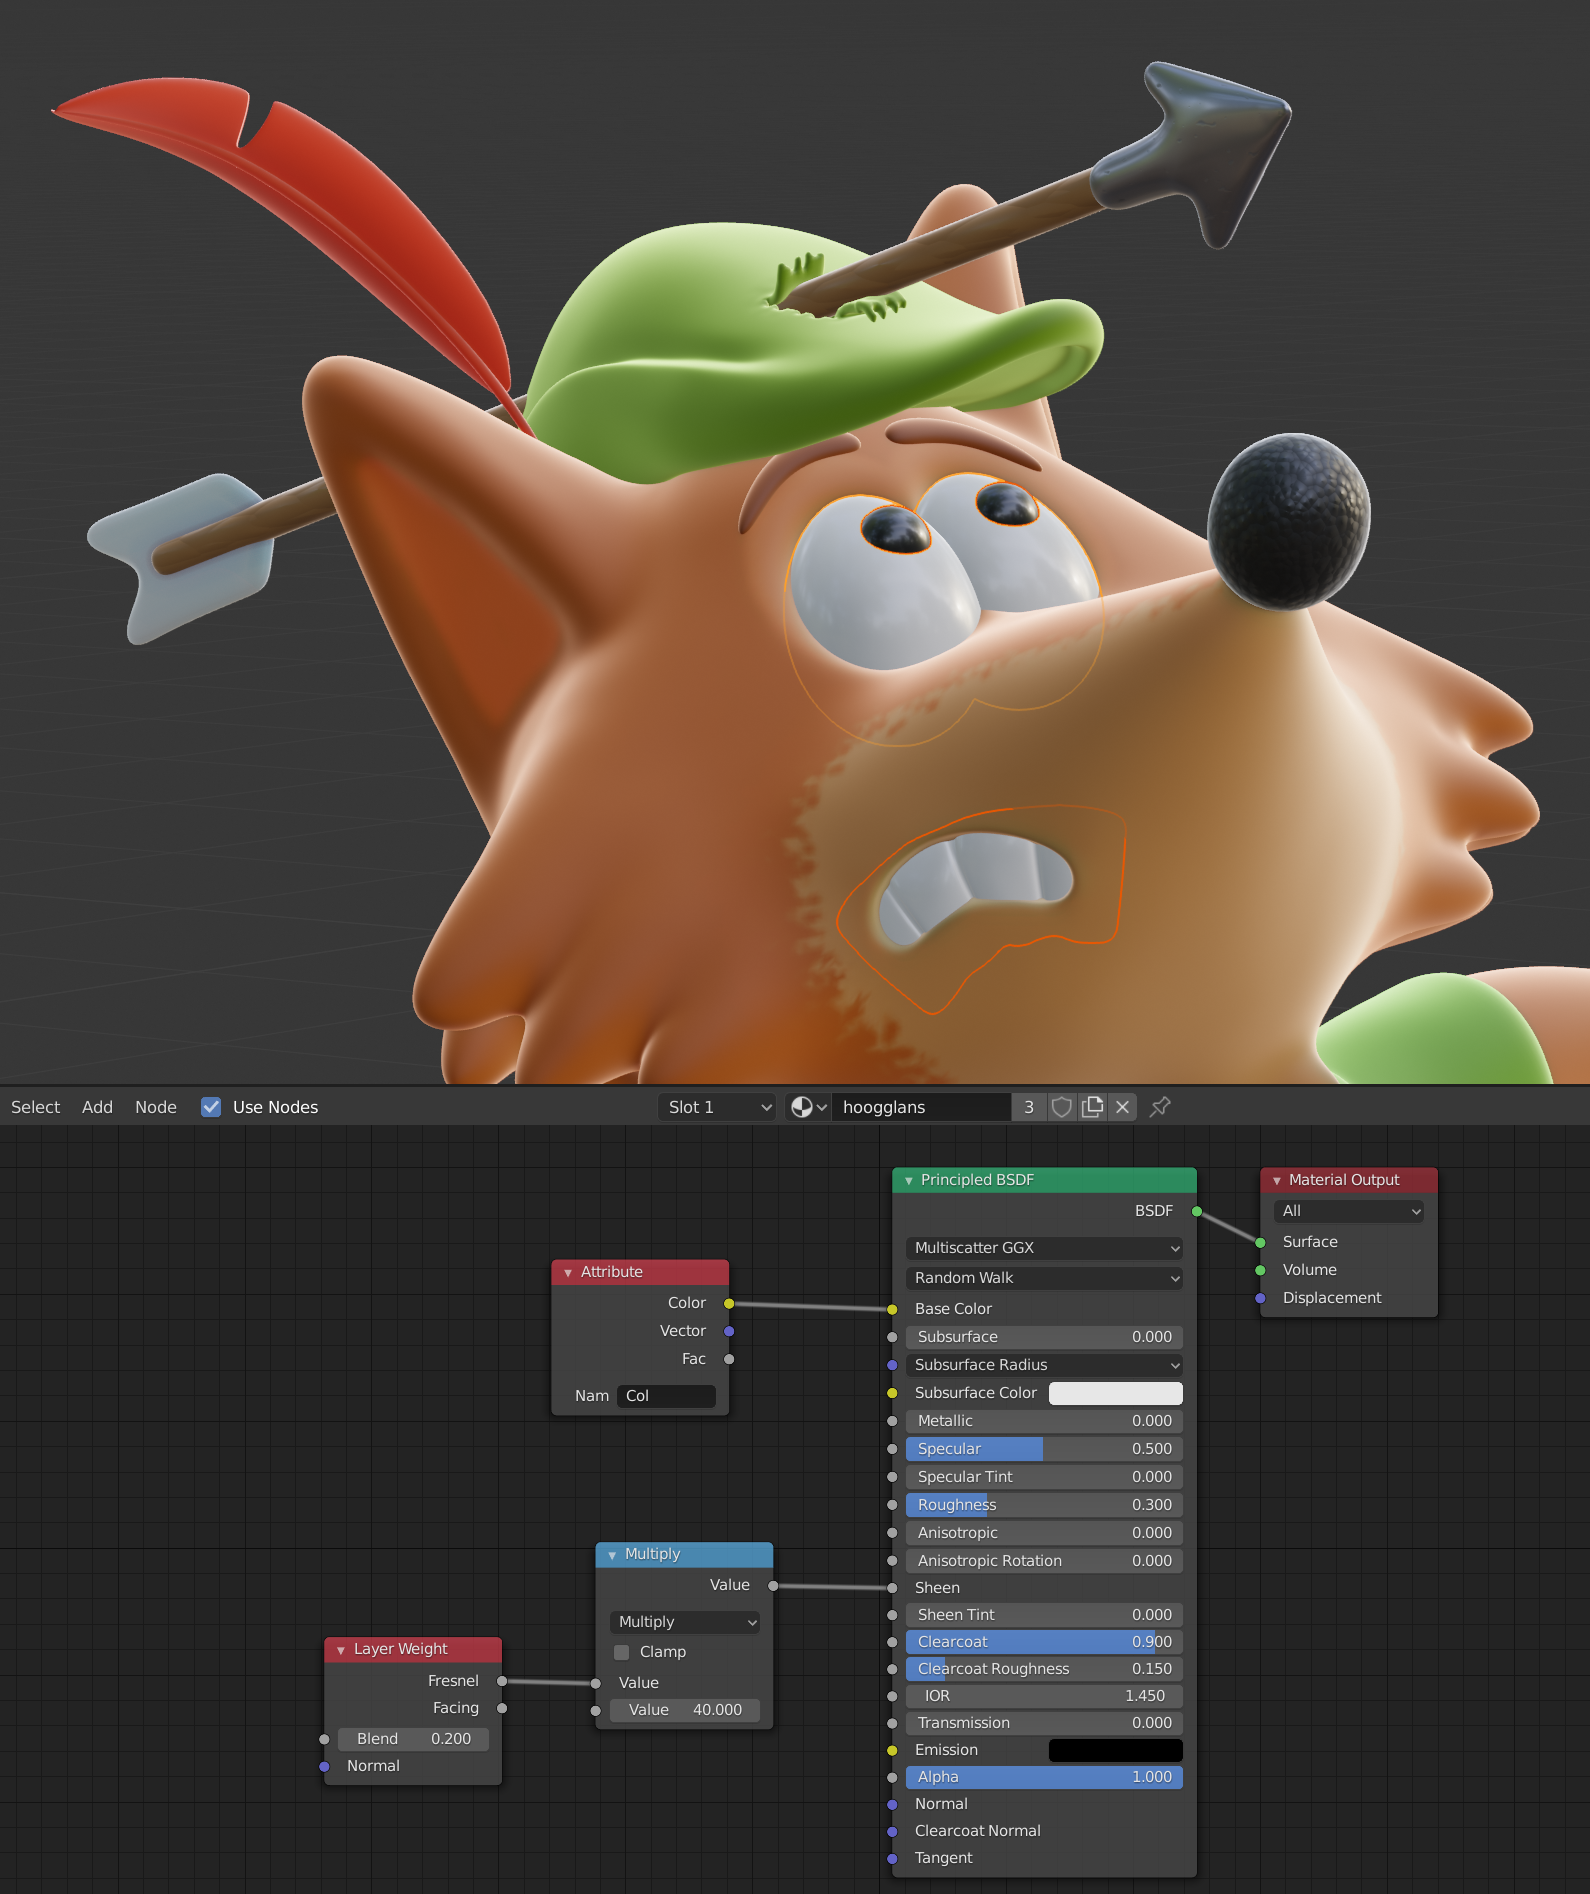
Now place your pointer in the new bottom section and press Shift + F3 to switch the area to the Shader Editor.
The default material is a Principled BSDF material, which is a flexible general-purpose material.
With the pointer still in the Shader Editor section, press Shift + A and select Input menu ➔ Attribute.
Enter “Col” (without the quotation marks) in the Attribute node’s text input field, then connect the Attribute node to the Base Color input dot of the material. This makes the vertex paint channel visible in the material. “Col” is the default vertex channel name, but you can rename a vertex color channel if you like.
Now we’ll add a sheen to the shirt, to make it more like fabric. Using Shift + A again, add a Layer Weight node and a Math node (in Add mode) to the Shader Editor, set the values, settings and node connections as in the screenshot, and connect the result to the material’s Sheen input dot.

Adding vertex color and a fabric-like sheen with nodes
The Layer Weight node restricts the sheen effect to the object’s edges, and the Math (Add) node adds enough to the output value to make the effect really visible.
Set the Sheen Tint value to 0.7, which pushes the sheen color towards the material’s diffuse color instead of neutral white.
With your pointer placed inside the 3D view, press Alt + H to unhide all objects, and assign the material to all textile / fabric parts (clothing, shoes, money bags, hat, etcetera).
A big advantage of coloring each part by applying vertex colors is that you don’t need to create different materials for each color, just for parts with different surface properties, like glossy parts and matte parts.
For the fur I’ve made a slight variation of the textile material, adding some SubSurface Scattering for a more vivid result. You can fiddle with the different Subsurface parameters, but I just lazily plugged the vertex color Attribute node into all Subsurface slots of the material, and changed some other values here and there, see the next screenshot.

Assigning materials to all parts
For the high-gloss shiny parts such as the eyes and teeth, a ceramic material approach works best, meaning you use a base layer with a low roughness, and activate a Clearcoat layer with very low roughness for a varnish-like high-gloss layer while the white doesn’t converge to dark grey shadows.
A ceramic white approach for eyes and teeth
For the metal parts (coins, belt buckle and arrowhead) I cranked up the material’s Metallic value and adjusted some other settings, see the next screenshot.

Increasing the Metallic value and tweaking some settings for the metal parts
To finish it off I gave the nose a subtle Voronoi noise with a Bump node in the material’s Normal input.

A bumpy nose using a Voronoi texture
4. Lighting and rendering
For lighting I simply added a standard Blender Area light type, then created a simple Plane primitive with an extruded edge and a Bevel modifier to serve as a background.
Press Z and choose Rendered to see the Eevee renderer’s result in the viewport.
The initial Eevee rendering result
The background plane includes a slight bit of Emission to avoid harsh dropshadows.
I turned up the Eevee settings, because the end result will a still image, so we don’t need speed-preserving low-quality settings.

Souped-up Eevee render settings
The shadow parts of the fox are too dark. To fix this, press Shift + A, and add an Irradiance Volume from the Light Probe submenu. Scale and position the Irradiance Volume cube to encompass the fox. Then go to the Render Properties tab ➔ Indirect Lighting rollout, turn up the Diffuse Bounces to 6, and press the Bake Indirect Lighting button to calculate the bounced light on the fox.
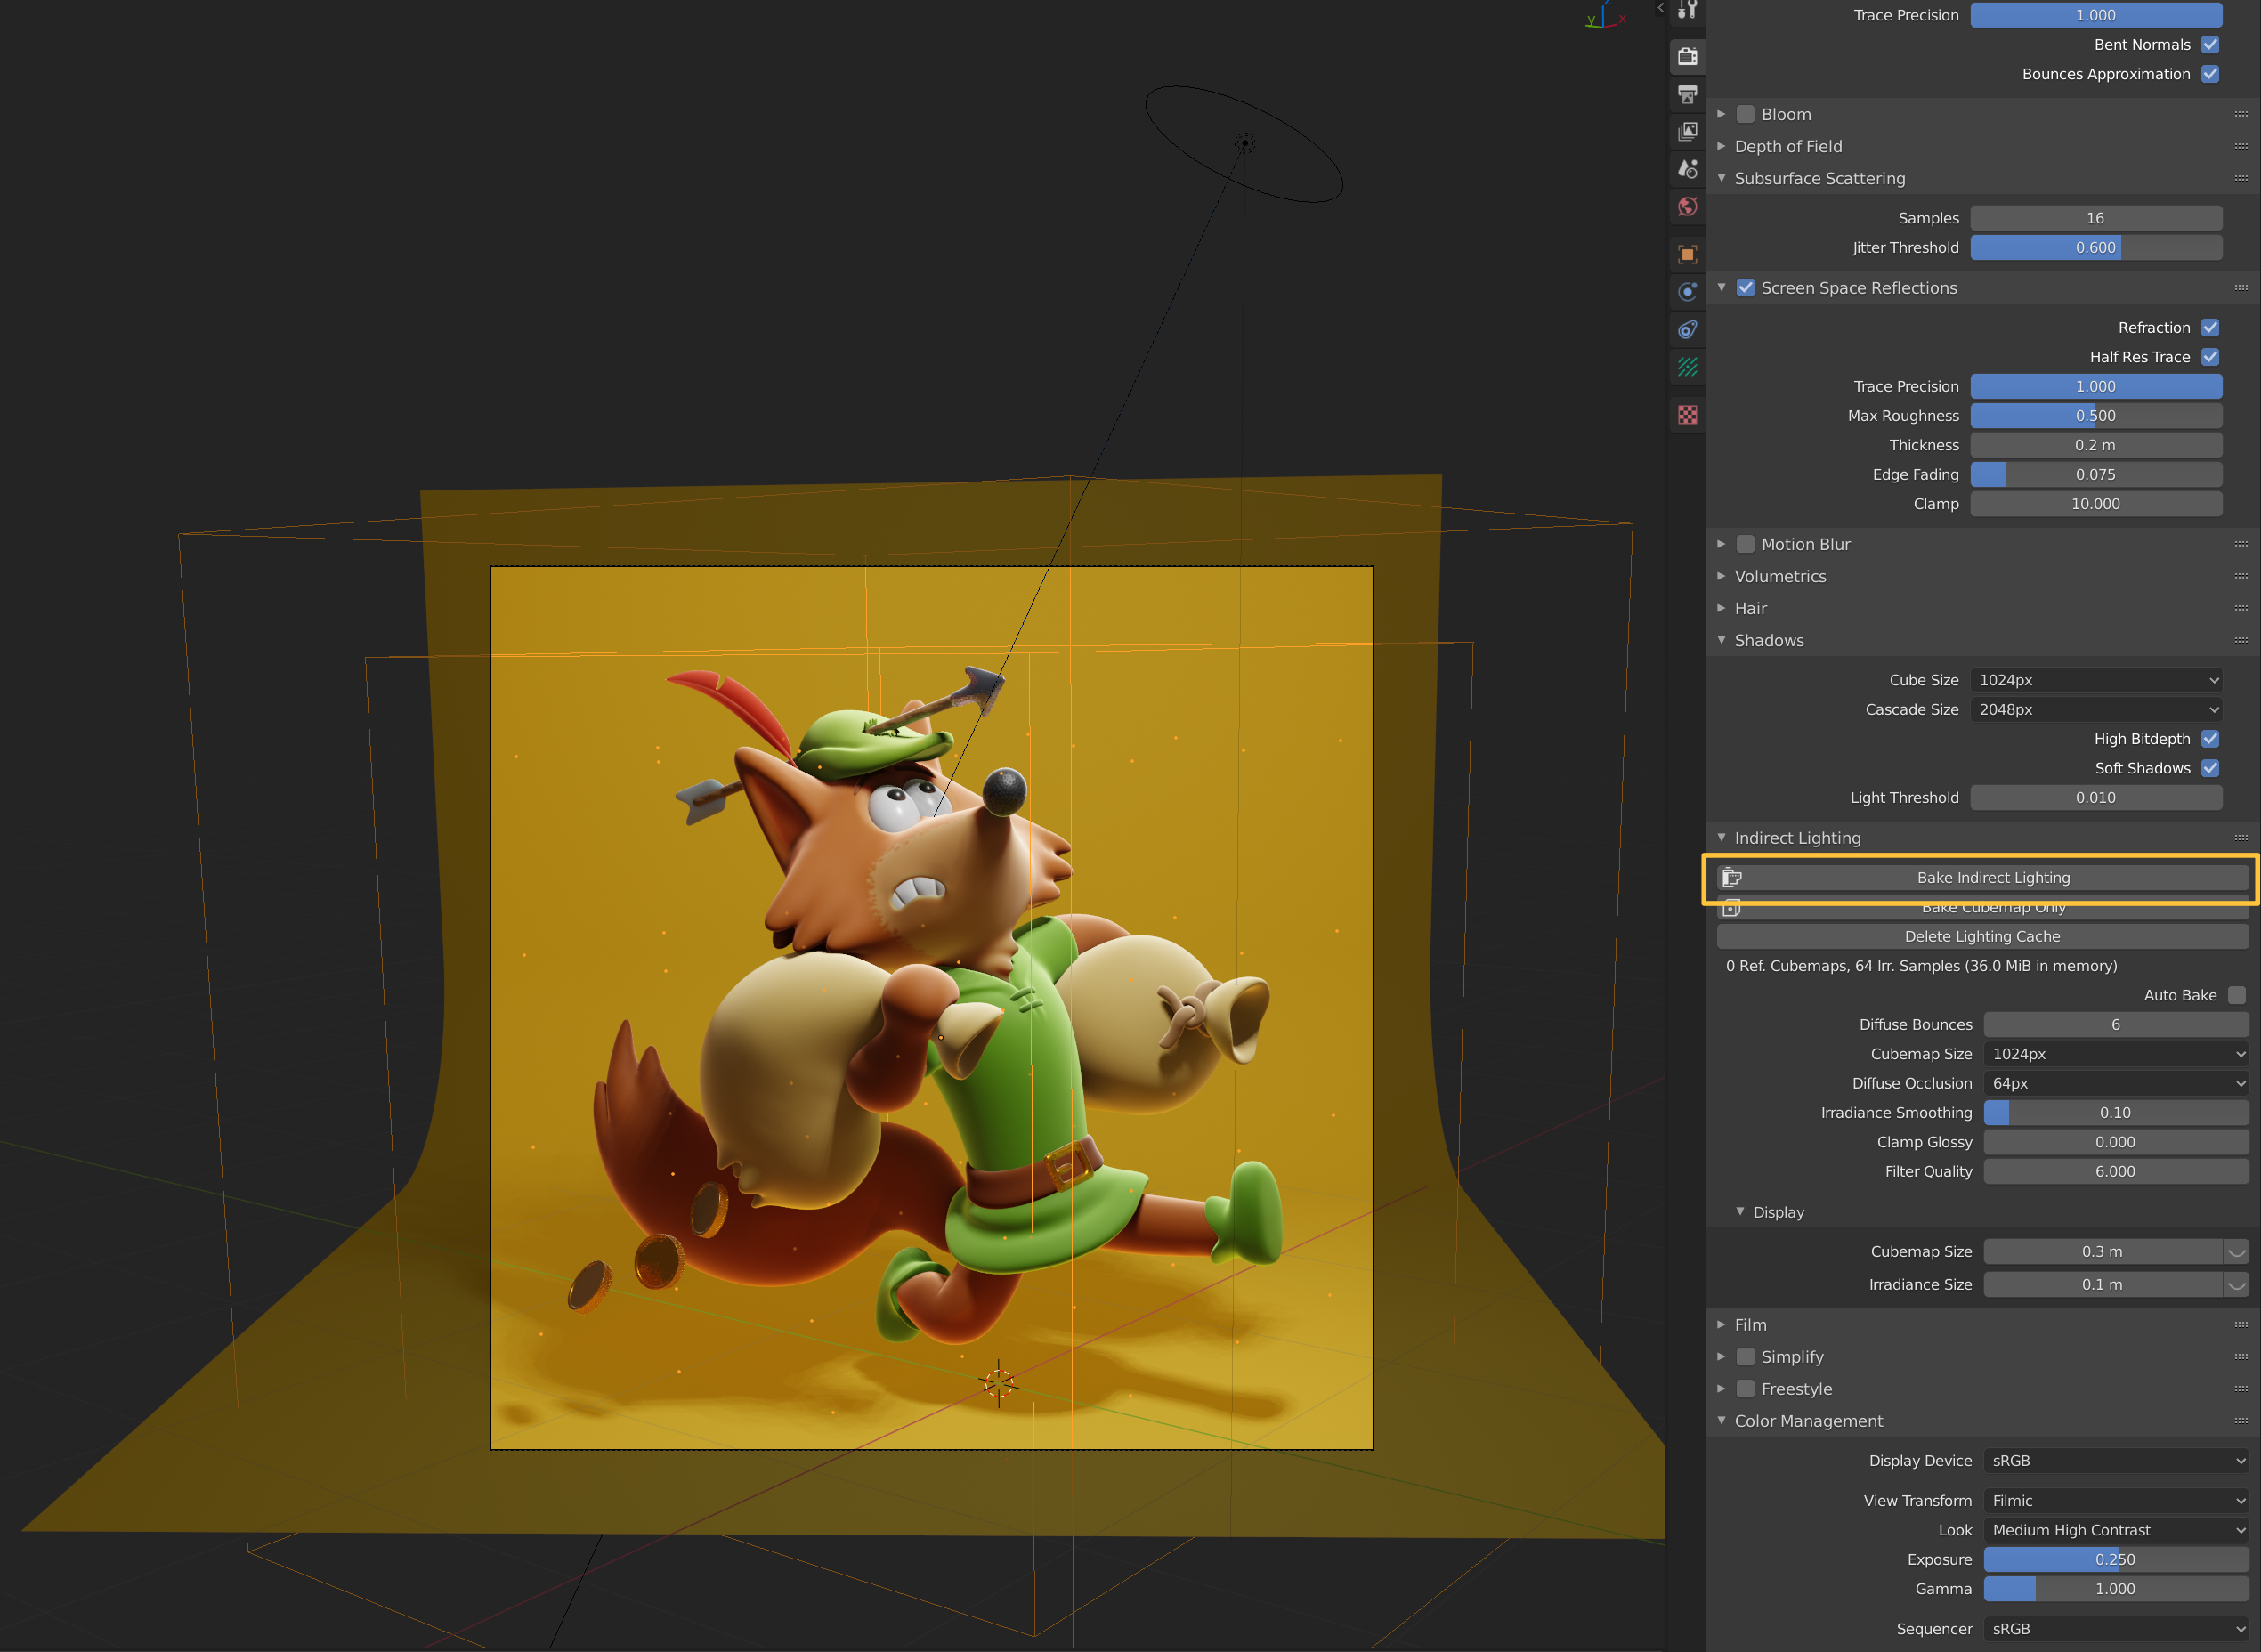
Baking indirect lighting to brighten the shadow parts
Let’s move on to some final adjustments. Scroll to the Color Management tab, set the Look to Medium High Contrast, and the Exposure value to 1.

Color Management tuning for lighter shadow areas
This concludes Robin Hood’s 3D journey. To render an image:
- Increase the Eevee Render samples (I doubled the value to 128).
- Add a camera (Shift + A ➔ Camera).
- Set the desired X and Y pixel dimensions in the Output Properties tab.
- Press the F12 key to render.
- When the rendering is finished, press Shift + S to save it.

The final Robin Hood fox Eevee rendering
To increase the detail you could UV map the parts and add some textures, like a textile pattern. For a more sophisticated rendering result you could switch to Blender’s Cycles renderer and add a HDR environment image for richer lighting and reflections.
Happy Blending!
Metin Seven (metinseven.nl)
A novel is created through imagination, structure, and consistent effort, combining storytelling skills with careful planning to shape engaging narratives. Writers typically start by designing characters, outlining plot developments, and establishing a vivid setting. Through steady practice, early concepts evolve into full manuscripts. During the process of learning How to write a novel https://clairerudyfoster.com/, authors gain insight into narrative structure, dialogue, pacing, and revision techniques. Persistent editing and refinement ultimately turn initial drafts into compelling finished stories.
ffrostheart10 I know I'm replying to an old post, but I usually go into my browser's print window and save the page as a PDF. That way I have an offline copy of the tutorial.
jjazze Thanks Jasmine! Glad to read that the article inspires you! Good luck.
Oooh, fun! I've wanted to find out how to make these "cartoony" textures! Learned some new stuff! I just gotta get back to making some 3D stuff again and I can play! :D Thank you! ^_^
aaltenfinder Sorry, no, there no videos. I prefer writing step-by-step tutorials.
Are there any videos for this tutorial? Thanks!!
ffrostheart10 Thank you! I'm planning to write more tutorials for CG Cookie, so please stay tuned.
I love these, is there a way I can easily access an archive of these style of tutorials for future use?