What's new in Blender 2.93? Here are all the new features, tools, and functions you need to know before you download and try it out.
When the Blender Foundation talks about new releases, they sometimes use the abbreviation "LTS".
What does Blender 2.93 LTS mean?
2.93 is the 4th release in the 2.9x series of Blender and the 1st to be labeled as an LTS release.

Source: Blender.org
'LTS' stands for Long-Term Support, meaning that any major bugs in that version will continue to be fixed for 2 years following its release.
The main goal of this is to ensure that you can create a long-term project in Blender without having to upgrade to a new version to receive bug fixes. For 2 years, you can rely on an LTS version of Blender being fully functional and stable. Or, you can use a non-LTS version to get the latest features at the risk of your project needing minor changes to make the jump from one version to the next.
(Blender Foundation explains the LTS pilot program here.)

Source: Blender.org
So, what's new in Blender 2.93?
Blender 2.93 Interface
The Outliner now shows the camera icon for render visibility by default, which should reduce confusion for beginners. Now if only older .blend files would import hidden layers as disabled or hidden collections rather than being disabled from view with the monitor icon which is hidden by default... then we’d be golden. But, I digress, this is a welcome improvement. As always, be sure to reload factory settings when you update if you want to see the new defaults.
The File Browser now supports the View Selected operator (hotkey number pad period), which will scroll to selected files.
On Windows, temporary windows like the render viewer or drivers editor are now drawn on top of the main window. This means that you can quickly work between the two without Alt+Tab!
While not an aesthetic type UI change, a very helpful one is the new menu option, Copy Full Data Path, that you’ll find when you right-click on any property. This will give you the full python path to the property as opposed to Copy Data Path which doesn’t include the object or material information.
You can now mute any node connection by dragging over it with Ctrl+Alt+RMB, similar to how Ctrl+RMB will cut the connection and Shift+RMB will combine and add reroutes. This is much more useful than muting nodes (M) because you can be much more specific about what data is being passed through.
Blender 2.93 Modeling
Curves have a new Taper Mode that changes how taper objects affect the radius of the curve.

Proportional Editing now has a more accurate falloff when using the Connected mode.
The Subdivision Surface modifier now has more options for how to smooth the object’s UVs. The default option of Keep Boundaries is usually fine, but I find that Keep Corners works better for unwrapping many hard surface assets like the below skateboard from the Fundamentals of Texturing. To see exactly what it’s doing to the UVs, turn on Modified Edges in the UV Editor’s overlays menu.

The Mirror Modifier has a new Bisect Distance option which determines how close a vertex can be from the cut and still be merged at the center.
Blender now supports selecting non-manifold edge loops. This is one of those seemingly smaller changes that flew by under the radar that is actually quite useful. Previously, you could not select an edge loop that connected more than two face loops such as the inside of the circle below. Now, you can! Note, this is not an endorsement of creating strange topology like this and the example is strictly for entertainment and educational purposes only ;)

Blender 2.93 Geometry Nodes
There are so many geometry nodes updates that they get their own section! There are several new nodes that enable way more possibilities than the system’s first debut in Blender 2.92.

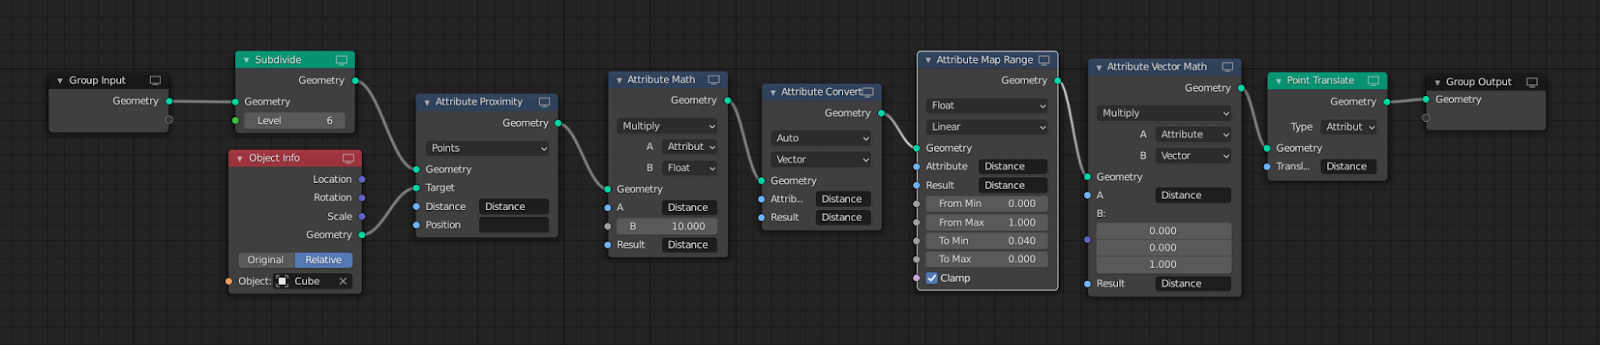
The Attribute Proximity node can be used to find the distance between one piece of geometry and another. The Distance output gives a value for how far each vertex is from the closest vertex of the target and the Position output gives the exact coordinates of the closest vertex. In the below example, I use it to build up some dirt or snow around the other objects in the scene.

Attribute Sample Texture gives a value for every pixel of a texture, which can be used to create cool effects like scaling instanced spheres up or down to create an old-school dot printed image.
Attribute Remove, as the name implies, helps clean up attributes that are no longer needed in order to save memory. Attribute Convert allows you to change the attribute from one type to another, such as from a float (single number) to a vector (set of three numbers). Attribute Clamp, Attribute Separate XYZ, and Attribute Map Range work the same way they do in the shader editor, except with attributes.
The new Bounding Box node finds a box with the same dimensions as the object so that some calculations that don’t require information from every face can be made significantly faster.
Collection Info can be used to get the geometry of all objects in a collection. You can add one of these to the Geometry Nodes editor very quickly by simply dragging and dropping a collection from the Outliner.
The Is Viewport node outputs True when rendered by the viewport and False for the final render. This is useful for having different values for each scenario like how the Subdiv Modifier has separate Levels values for Viewport and Render.
Points to Volume creates little volumetric spheres around each vertex, which could be useful for all sorts of dynamic effects like moving clouds or simple smoke.
Volume to Mesh can be used in combination with Points to Volume node or any other volume data to create a mesh in the same shape as the volume.

The Subdivide node offers a way to do a classic subdivision without smoothing like in Edit Mode.
The String Input node can be used to access an attribute by name and plug its result into any attribute input socket.
Last but not least, several mesh primitives have been added as nodes, so you can now procedurally create cones, cylinders, circles, cubes, spheres, icospheres, lines, and grids!
In addition to all those new nodes, more Blender attributes can be used as inputs such as UV layers, vertex colors, material indexes, face normals, smooth shading, and edge creases.
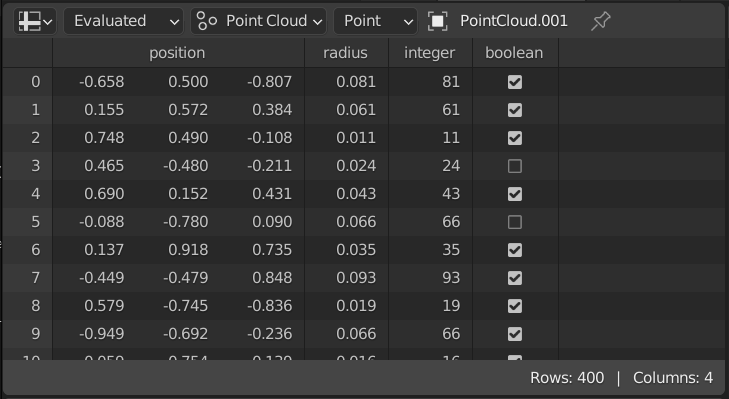
An entirely new editor, the Spreadsheet Editor, was added specifically for use with geometry nodes. You probably wouldn’t want to use it to create a budget but you will find it useful for inspecting the values of attributes as you adjust them via the nodes.
Attributes from geometry nodes can now also be used for rendering effects in Cycles! A direct link between procedural shapes and procedural materials should prove to be quite useful as the geometry nodes system matures.
Blender 2.93 Sculpting
The Expand operator in Blender 2.93 is a more fleshed out version of the Mask Expand operator found in previous versions. It can be activated for masks using Shift+A (topology based) and Shift+Alt+A (normals based). For face sets it’s Shift+W and Shift+Alt+W. There’s quite a lot it can do, but it takes some getting used to. The extensive amount of hotkeys you can use while in the operator can be found in the status bar. It can use gradients (G), recursive patterns (R), textures (Y and T), snap to face sets (Ctrl), and more!
I found that using a texture with Expand was confusing at first, but what you need to do is assign a texture to the current brush and then set the texture mapping of the brush to be 3D. The operator uses the current brush’s settings even though it is not part of the brush.
The new Mask Init operator can be used to randomly initialize a new mask for each vertex, face set, or connected mesh. Pablo, the developer, mentioned that more ways of generating masks will be added to this operator in the future.
Face Sets Init can now create new face sets based on the current boundaries of each face set. This can be used to split two disconnected parts of one face set into their own unique face sets.
A new hotkey, D, can now be used to switch between objects while in sculpt mode. This may come to other Blender modes in the future, but for now it’s exclusive to sculpt mode.
Blender 2.93 Rigging and Animation
Wayne Dixon will be happy to learn that bone axes can now be displayed anywhere along the bone but default to the root (where the pivot actually is) rather than the tip.
The Cycle-Aware Keying toggle was reshuffled back to the keying menu after its brief vacation in the auto-keying popover.
Blender 2.93 Grease Pencil
A new Line Art modifier for grease pencil objects generates strokes around an object or all objects in a collection. It’s important to note that this modifier calculates where the strokes should be placed based on the scene’s active camera, so you’ll need to look from the camera’s perspective in order for the lines to look correct.

(Image credit: ChengduLittleA)
New Import operators are able to load SVG and PDF files directly into grease pencil objects.
A potentially confusing change, if you don’t know about it, is that Autokeying must now be enabled to create new keyframes on the current frame when you edit your grease pencil object in Draw, Edit, or Sculpt mode. If it’s off, it will apply that change to the previous keyframe. Autokeying will be off by default in normal files but on by default in the 2D Animation template. This makes much more intuitive sense to me as a merely casual GP user and I’ll be happy to have fewer accidental keyframes created as I work.
Multiframe is now turned off while playing a grease pencil animation so that the result is actually visible. A new display mode for multiframe also allows past and future keyframes to be drawn using the onion skinning colors.
The Dopesheet now draws a block in between grease pencil keyframes where nothing has changed, similar to regular animation keyframes. The editor’s context menu has also been reorganized.
Annotations got their opacity control back after it was temporarily removed for a few versions.
The Fill Tool has been completely refactored and is now much more robust. It’s faster, can handle areas outside the visible viewport, can fill animated shapes, can detect strokes that are close to closed shapes but not quite (stroke extension), can have a precision of less than one, and will avoid filling if the area is not enclosed to prevent accidents.
https://www.youtube.com/watch?v=Jtp0vF3PlbE
Interpolate is now its own tool instead of an operator. You can also find Interpolate Sequence in the Draw menu and it now has a redo panel for tweaking the parameters after you use it.
Grease Pencil modifiers have gotten two small tweaks. You can now use more than one Lattice modifier at one time and the Noise modifier has an Offset parameter so that you can animate the noise along the length of the stroke.
Blender 2.93 Eevee Rendering
Blender 2.93 fixes several of my gripes with Eeevee all in one release!
Eevee’s Depth of Field has been completely rewritten and now looks incredible! The default looks as good as any real time depth of field I’ve seen in any app, but there’s also High Quality Slight Defocus and Jitter Camera options that will make it match Cycles’ true motion blur exactly if given enough samples.

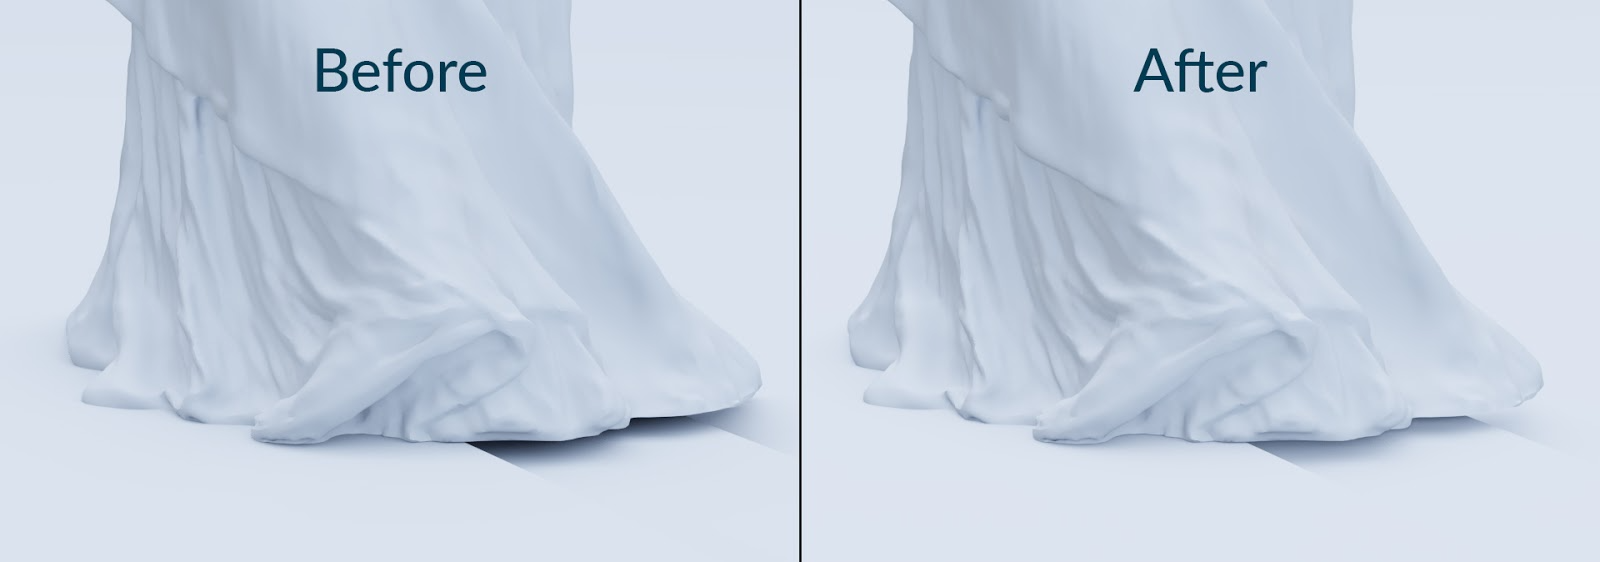
Ambient Occlusion was also refactored to look much more natural. The long list of improvements includes fixing noise on distant geometry, fixing overshadowing at grazing angles, improved performance, smoother results when using the Bent Normals option to sample the environment, Bent Normals support for glossy reflections, less overshadowing on thin objects, and it is now computed per BSDF rather than per material so mixed materials should look much better.
Volumetric lighting has been significantly improved as well. Volumetric shadows were updated to be more correct, light sizes are fully supported by volumes so that they no longer have that pin prick of super bright light right in the center, and there is less flickering when moving a light inside of a volume.
In addition to all of that, the Glass BSDF was fixed so that it has less artifacts when using a very low IOR, the Specular on the Principled BSDF matches Cycles much better when creating metals, Reflection Cubemaps look better on objects with low roughness, Subsurface Scattering no longer leaks light to nearby surfaces, screen space reflections, refractions, and shadows produce less noise, and animations now render faster thanks to persistent data.
Blender 2.93 Cycles Rendering
Random Walk Subsurface Scattering in Cycles is now quite a bit less noisy, and in some cases can even be faster to clear up than the current, less realistic default of Christiansen-Burley.
Area Lights have a new Spread Angle property, similar to other renderers like LuxCore, which can be used to throw the light forward rather than having it spread out evenly in all directions.
The Attribute node, as mentioned previously, can be used to read attribute data from geometry nodes.
Persistent Images has been changed to Persistent Data in the Performance panel and includes more types of data such as static geometry. This can significantly improve render times for animations but for particularly heavy scenes it comes at a steep price of increased memory.
A new Fast GI Approximation sub-panel in the Light Paths panel now houses the AO and Environment bounce settings that were previously rather hidden in the Simplify panel.
Lastly, OpenImageDenoise was upgraded to version 1.3, which improves the preservation of fine details a pretty good amount. The next OpenImageDenoise version is right around the corner, so we can expect to see even more improvements in Blender 3.0.
Blender 2.93 Library Overrides
Library overrides continue on their slow but steady quest to overthrow Blender’s ancient proxy system. Resyncing overrides now happens automatically when loading a .blend file created in 2.93. A new collection called OVERRIDE_RESYNC_LEFTOVERS is created for any objects that are no longer needed by the override but were previously edited by the user.
A new Outliner view for library overrides can be used to see and manage overrides all in one place, regardless of what scene or view layer they are linked to.
I have no idea when the Clean Up menu was added to Blender’s File menu, but now that its operators have been improved to better handle linked data, I’ll be using it all the time in the future.

Blender 2.93 VFX, Compositing and Video Editing
A new Average Tracks operator in the Track panel of the Movie Clip Editor can be used to combine several less stable tracks into a single, more stable track.
Over in the Compositor, the Cryptomatte node has been redesigned to be easier to work with. The matte layers are now extracted from the metadata of whichever image or render layer is selected by the node, so you won’t have to plug in a bunch of secondary sockets anymore. You can also pick Matte IDs directly from the regular image backdrop without switching to previewing the Pick output, and a handy tooltip will tell you which area your mouse is hovering over.

The brand new compositing node in Blender 2.93 is the Anti-Aliasing node. Finally, anti-aliased Z passes! And, whatever else we want to anti-alias to boot.
Over in the Video Sequence Editor, scrubbing through FFmpeg video has been sped up around 1.5x.
Proxies (lower resolution versions of your video made for faster editing) have also been improved quite a bit with faster render times, better defaults, and simplified settings. They’ll also now be created for you behind the scenes when you switch your preview size in the View Settings of the Video Clip Editor’s Preview.
Several other quality of life enhancements have been added as well including automatically setting an effect strip’s Blend Mode to match the input strip, previewing the adjustment of a strip during transform regardless of where the playhead is, and much better defaults and extra options for Text strips.
And finally - other random updates
Blender upgraded to OpenColorIO 2.0 in Blender 2.93, so you should see a subtle increase in color management accuracy.
The bult-in animation player for previewing rendered animations is now a bit faster and should be significantly less choppy.
The Image Editor can now flip images vertically and horizontally.
Windows 7 is no longer supported by Blender. To the two people still using it, it's time to upgrade!
What's your favorite feature in this release? Let me know below!
Featured image line art demo by Yiming Wu