I want to use dynamic paint to create text from the tread pattern of a tyre on a ground plane. Cos my tyre is modelled at real world scale and needs v high level of sub divisions to capture the tread pattern it's not practical to simply subdivide the entire ground plane. The first time I've ever had my PC start to lag have happened simply setting up small tests.
Is there a solution where I only change the ground plane to a high res where I need it under the tyre - see below.
Or could/should/do I need to approach this differently?

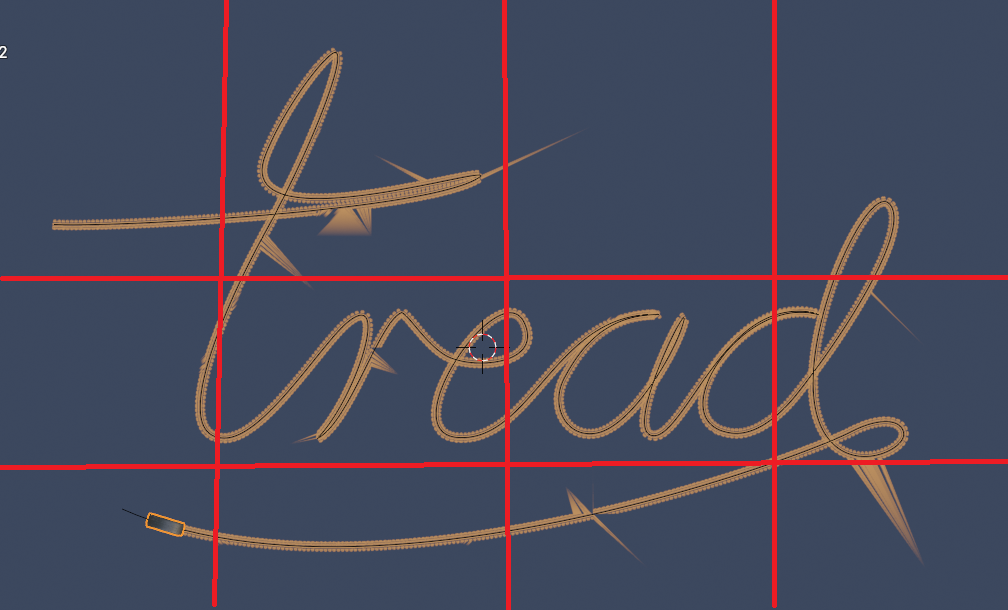
I want the first image of the dark ground and yellow/orange track pattern. As it's displacement the tread pattern left has imperfections you'd get from a real tyre 'printing' a yellow paint trail behind it. The reason I want to do it this way is that it's a wholly contained solution without any need for matching, tweaking etc. suggested below
I think the other solution you suggest probably seems easy to you but leaves me scratching my head - going 'huh?'
No idea about curve UV's, no idea how I'd use a 100+ png masks to reveal a track via animation. Unless you can point me to a tutorial where this workflow is fully demo'd it's too big a gap between your description and my knowledge for me to bridge.
This whole animated tyre/DP rabbit hole has been really demotivating. It seems like a fairly basic thing - it's a classic trope and I've seen hundreds of variations of this type of concept but it's leaving me totally frustrated as there doesn't seem to be any explanation as to how to approach it
There is a huge disconnect to how things work in real life and how it's being faked in computer graphics. As a result, things that seem easy to do, can sometimes be really hard in 3D Software. For one, there is no actual Collision in 3D. This has far reaching consequences. Being able to run simulations on a computer is nothing short of a miracle, don't forget that😉
It doesn't seem best to me... it seems bonkers... that's why I've posted here for advice as I have no idea what I should be doing to accomplish the goal.
This approach gets me the geometry resolution I need for DP displacement to work for the level of detail I need consolidated to the most practical minimum area I can apply it to.
It seems like I should give up at this point
Need to redo the mesh for more resolution and to stop the bleed but in principle it kind of works

 As someone who use to do weird things because I had a really low spec PC, here is something you might want to try. Divide your plane up into smaller planes.(See image) Put each plane on separate scenes or blend file. Make sure the same camera is linked to each scene. Select camera, Ctrl+L->Scene->Select scene. Note: It may be Shift+L I don't remember off the top of my head. If you use multiple blend files, then do the camera animation and brush animation in one file and use F4->Link->Select file with the camera and animation in it. This way you can break up the piece into smaller chunks. Render with Transparent background on all except the bottom layer. Then you can combine in VSE or compositor with alpha over nodes, whichever one you're more comfortable with using.
Thank you. I baked the paint over 250 frames with 6 substeps. Any idea why it doesn't paint the first half properly and then suddenly changes on the e?

I have no idea. Then again I've never used more than 2 substeps. What's your FPS?
***Edit*** Just did some testing and it looks like you don't have enough contact time in those areas. Increase the end frame and/or slow the tire's rotation/movement in those areas.
24.fps. I upped the substeps originally as it got rid of the gaps
It corrects itself from frame 100. I had previously set the animation to 100 frames and then extended it to 250 in the curve data properties. I figured more frames would mean less gaps. So there's obviously some sort of conflict in the previous animation frames I set in the canvas even though I've since put the end frame to 250 in the canvas
Hey Charles,
Please don't kill me, I have absolutely no idea, why I didn't think of this before...
You can use Dynamic Topology in Sculpt Mode, with the Density Brush:
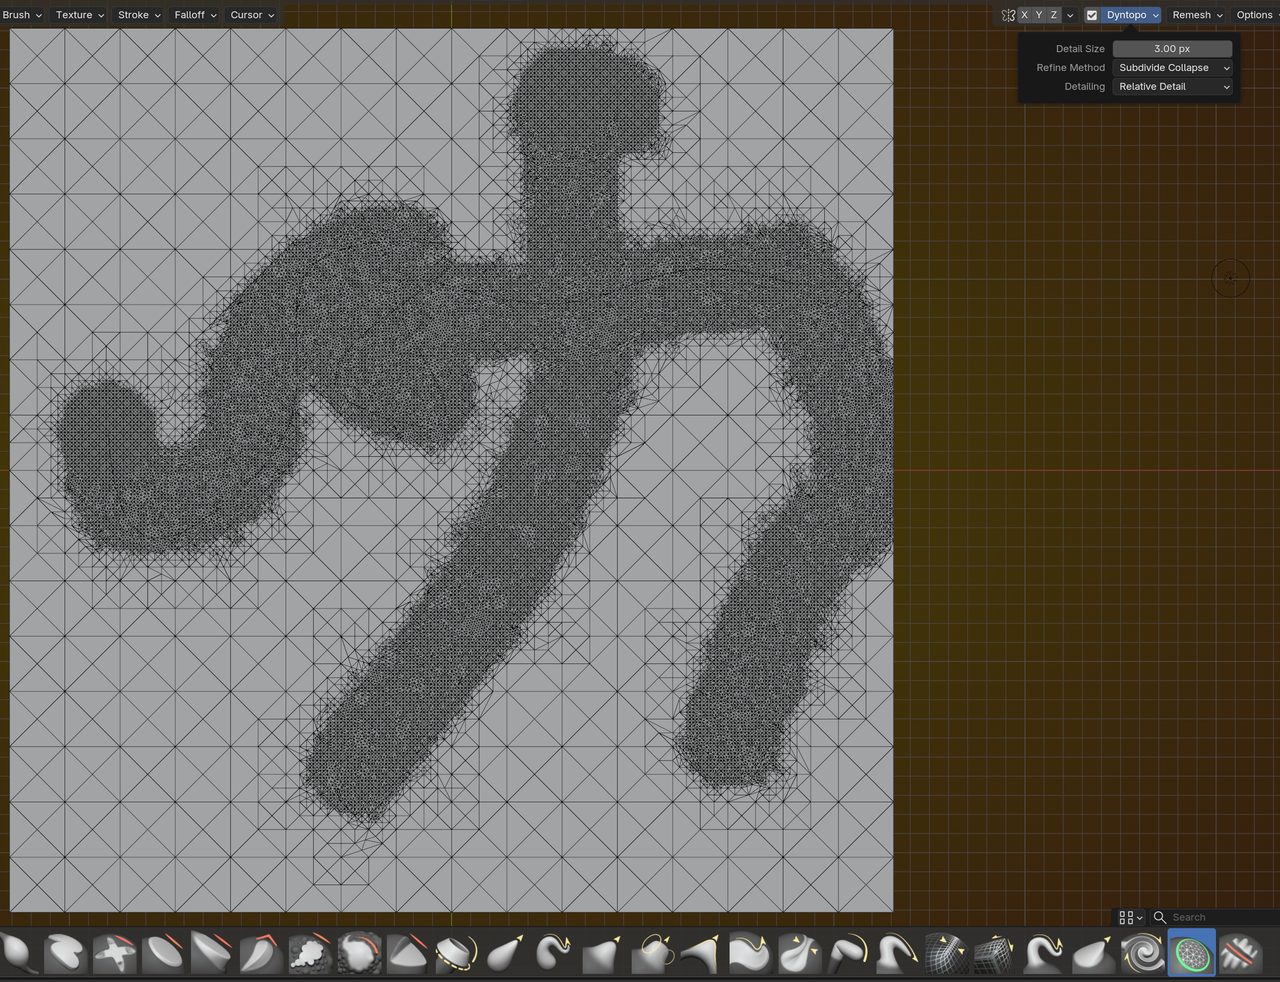
As for the DP irregurarity, that might be because of some Cache. Delete the Cache and re-Bake after changing the number of Frames.
YES MARTIN! I've not done any sculpting as there's only so much you can focus on.
Painting the density of the mesh like this is exactly the sort of thing I think will work for this. I am busy today but will try it out as soon as I have a block of time
