Would appreciate some guidance on workflow and if I'm doing this in the generally accepted 'correct' way.
Modelling an insect abdomen - I want to make this a hard translucent shell in sections with perpendicular extrusions along the edges which can be bolted together - flange joints is what I think they're called.
I've modelled the shell - mirrored on X
Selected 3 sections, duplicated them and separated them into separate objects. Cleaned up the topology and given myself a thin edge loop to extrude along each edge. 
Then shrink wrapped these parts back to the original model above.
This is now where I'm second guessing myself.
This is the sort of thing I'm trying to achieve
Hi Charles,
First, any method that works is okay, but here's what I would probably do (if I understand correctly what you want):
You can of course Separate the 'flanges' out (at 'stage' 5 or 6) If you want/need to.
I prefer to use the Topology of the original Mesh like this, to create those 'flanges', over a Shrinkwrap, so everything fits correctly, without any gaps or intersections. This may not always be possible and then you'd need to Add a Shrinkwrap (tip: use the Vertex Group Option in the Shrinkwrap Modifier).
My thinking has always been, I'll try it all. It is so useful to see where any path will lead. That is how my brain started to develop the Neo vision of The Matrix, where you see the wireframes in advance and you know what will lead to a pitfall before you try it, giving you the advantage of arriving sooner to the solution of a modeling conundrum.
When I don't know how to approach something, I'll duplicate the mesh and then I'll go ok, let me try it like this first, I get into a pickle, well that produced X result and I got stuck or it looks bad, I'll create a "Trash Bin" collection and put that one there, go to the base mesh, duplicate it again and try a different approach and see where it gets me. And little by little, over and over trying out stuff, you just start to know where a path will lead, because you have been down that path many times before.
So I'm less worried about getting it right and more about just seeing the path's ramifications. So I'd say, try all your options and see where they get you. You'll learn from it all and start to develop the Neo Sight.
Ahhh... ok interesting... I never thought to bevel! Thank you. This is just what I needed as I start to model harder things my gut says I'm basically making it much harder for myself by approaching in the wrong way or doing steps in the wrong order.
I built the main shell from a sphere with a lattice. Then I used that edge flow to separate overlapping parts 
and then resolved the topology with knife tool on each of the 3 separate parts so struggled to get them to match even with shrink wrap.
What I see now (and it seems so obvious in retrospect) is I need to establish the edge flow on the model first. then bevel so I get nice even edges on both sides of my cut, then extrude along normals (scale along normals doesn't give me the correct result) and then tidy up the topology.
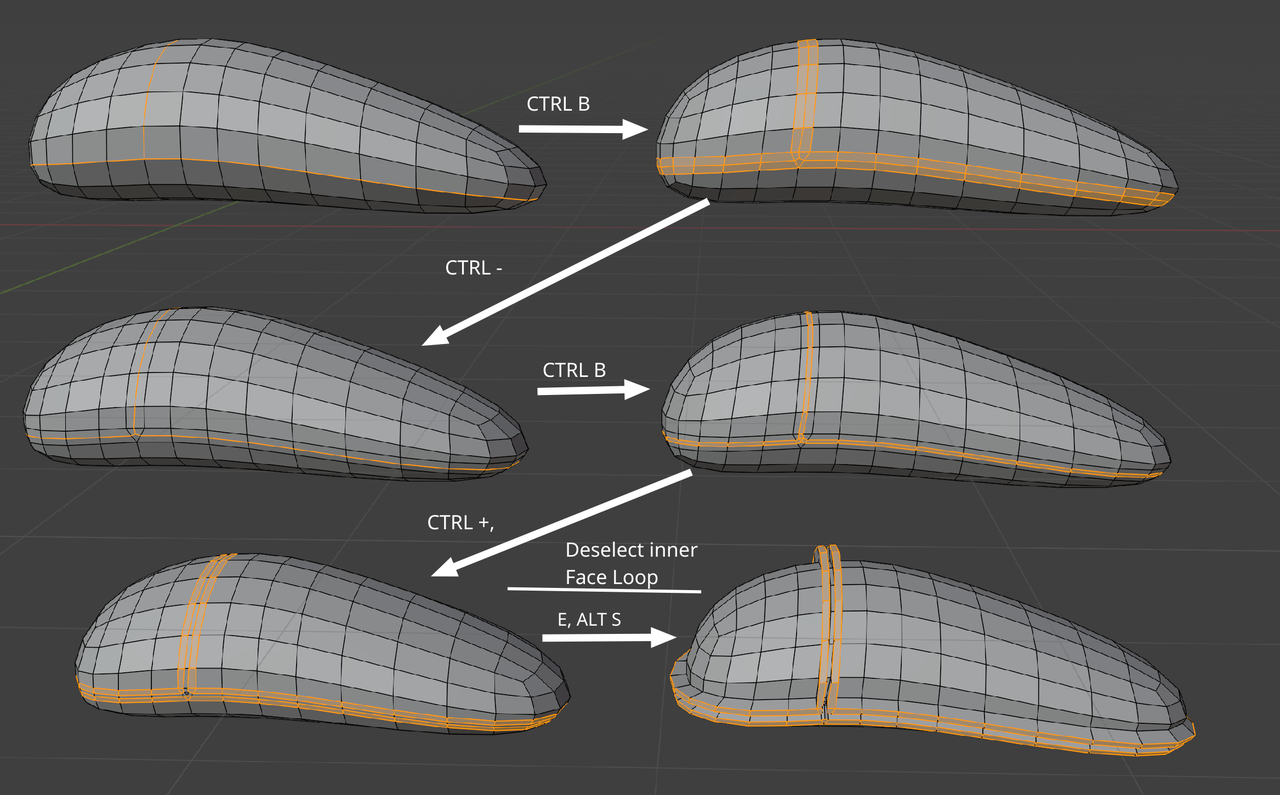
So I tried this out on just a sphere.
Resolved the edge on the top so I could get an edge running up the Z and bevelled
Selected face loops and extruded along normals and fixed the little janky bit from the bevel on the inner edge

SubDiv and supporting edge loops. Realise I need to adjust extrusion and topology to get right angles as annotated

The top part I 'fixed' has caused a flattening which I expected but I'm hoping a shrink wrap back to the original model (sphere) this would fix this, although now I think about it a shrinkwrap after I've done the extrusion isn't going to work. I think I need to shrinkwrap the mesh and apply it before the extrusion or is there a better solution? Ie my 'fix' to the top wasn't a fix but creating a problem down the line.
HI Charles,
A Solidify Modifier after a Shrinkwrap could work in situations like this. (Or Apply the Shrinkwrap before Extruding, like you say.)
In your case, you could also experiment with the Addon Loop Tools. Choose: Circle to get rid of the flat top in the center loop:
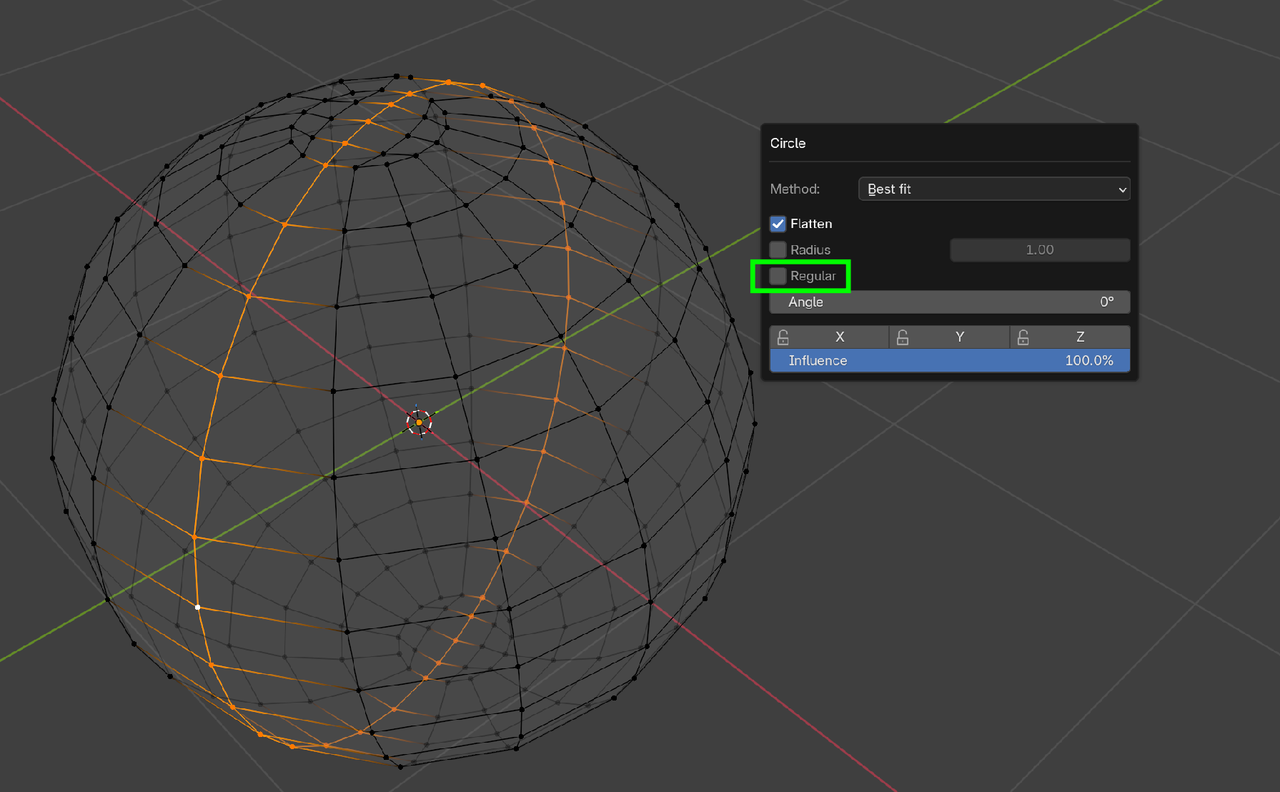
You'd still need to take care of those 6 Vertices next to the center loop of course. (Smooth Vertices, or Loop Tools > Relax might help., or combine this with a Shrinkwrap.)
OK I'm getting closer now. 
However although I did the bevel separately to each loop it's left me with a middle connected internal edge. Only realised when I came to shrinkwrap as that internal edge is connected to the faces which are a vertex group. Oops!
Going to start again as I want a thicker flange joint anyway and realise I need better spacing / topology to get it. Thank you so much for guiding me in the right direction. I feel like I can crack it now.
Hmmm... so extruding or extrude/scale along normals isn't working for me. And adding shrink wrap to the vertex group with an offset doesn't bring them back in line.
I want the extrude at 90 degrees ie all the extruded edges on the same z height as the inner ones they are being extruded from

I tried selecting the edge loops and snapping on Z to the inner vertex but the Z height slopes downwards from left to right so that doesn't work

Then tried an extrusion, Scale with shift Z, and a shrinkwrap with offset to bring back and even width but it's still wonky

It feels like all these issues must come back to my original mesh cos this doesn't feel like it should be this hard. Starting again!
Hm,
It seems that you need to consider what you want...
Extruding along the Normals is doing exactly what it syas, but that can be different from what you expect.
Look at this simple example:
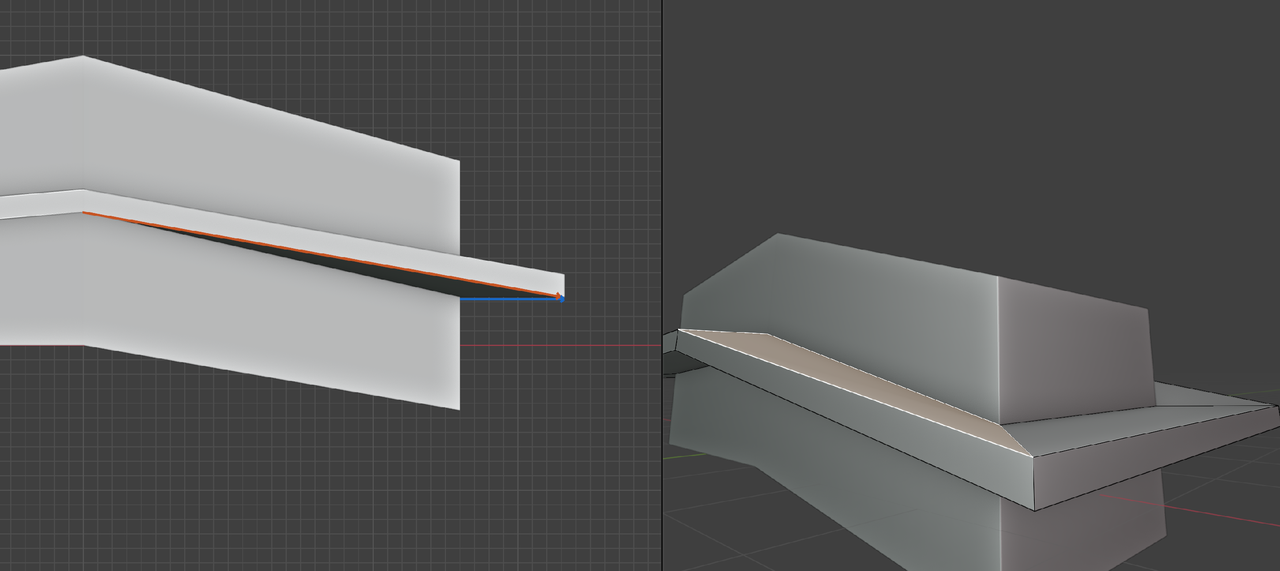
Because of the blue Normal, the red Edge is being forced in that unwanted direction.
So I completely rebuilt the base using a single cube and not the sphere. Didn't rotate the base this time. Then it was relatively easy.

Phew! I'm allowed dinner now
I totally hear you! So many times we end up having the wrong original approach and then we might as well start over. Great call on checking what the best approach is here. I might do that in the future too.
One lesson that came to mind that can be helpful with these tricky shapes was this one:
https://cgcookie.com/lessons/modeling-the-pot
Jonathan transfers normals for a cleaner look without having the absolute perfect topology. At about 27 minutes.
Can't wait to see your final model!
I have done this. Well I've done to about 95% complete when I took 'a break' for Xmas that turned into 18 months off. Then had to effectively start again from scratch. I did Toaster guy as the submission to the core texturing homework but also as my companion to Pothead. I wanted to be able to create a suitable environment for the final Pothead render and just don't know enough to be able to do it to a level I'm satisfied with.
The robo beetle has gone from following a tutorial practice into a full blown proper project as there's lots of little mini projects as above that will all hopefully come together although my current assessment is 'commendable failure'. I don't know what the most efficient way to learn is but I think doing my own mini practice projects that touch on modelling, texturing, lighting and rendering works best for me.
That makes total sense to me. Lots of mini practice projects work great for me as well!