I started learning 3D graphics in Blends a couple of weeks ago and have been through the basics and Press Start tutorials. I'm now embarking on the CORE series.
This is the first iteration of the scifi crate (there may be more, if inspiration strikes). I haven't added much. Some handles and the lock on one side is partly open (the idea, at the moment, is that when lifted there is a release for the top part that allows the lock to be pulled out completely so that the latch over the top of the crate can be removed).
There are some artifacts I haven't been able to fix yet, mostly related to the gratings. I modeled these straight into the box rather than creating separate objects and removeing those parts of the main body so that it wouldn't show through the indentations. But that has led to some large n-gons which are distorting the surface. The boundary is also a bit distorted due to the bevel modifier and the narrowness of the grid.

Thanks, Omar!
The reflective surface does help to hide some of the imperfections quite well. I'm particularly aware of them because I've been staring at the model for quite a while :). I know I'm going to keep coming back to this model to see if I can remove them. I'll give the approach in the video a try as well. And there might be ideas in the videos to come that will show me ways I can improve the mesh.
It turns out the problems were not due to the n-gons, but duplicated vertices. I ran a vertext merge, which removed a bunch of vertices. After that, I was able to switch the bevel modifier to use angle rather than edge weight and the artifacts went away while keeping the level of beveling that I wanted. A good reminder to me to check for duplicated vertices by running a merge occasionally. Learning to spot duplicated vertices would not doubt also be useful, though I imagine it's difficult to spot them when they're really close together.

A soccerball. The added mesh for the silver lines do cause a noticeable distortion, making it look like they're indented into the ball a bit. I'm not sure how to get rid of that. But they did provide some practice in selection and creasing.
Perhaps there's a way of creating a material or texture that gives the same colouring without having to create additional mesh.
The blue panels also look like they're sticking out more than the red ones. I tried to mitigate that with some scaling down, but I think it's an error I made earlier that can't easily be fixed at this stage.

The first version of the hard drive. There'll be at least one more once I've added details to the back.
This took quite a long time to render. All that reflective material becomes quite heavy going. And it's all just surface reflection. Perhaps the holes are adding a lot of computation because I did give the inner section a non-zero thickness. I might try again with a non-reflective material on the insides of the holes and inside the inner section to see if that speeds the rendering up.

Don't worry, it's a simple model and a simple scene, it wont strain your computer. Render optimization is really important later on when you have lots of light bounces and lots of objects and lots of complex materials. I'd say you can rest easy when it comes to troubleshooting this render.
It took at least 3 or 4 minutes to render, much slower than any others I've done. That was at a threshold of 64. The stats say that there are already 78k triangles. The example file, which includes a USB port, has 55k. So I've managed to add almost 50% more triangles. I suspect the fact that I made the inner section solid is where those triangles come from - the holes have depth, so every one of them is adding quite a few triangles. Though most aren't going to be hit by the ray tracer.
Mug and saucer. I'm quite pleased with how this turned out. The curvature of the saucer is notobvious in the first image.

But from a different angle (a light now behind the saucer), it becomes clearer.

And now done with round one of the the cookie. A slightly different mesh, but it worked out well. Only very slightly different. I had a very different one, but my computer crashed and somehow even the recovery files weren't the correct ones. I'm looking forward to trying to model other objects.

And now, my final modeling exercise. I purchased the videos through Humble Bundle, so I'm not watching them directly on CGCookie. But here's the image so far. I say "so far" because this is a scene I expect to come back to. I created a similar scene many years ago when I had access to 3DS Max and one of the things I wanted to do was create a new version. The composition is off - too much happening on the periphery - and the textures and shading definitely need work. I reckon the CORE textures and shading and the CORE lighting series will be particularly useful in improving the scene.

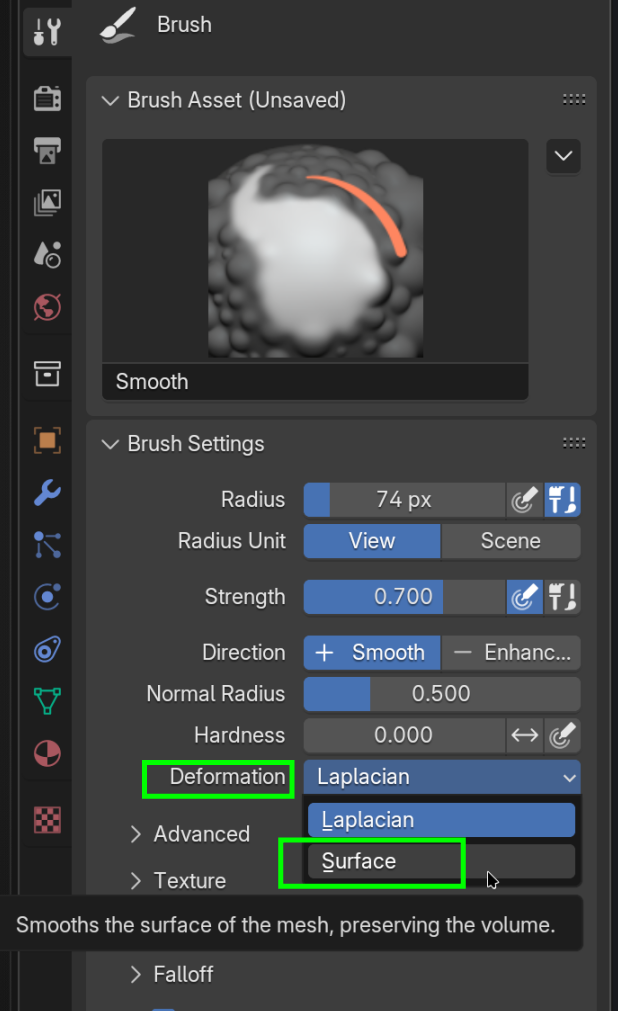
And the results from the digital sculpting videos. I had a lot of trouble with some aspects, particularly when it came to trying to smooth parts of the model. Sometimes smoothing mostly destroyed whatever feature I was trying to add topology to when using dynamic topology. But it's not a bad result overall. It does have waaay too many faces, but fixing that wasn't covered in the video, unfortunately. One way is to apply a single smoothing click at various points with dynamic topology turned on and Subdivide Collapse selected. But that can lead to rough areas if not applied very carefully. Remesh did a good job for most of the model, but some parts were damaged, particularly any relatively sharp edges. Something to investigate in the future.
There's shading, texturing and lighting to consider as well. The shark is currently just blue, but I'd like to have a mottled fade to grey/white for the underside. The quadropus grew from one of the earlier videos in the series. It needs some better colouring eventually, too. For now it's just got two noise textures. One feeding Fac into the colour an Color into the Tint of a Principled BSDF and then into a slot on a Mix Shader. The other with its Color just feeding straight into the other slot on the Mix Shader. The different settings give the two different mottled looks and mix of colours. But since I have no idea what I'm doing with any of those, the results are essentially random :)

I tried the smoothing on "surface" when modelling one of the other sharks for practice, but then the smoothing seemed to do very little. Something to practice.
However, I've gone through the core lighting videos and have my lit scene ready to go, I think.
I've started the shaders and materials videos. The first task allocated is to try to create a material that is like candle wax. This sort of works, though it was done through a very hit-and-miss approach. I have no doubt there are ways to make it better. The candles themselves haven't gotten much in the way of modelling. They're pretty close to being just plain cylinders. But that's partly because the focus here was on the material rather than the model. The flames could definitely be better. At the moment they're just naked point lights.