Can anyone help me to understand how scaling works on a curve? I don't know how to explain it, so I'll just have to show some pics.
Basic cube and curve added to the workspace. I've moved the curve so its left end is at the origin. I've added a curve modifier on the cube pointing to the curve, and I've parented the cube to the curve:

But, of course, that curve is tiny. So, we need to do something about that. I've got two options, and they do radically different things for me. And I have no idea why.
Option One (used in this video) is to select the curve, go into edit mode, scale it up, and then slide it on the X so that its end is at the origin (which, speaking of, is there a way to get it EXACTLY on the origin rather than eyeballing it?). Doing that gives us this:

And if I add an array, and make it first modifier, it looks good:

Note the important part (to me) is that the scale is 1/1/1.
So, now we rewind a bit with some ctrl-z and get to small cube and tiny curve:

So this time, I'm going to grab my curve and scale it in object mode, and slide it over:

My scale is now 15.778/15.778/15.778. Well, we know how to fix that. Apply the scale transformation.

And now I add my curve modifier:

Huh?
And, hell, why not, add the array while we're in here:

At least it's following the curve, but my scale is still totally blown somehow.
So, this kind of leads to the big questions.
First of all, what is the difference in my curves? When the first curve is scaled in edit mode, it gets larger, but its scale value remains 1 (which, until working on this explanation, I don't think I actually knew). OK, fine. I'm going to guess that's just the way it works. But why isn't my second curve, which I scaled in object mode, and the applied the scale transformation the same thing? They're both Bezier Curves with a scale of 1 with an origin at the geometry origin. What makes them behave differently? Why are they different?
Second, I've got another project where I'm (somewhat) deep into things and I've got stuff laid along a curve that's got a scale of 10. If I apply that scale, my object goes all nuts like the final picture above. How do I fix that without creating a new curve, scaling it in edit mode, and then reapplying? It's not exactly the most onerous thing in the world, but I would really like to understand what's happening here.
I just tried it, I had never seen that. Didn't know that could happen. That is a strange behavior for sure. Maybe Martin knows about it. All I can say is that in Blender probably 3D in general, there are things that once you are well into it and you then discovered you made a mistake, there is no other choice than to start over. When you try to apply the scale or fiddle with something and it just goes crazy, you just have to accept you set it up wrong and now you have to set it up again and ruin all your progress. Good news is that the more you make those kinds of mistakes, the more you know the road that leads to disaster and you learn to avoid them and plan ahead.
OK, well, if that's the rule, that's the rule. It's just, if I'm scaling an object, and you know, it's an object, it seems like it should be done in object mode.
But obviously, if it doesn't work, well, then we don't want to use that. It's just a habit to break in this case, I guess.
Scaling in Object Mode, means you are Scaling the Coordinate System of that Object (whether it's a Mesh or a Curve).
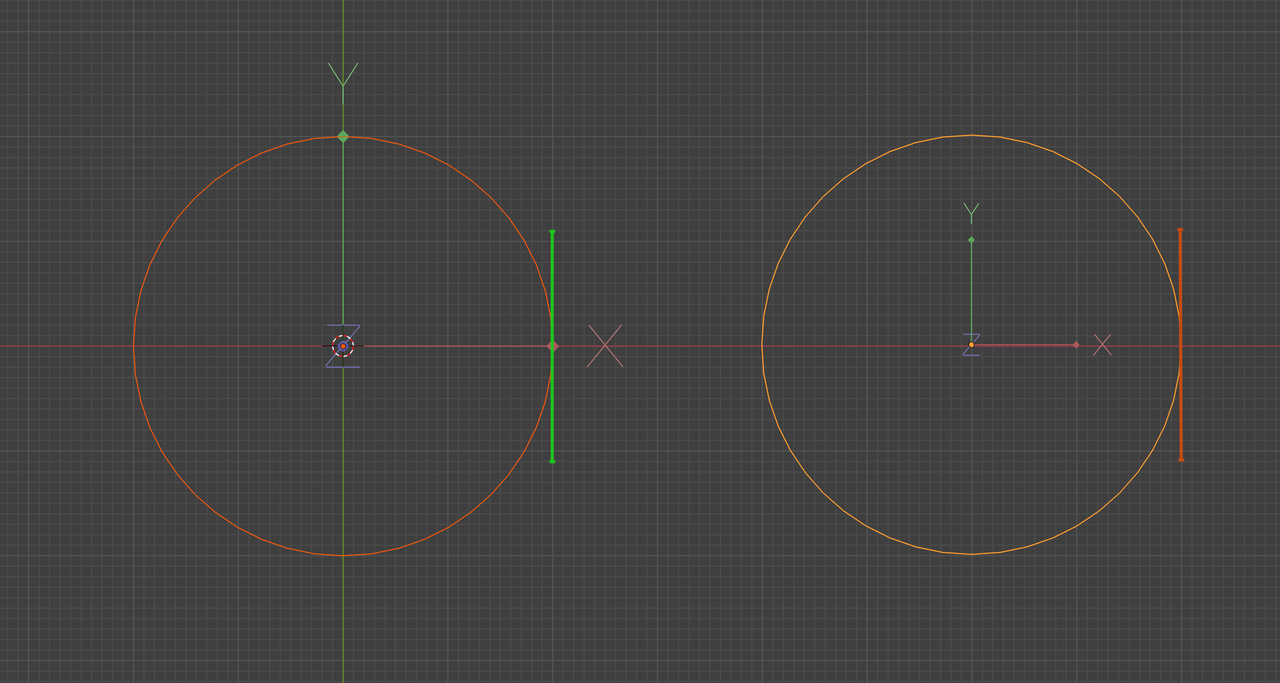
If you look at this picture, the Handles of the Control Points of the left Curve (Scaled in Object Mode) are about 1.1m apart, while those of the right Curve (Scaled in Edit Mode) are about 2.2m apart. When you Apply the Scale, the distance between the Handles of the left Curve doubles. In 1 Axis (the Tangent), the Size of the Control Point changes.
This doesn't explain completely, what is happening, but it might give you a gut-feeling, why the behavior is different for Curves, than for Meshes and keep you from diving into the rabbit hole (it's not worth it, believe me).
First, data vs transforms. When you edit things in edit mode you are affecting the data. When you edit things in object mode you are creating transforma. Take the default cube, tab into edit mode, in mesh overlays check edge length. You will see that all the edges are 2m. Tab to object mode and press n to bring up n-panel(technically called the sidebar) on item tab at the bottom you will see that all dimensions are 2m. Scale by 2(press S then 2 then left click). Now the dimensions are 4m. Tab into edit mode and the edges are still 2m. Tab back to object mode you will see that the scale is 2. That means it is multiplying the data by 2 on all axis. Then apply the scale. Scale becomes 1. Now when you tab into edit mode the edges are 4m. When you apply any of the transforms it changes the data.
Second, to answer your question. What gets changed is not only the curve and handle length, but the radius is also multiplied by scale. This is what's causing your problems. You can go to edit mode, select all control point(also called vertices) of the curve and on the n-panel hold alt when you click in the radius field. Change it back to 1 and press enter. For people using emulate middle mouse button just click in the field, enter number, and press Alt+enter.
Ugh, that's painful. But thanks for the knowledge everyone. Some day it may become more ingrained, but for now I think the answer is going to be putting "when working with curves, use edit mode) in my notebook.
Interesting. I mean...I've got no reason NOT to, just didn't know it was a good habit. Or, I guess, working in object is a bad habit.
Well Joe MMerijeek ,
Its mostly Scaling in Object Mode, that's causing problems. With Meshes, you can simply Apply the Scale after the fact, but with Curves that gives often unwanted results (as you've seen).
Transforms, done in Object Mode, Transform the Object's Coordinate System and Scaling a Coordinate System 'distorts' it.
That's why Scaling is best done in Edit Mode. Rotating (and Translating), on the other hand, is usually best done in Object Mode.
Scaling in Object Mode can be useful, when you have Linked Duplicates (copies, that all use the same Mesh Data, ie.: Vertex Positions and so), for instance one rock, that can be placed around the Scene, Rotated, Scaled and so, all in Object Mode, to make it look less like just one rock.
This will all become much clearer with time.