Going through the CORE series and posting my results as I go. I've been trying to get into 3D asset creation for years but have had trouble creating things. I'll model a low poly character after several failed attempts only to find that my topology makes it deform poorly, or I'll see an environment photo I want to recreate then get stuck on making believable foliage. I have even tried to animate characters already made and rigged up but struggle to make motions fluid.
I'm not particularly uncomfortable with Blender's UI and terminology after being exposed to so much basic training. However, I've found that my lack of solid fundamentals have made learning intermediate and advanced subjects difficult and stops me from acquiring the skills needed to really advance to where I wish to be. My goal is to be able to create both realistic and stylized characters and environments for both games and film, and to be able to rig and animate them for use in my own projects and a team production environment.
With that in mind I intend to fully go through the entire CORE series here at CGCookie and do every assignment and exam that's offered. I want to practice everything that's taught in the hopes that it converts into skill that I can use outside of the course.
Snowman made by following the CORE series Intro to 3D Modelling. Made an empty as the top parent of the original snowman then duplicated the tree to create two more that I repositioned and tweaked to make them a bit different. Changed materials to be emissive to make it easier to take a picture without messing with lighting.

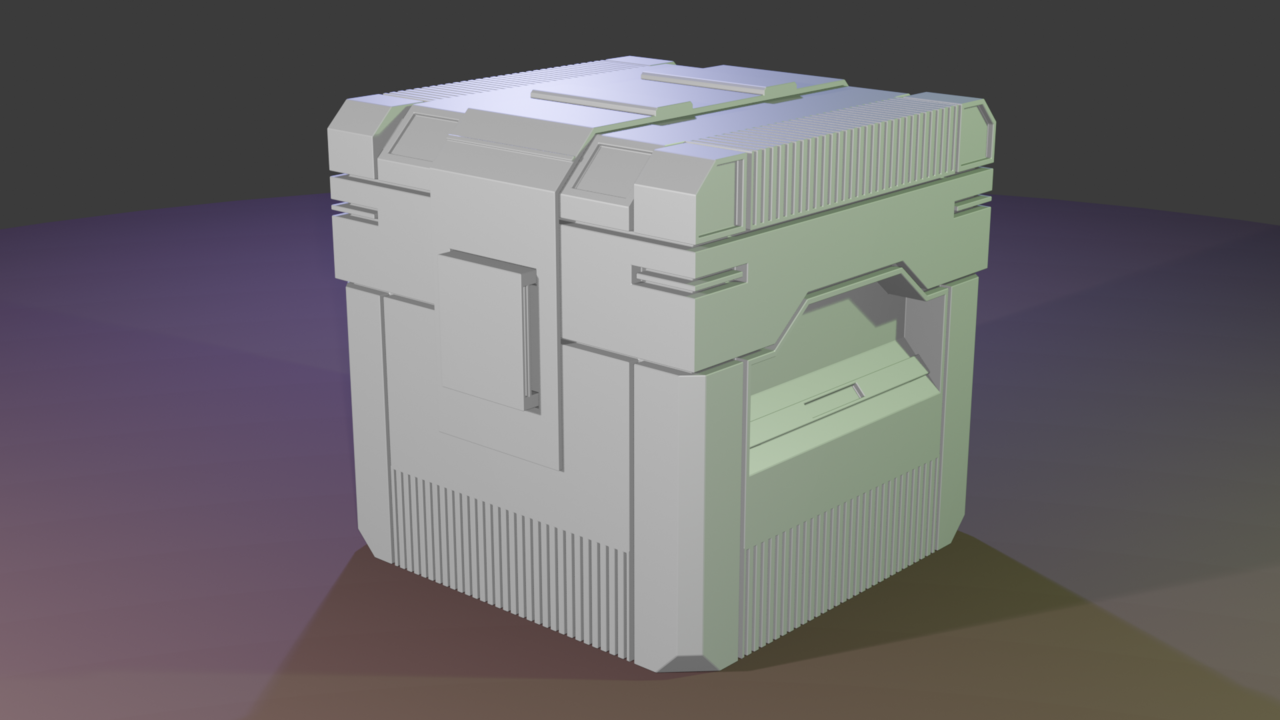
Sci-fi crate made by following the CORE series Intro to 3D Modelling. Like the instructor said I added more surfaces to it than what was done in the video and tried to make it more interesting to look at. Added some color lighting for the render in the hopes of making the surfaces pop out more.
A soccer ball made by following the CORE series Intro to 3D Modelling. I pretty much followed the tutorial 1:1 although I subdivided the starting icosphere with its Add panel and not after the fact. This might have been why when I was selecting the areas for the white part of the ball that I had to select a triangle face (which was the center) instead of a single vertex before growing the selection area. I'm not 100% sure why there was a difference but otherwise it was the exact same process as the tutorial.

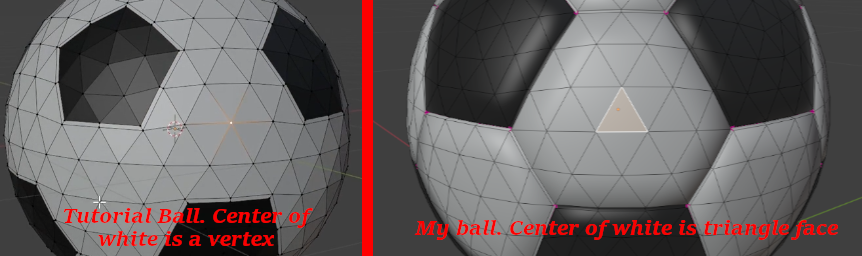
Re: the football, you're on the right track with deducing what happened. It's just been subdivided more times than the tutorial ball regardless of whether it was done in the redo panel or via subdividing the mesh.
If anything, it'll look smoother as there are more verts. But it'll just be more processing that blender needs to do. Although with a small model like this, it's not going to make any difference. Just something to be aware of when working with large scenes or objects, especially when you start having fun and add modifiers 🤘🤠🤘
Ps. I'm subscribing to your polybook. I agree with Omar's sentiment towards your humbleness of wanting to go back and dig down and learn the fundamentals before jumping into the deep end. I can actually relate to his comment too, where I did try to make a big robot before taking any of the fundamental courses and very very quickly realised I had no idea what I was doing.
Keep it up and give yourself all the time and patience that you need, it'll absolutely pay off, and I look forward to seeing your progress!
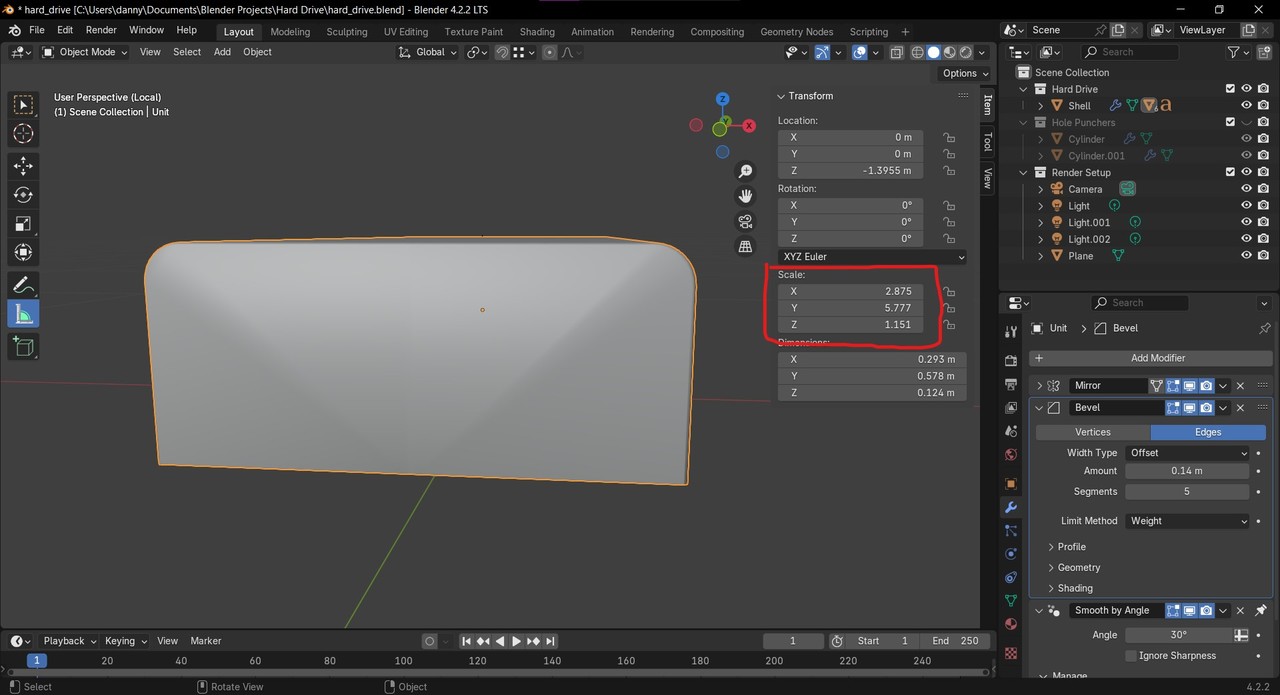
A hard drive made following the CORE Hard Surface Modeling. Struggled a bit with getting the shading to be smooth on areas with N-gons but got a result that looked good enough for a render. Will probably re-visit the videos talking about N-gons and smooth shading again but I'll likely be avoiding any N-gons where I can. This time around I got them when beveling which I know I'll be doing often, so I'll be focusing more on fixing bad shading results and why they happen.

So after a good night's sleep I came back to the hard drive to figure out why I was having shading problems. I felt like I was using the modifier's correctly but it just wasn't acting right. That's when I went into edit mode and saw that the bevel modifier wasn't behaving like normal and realized that it was because my object's scale wasn't applied that I was getting shading artifacts. Haha sometimes it's the simplest thing.

Thanks for the encouragement Omar and Harris!
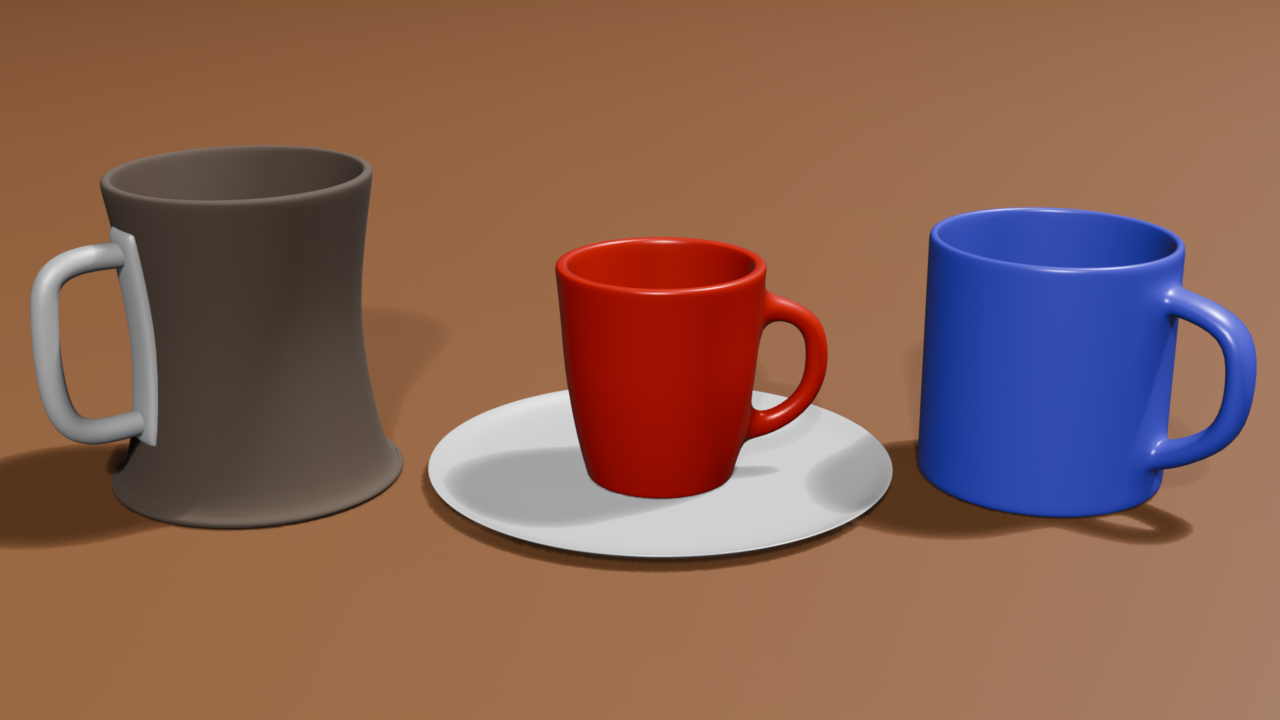
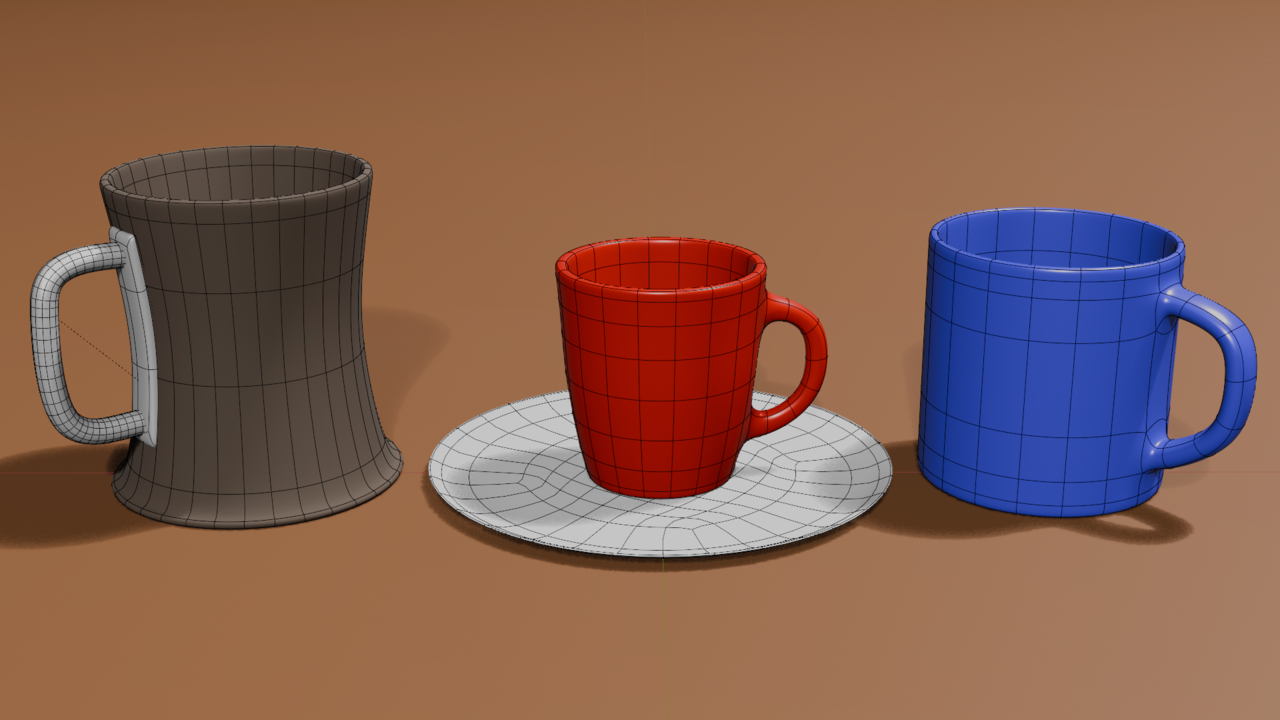
Coffee cups made following the CORE Subdivision Surface Modeling. Made the red one following the steps in the tutorial, then did the blue one with the same method but with a different design. The brown tankard I did using a different method with the solidify modifier and a curve for the handle as the tutorial said to try making a cup a different way than what was shown. Even got to use what was taught about edge creases for the handle bib to make it form to the mug even with the subdivision surface modifier on it. Lastly I made a little plate for the original cup. You may not be drinking coffee out of that last cup but who's complaining :) .
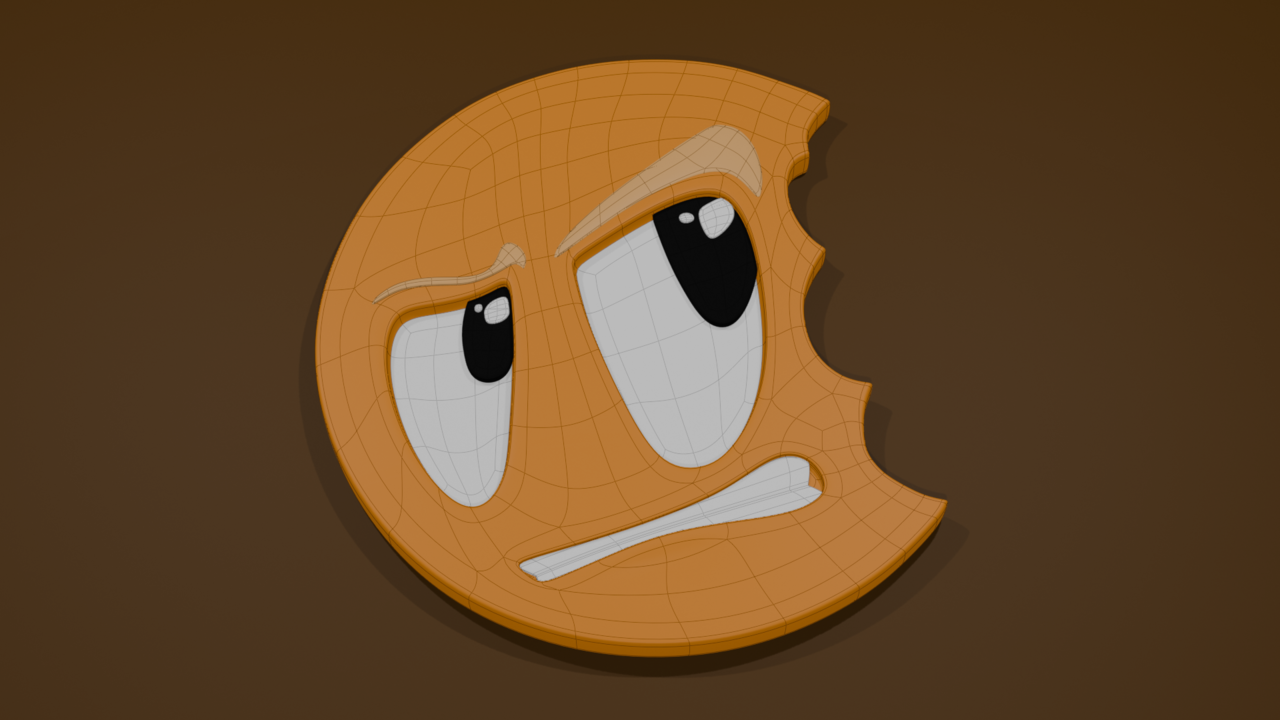
CGCookie logo made following CORE Subdivision Surface Modeling. This was a great learning experience for me as it helped me think about edge flow more than I ever have before. I didn't quite follow the tutorial step-by-step as I was trying to do as much as I could alone and refer to the video as needed, so my topology ended up being a bit different (namely between the eyes) but overall I'm happy with the result. Added the eyebrows and eye gleam just to get a bit more practice with tracing a reference image as well as doing creases to get sharp points on a subdivided object (eyebrows had some sharp ends). Also wanted to try and get it to match the colors of the reference so I extracted the color codes from it and used them in the materials.

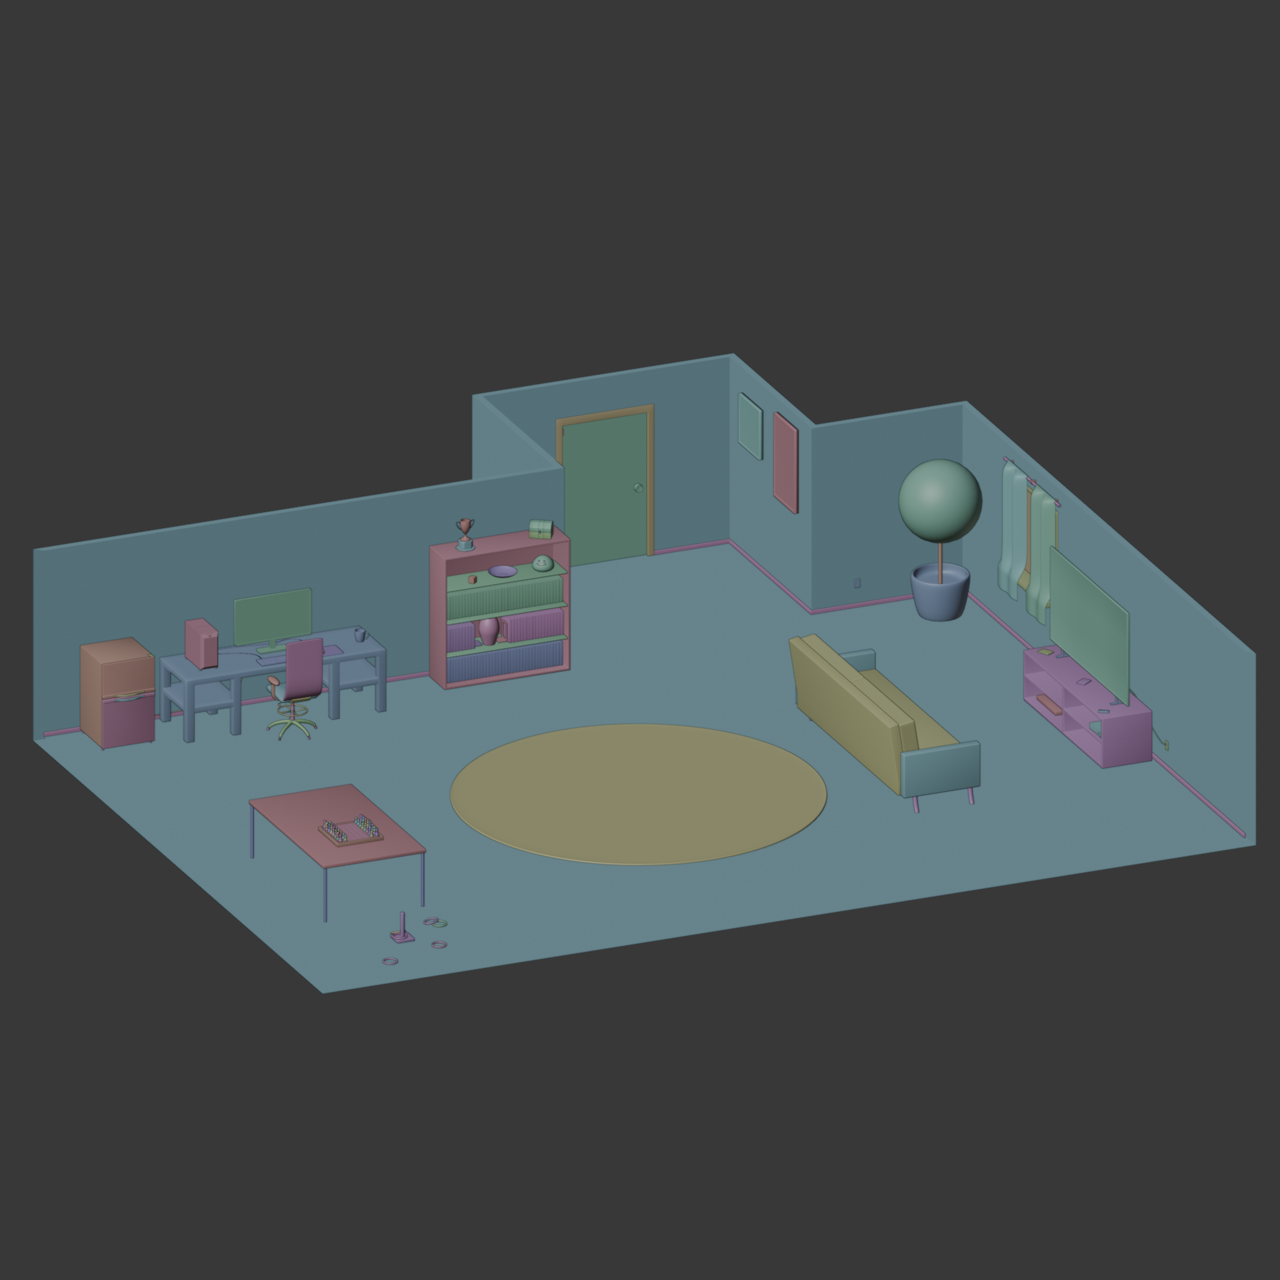
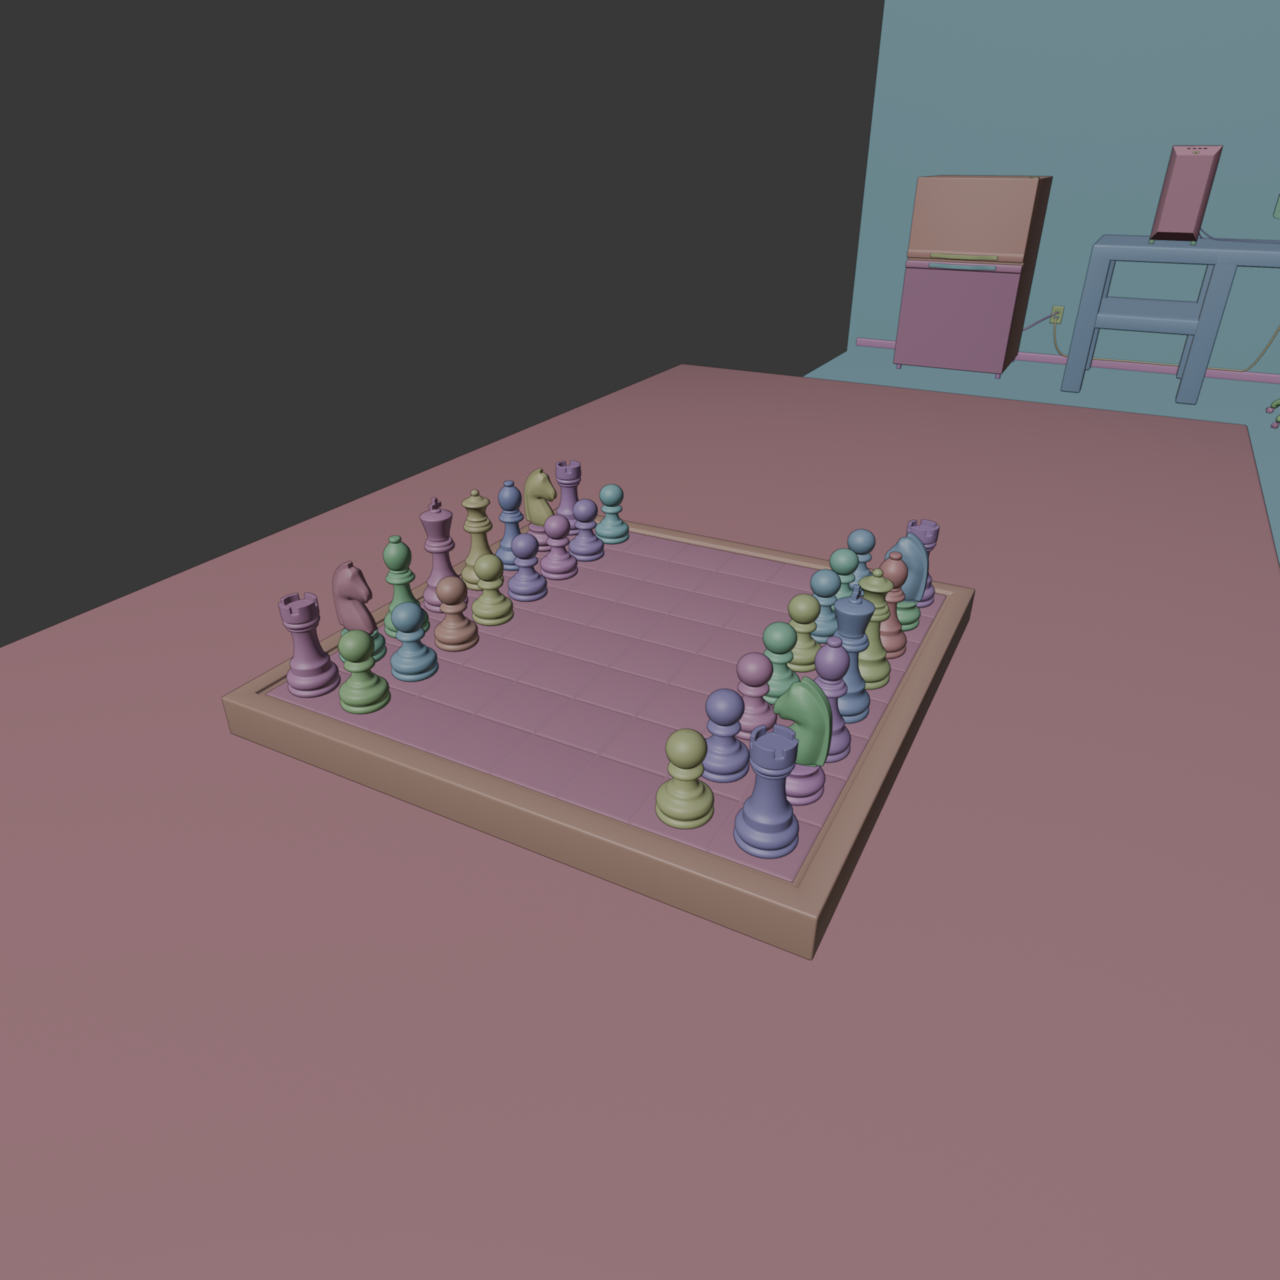
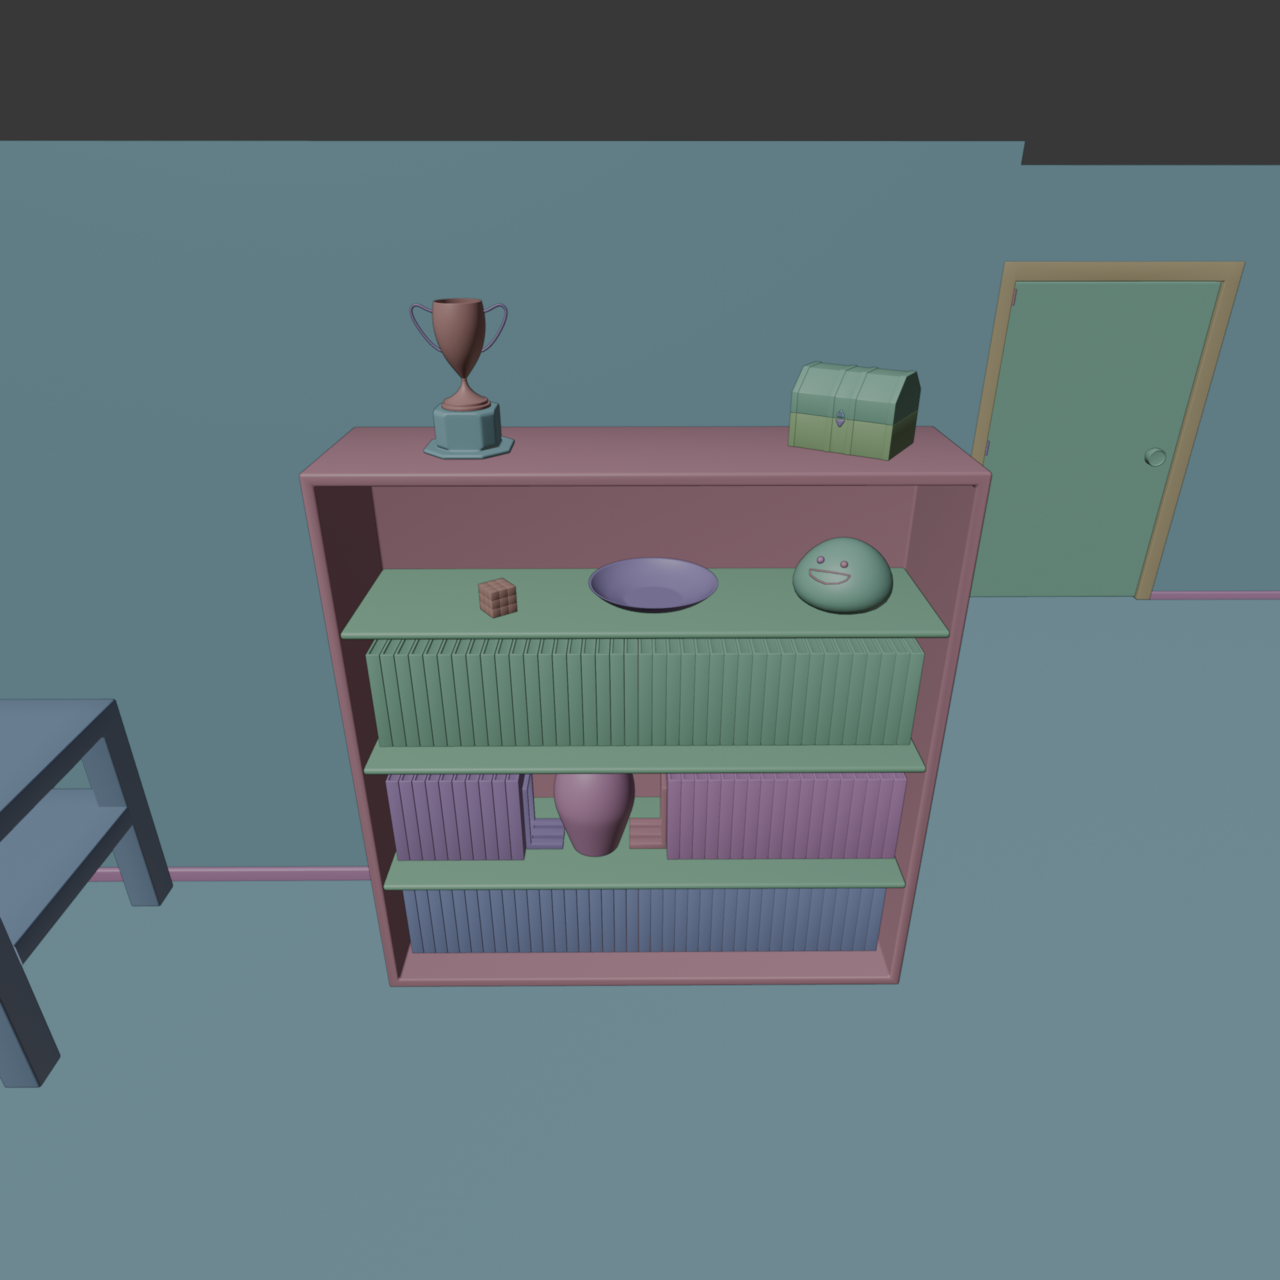
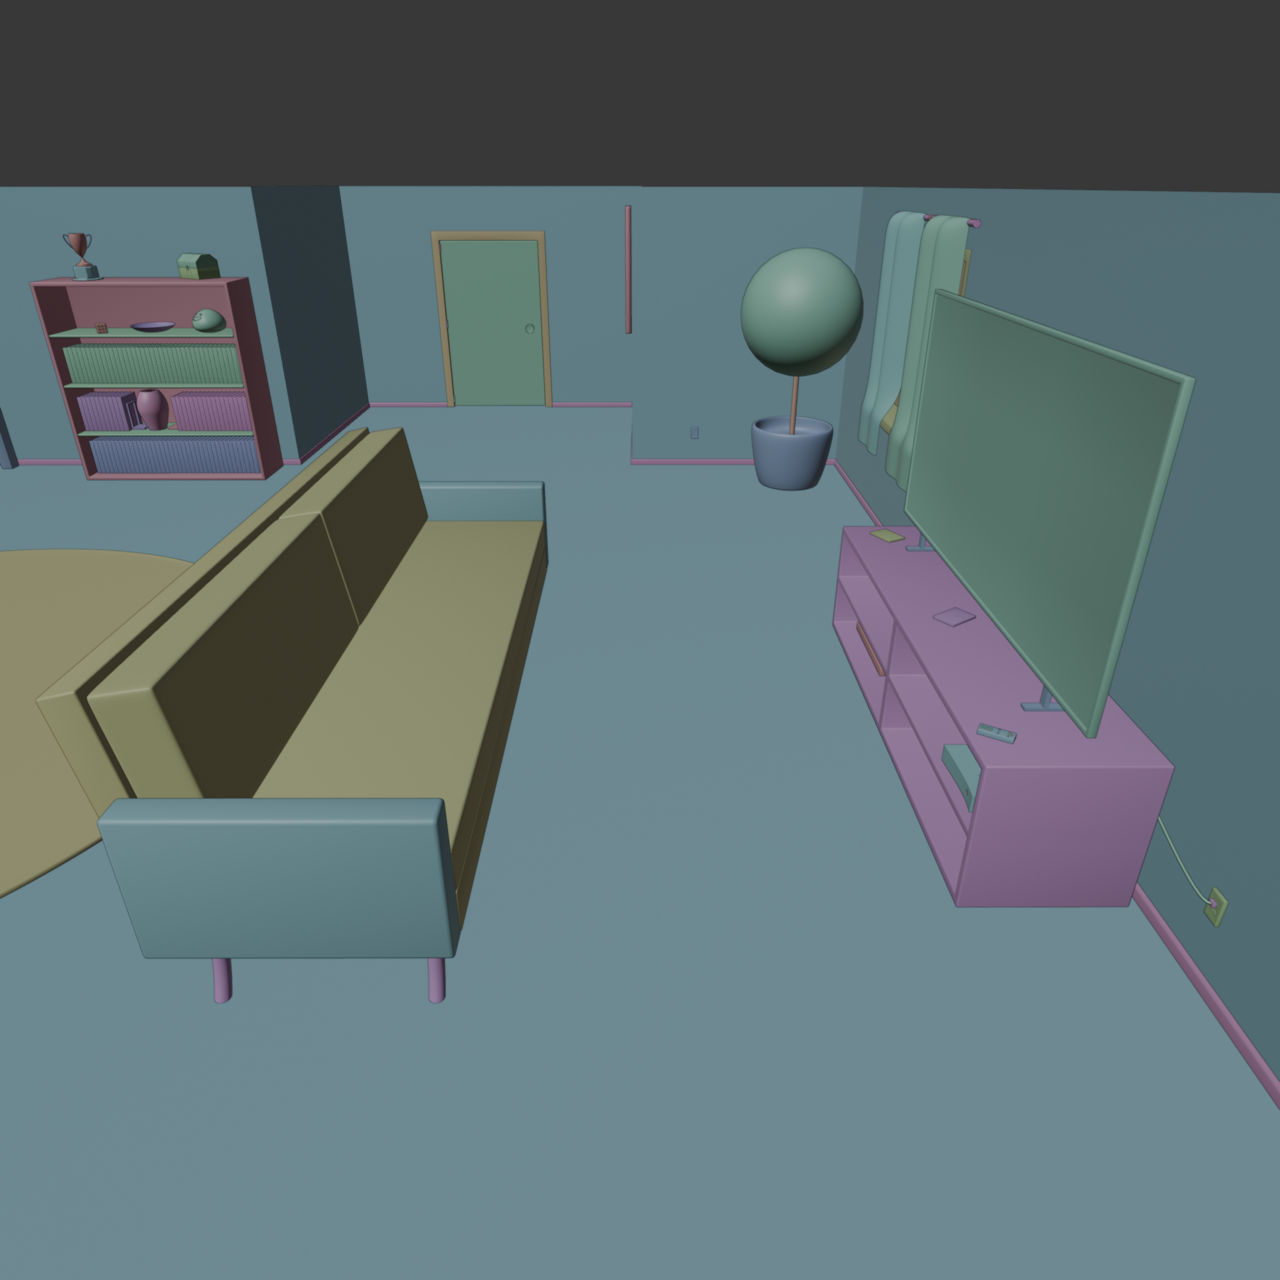
Low Poly Room made as a submission for the final exercise in the CORE Subdivision Surface Modeling course. I had started this a few months ago but hit a few roadblocks along the way and put it down for a while. This week I managed to pick it up again and actually get enough done that I felt it was worth submitting :) .
I used most of what I learned during the course up to this point in this room scene. Since I took a fairly long break I had to knock off the rust but was surprised how much I remembered. During a few models I had some real trouble making them, namely the office chair and the chess pieces (particularly the knight piece). However after doing some more research on how other people approached them and fiddling with various modifiers I was able to get them done albeit not quite to the degree I wanted them to be. I'll definitely revisit the office chair in a future project when I feel I'm more prepared for it.
It was both fun and exciting working on this scene and I can't wait to move onto the next part of the CORE series (assuming my submission passes)! If there are any tips anyone can give based on what they see in this room scene I'm all ears. I feel I made the room too big for what I wanted to put in it but didn't feel like shrinking it after the fact.

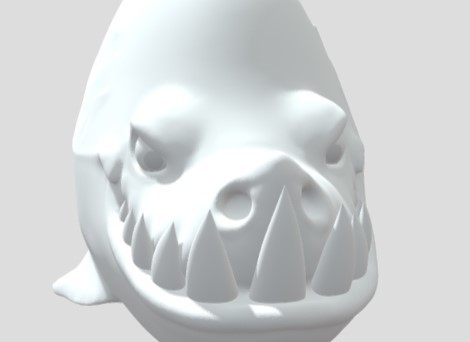
https://sketchfab.com/3d-models/shark-remeshed-cgcookie-2f8c5a33b3ea4d1aa088a8513f4cdf74
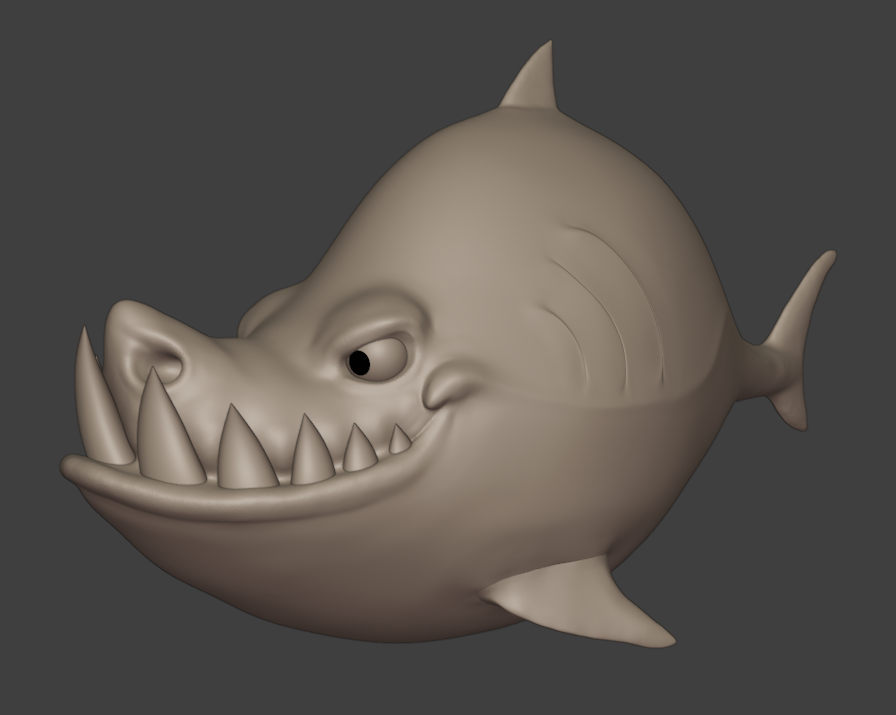

This is my submission for the shark sculpt exercise. I had to perform a remesh as my .blend file was over 100MB which is the limit for free uploads on Sketchfab.
I had some trouble with getting sharper fins as I don't think I was using the pinch brush properly for most of the exercise. I also had a lot of trouble with the lower fins since I tried to jump ahead and do it myself without following the course video. I ended up making a bit of a mess around the lower fins and did my best to clean it up. I couldn't figure out how to best smooth the area around it as I tried adding more geometry and smoothing that way but that alone wasn't enough.
I'll likely do a different shark after I go back and re-watch the videos where the instructor uses the pinch tool. I'm using Blender 4.3.2 and the sculpt tools and interface got a bit of a change from what's in the video so it just takes me a bit to figure it out :) .
Thanks for catching that! Not sure why it did that but first time using Sketchfab. Reuploaded as a .glb file and seems to be good now.
Yeah sculpting is one of those things that is mostly an artform and not so much technical. I compare it to drawing all the time, as in it's not in the tool. A pencil is all we need and we know how to use it, yet we can't just pick it up and draw incredible art pieces, we need so much more than that. Same with sculpting in Blender, you'd think because you know your sculpting tools you're set to go, yet we need so much more than that. So it's all about practice, eye, wrist, artistic judgement, and more and more practice.
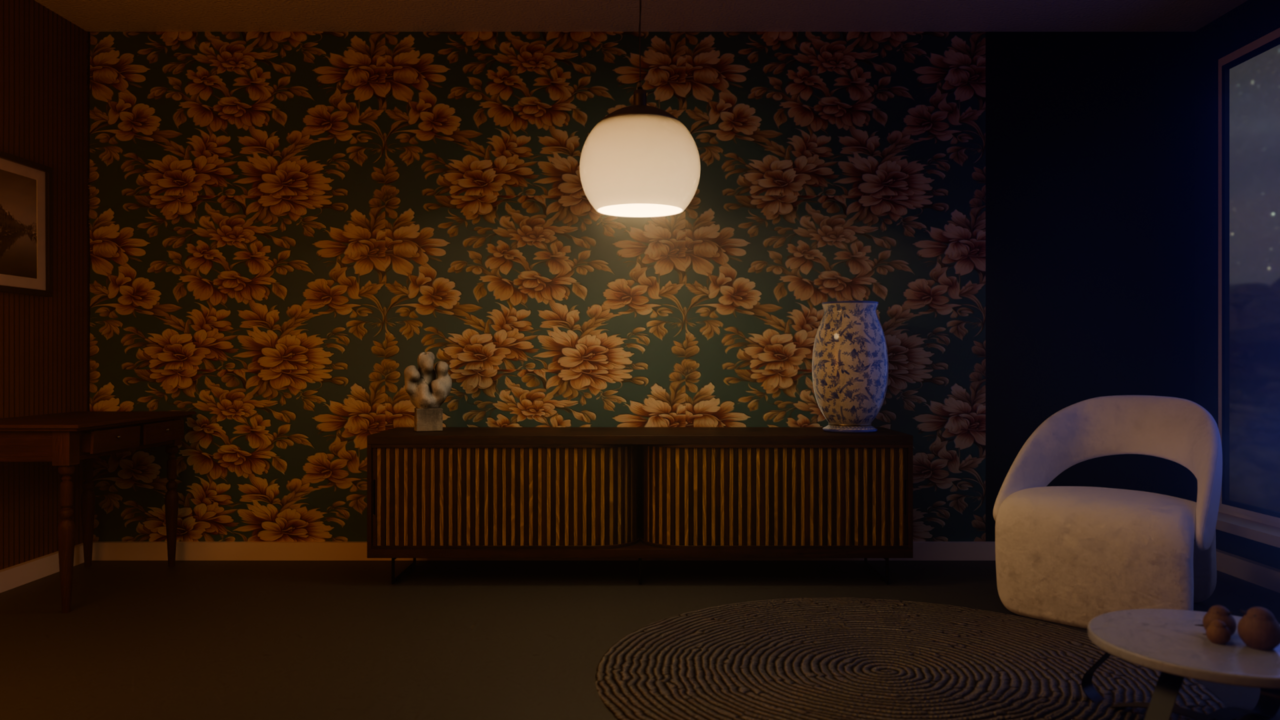
Room Lighting exercise submission after completing the CORE Fundamentals of Lighting course. Room assets provided by the course, I simply lit it to "tell a story" as the instructor put it. I used some subtle volumetric scatter, an HDRI with an assisted blue light to get the color I wanted coming from the window, and a warmer fireplace-like light source coming from just off screen to the left. Added a few more lights around some objects to get more color to them other than those three primary sources (fireplace, middle light fixture, and right window). I finished it off with changing the color management to have a medium contrast so that the shadows weren't so strong in the corners of the room and let everything feel a bit more welcoming.
I liked the lighting course as it was just enough info to get me going and even showed me some good resource saving techniques such as the area light portals which I got to use in this very first scene. I only used 200 samples with Cycles and with the denoiser it still came out good IMO. Definitely welcome to feedback on anything as I was mostly just going by what looked right.
Also this is a 1080p reduced version of the final render. My submission render is at 2k but had to downsize due to file size upload limit. Strange thing is that the limit is 5MB but my original file is 4.8MB, yet it failed to upload twice due to "exceeding the 5MB file size limit". Not sure if that's a bug with the website or if the file size cutoff is actually a bit smaller than stated.
There is another lighting course with an earlier Blender version. The version doesn't make much difference, because this one is also filled with timeless lighting knowledge:
https://cgcookie.com/courses/fundamentals-of-digital-lighting-in-blender