Hi there,
Super basic and silly question, but I just now realized I don't know if there is a simple/straight forward way to keyframe the visibility of an object in Blender?
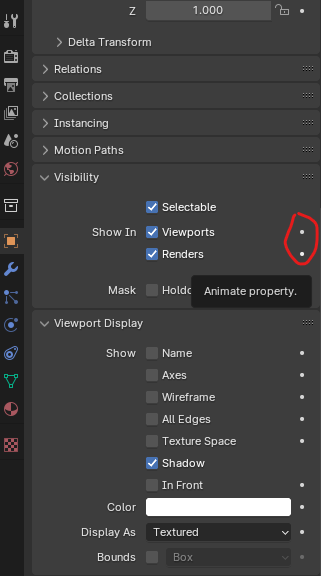
You can do that in the data properties on the right under visibility, think it’s just above Viewport visibility. Not at computer right now, but sure it’s there. Different ray visbilities too, all easy to keyframe.
Awesome! Thank you guys!
How do you set the keyframe on the icon though? I tried a few different modifier keys but it just toggles on or off.
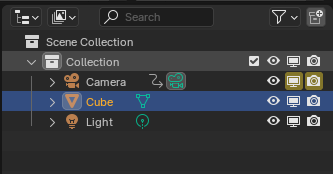
In the Data properties it's easy, but the ability to do it straight on the outliner is much faster!
To do it in the outliner you click on the filter icon in the header and then click the monitor icon so that it shows in the outliner. Then with mouse cursor over the monitor icon next to the object either right click and click insert keyframe or press i. For Render enable/disable you just move the mouse cursor over the camera icon and either right click or press I. Once you have 1 keyframe of this type you can go to the dopesheet editor and click view and check show sliders. This will show the monitor Icon in next to the property name in the expanded action in the channels list on the left. You will need to click the arrow head(Turning it off) and the dashed box(Turning it on) icons on the header. I usually type disable in the search at the top of the channels while I'm animating the Viewport and Render enable/disable. This will allow you to animate these setting in the dopesheet editor. To animate in dopesheet just move to the frame and click the icon next to the channel name. It will add a keyframe or change an existing keyframe. Note: For those who want to know. the arrow head is show only selected. When you disable in viewport it is no longer selected which is why you have to turn this off(Not blue). The dashed boxes next to it shows keyframes for hidden objects. By typing disable in the search it hides all channels that don't have disable in the channel name. Also the view slider will show other channels settings too and can be animated thru the slider. Just note that changing thru the slider automatically updates/adds a keyframe.
Awesome! Thank you for such a detailed explanation Dwayne, and thanks everyone! I didn't know a lot of these tricks.
One last question though: is that so that we cannot interpolate or adjust bezier curves between on and off? I could only get it to work on constant.
If that's the case, is there another way to achieve a "fade-in/out" that is also simple, or just through manipulation of materials?