Attention: Python and developing ahead. I've been contemplating a solution for this, but it's becoming increasingly complex for me. The question is clear: How can you synchronize the clock with the position of the sun? In other words, how can you create a functioning clock in this animation? (A day time lapse)

The solution I've devised seems overly complicated, but I believe it's a viable approach...
So, let's get started:
I'm not certain if this is feasible, but it seems plausible in my mind... I would appreciate it a lot if someone with more expertise in this area could correct me and show me the script for this... or explain how they would approach this question!
Thank you all.
Hi Juan,
That is an interesting problem..
The main problem is, that the sun rotation, doesn't directly transfer to a time...
But if you are able to make a correlation, there are probably many ways to do this, but here's one idea:
You'll need to do the math to get the conversion you want, but this might get you in the right direction.
Why not use the sun position addon that comes with Blender. You have to set the date and time and location and it will adjust the sun lamp and or sky texture. There is also a HDR+Sun lamp mode, but I haven't used it. Then you can either use drivers or keyframe the time/date. The manual isn't very helpful, but it's a starting place.
Didn't knew it existed! hahaha (I'm a newbie at Blender...) I've been reading about it now, but I stumble at the same painpoint... How can various textures automatically switch among eachother in the shader editor, depending on a value in this case being the string of the sun's elevation?

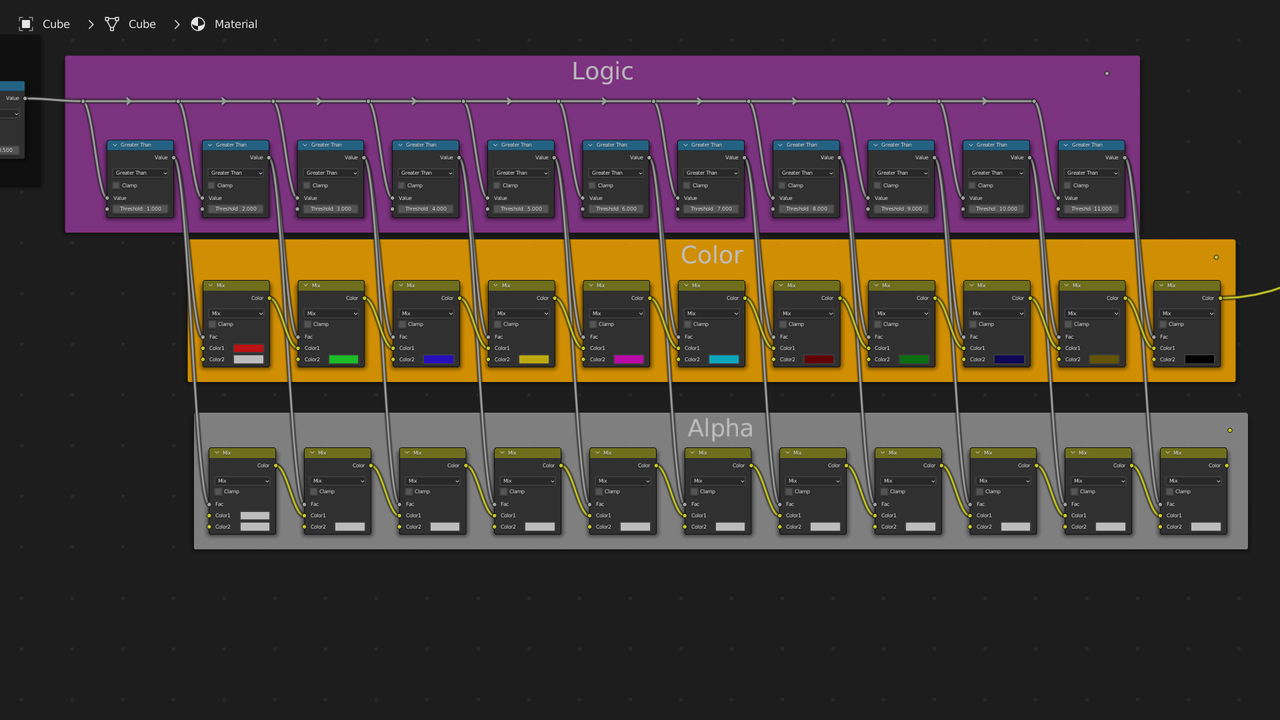
Thinking in terms of textures/materials the first thing is to convert the degrees to hours. Going based off a sundial it's 15 degrees for each hour. Blender uses radians so we have to deal with the conversion problem for degrees over 180 and map this to the hours from 1 to 12. So here is what I came up with. The axis rotation is just a value node. I copied as driver the axis of an empty. You'd use the axis of your sun lamp or the elevation setting if using the addon. You might have to do some additional math to get the exact timing. Mine just goes 0-14 degrees is 01. 15-29 is 02 and so on until 180-194 which starts at 01 again. 195-209 is 02. The last add node adds 0.5 just so I can use hole numbers in the greater than nodes.
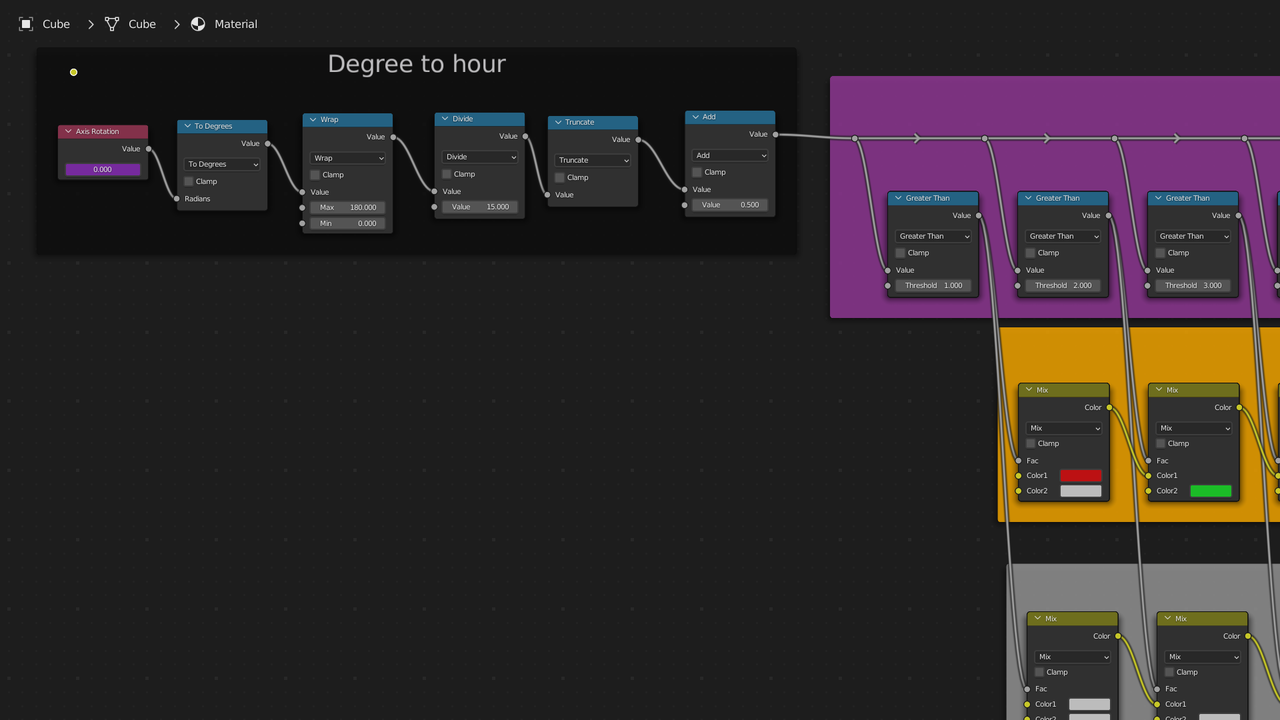
Then we have the texture selection section which is divided into 3 parts the logic, the color, and the alpha. If you don't need to pass thru the alpha channel then you can skip the bottom section. Greater than produces a 0 if it's less than the threshold and a 1 if it' greater than the threshold. A MixRGB(Color mix in newer version of blender. I did this in 3.2) set to mix will be all the top if fac is 0 and all bottom if fac is 1.
You can do it easier in geometry nodes. Just note if you use 180 or higher you will need to correct for the conversion, which inverts the value. 180 becomes -180, 270 becomes -90, etc.
I added the clock.blend file That I created to google drive. This is suppose to be the share link, but if it doesn't work let me know.
https://drive.google.com/file/d/1S9ZSvsaRkVM1-_XSUp_arcmkt8pdvNhG/view?usp=sharing
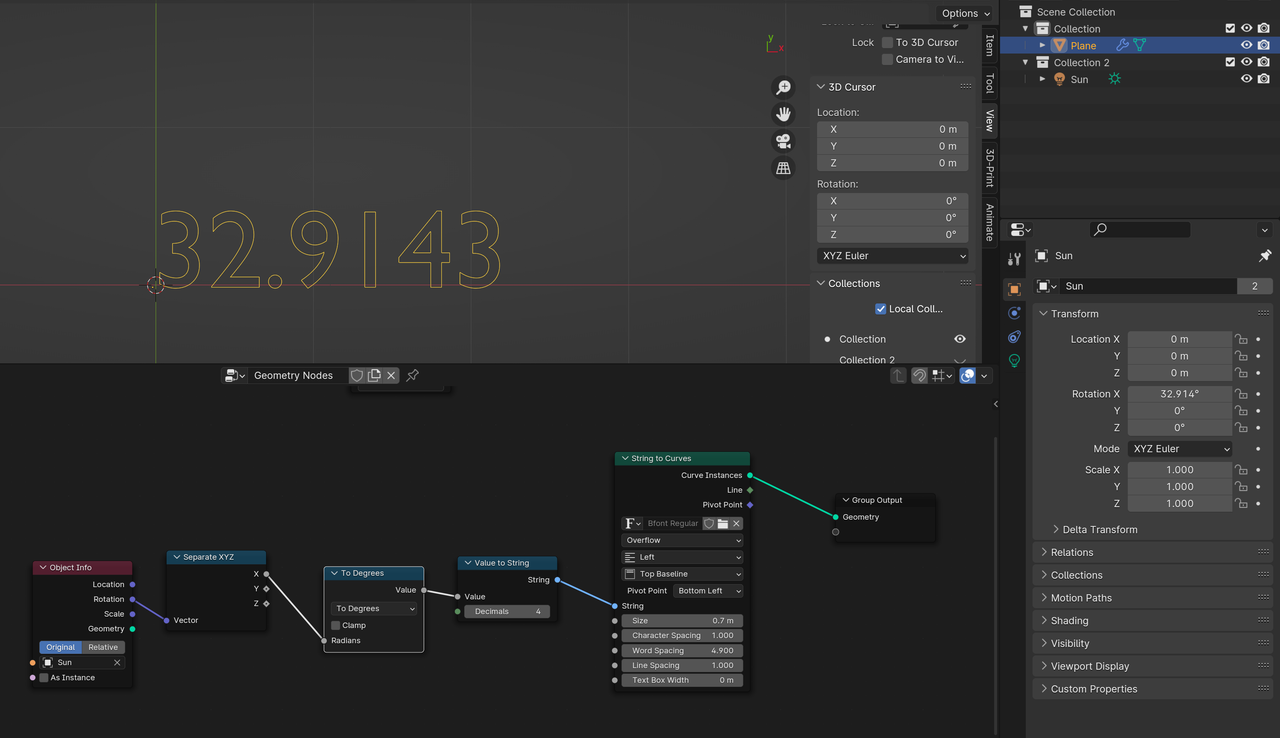
Forgot to include pic of my geonode setup. I use 010203040506070809101112 for the string. 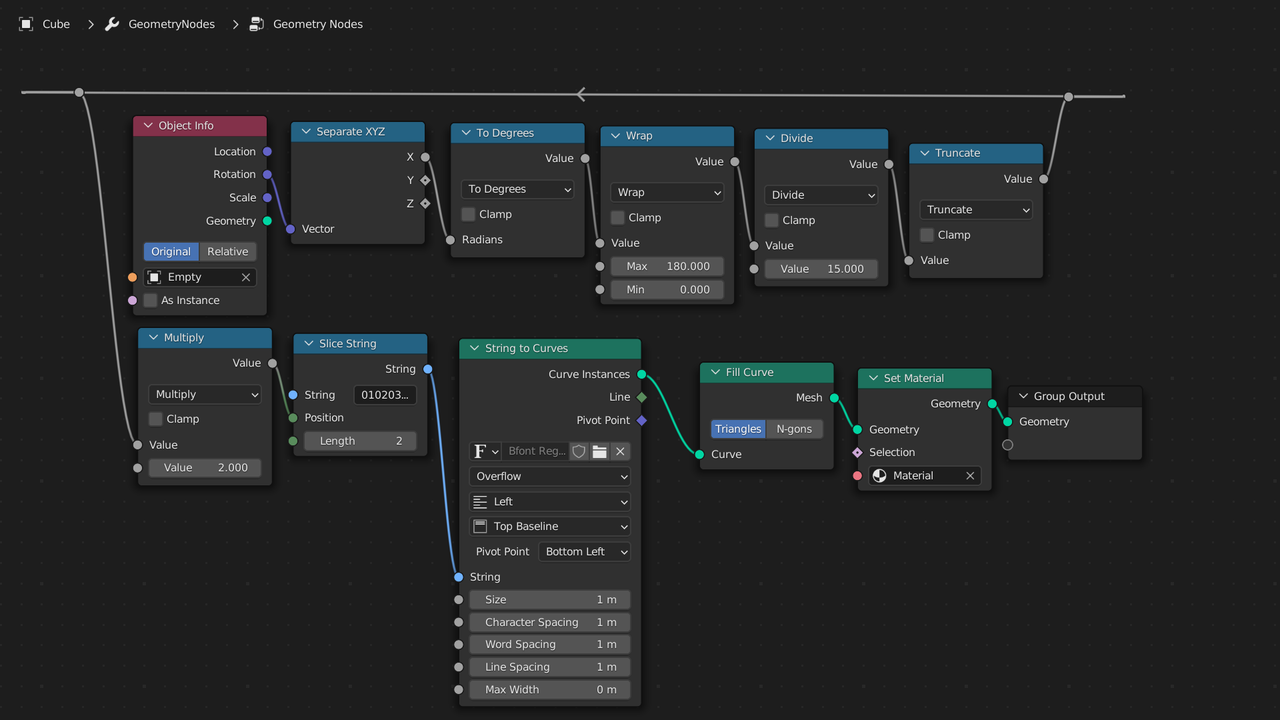
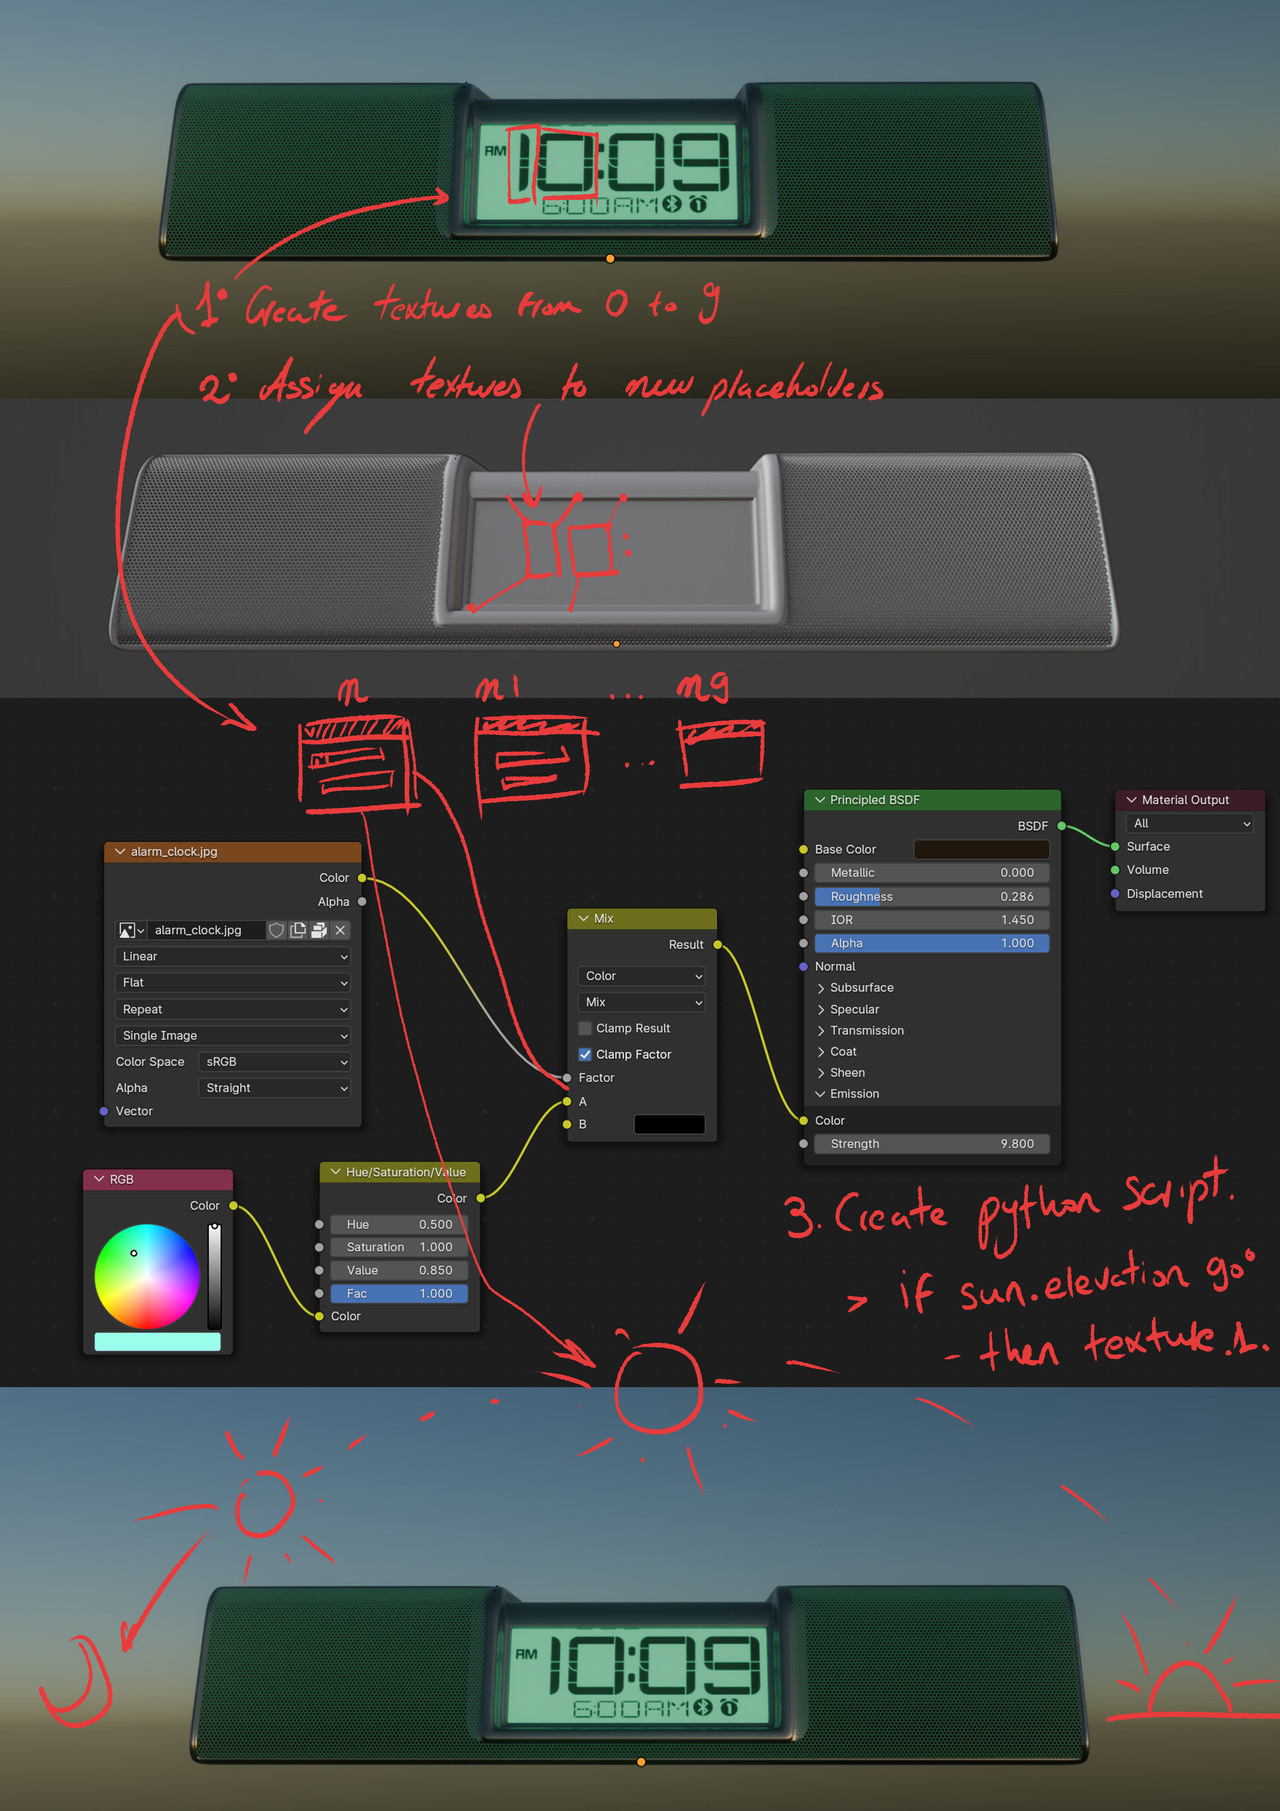
![]() spikeyxxx Could you explain step by step from the beginning how you would do it? Sorry, I think I am missing the point. I believe that I understand what you meant though; you are talking about animating the sun's elevation with an Empty, then using the value of the position of that Empty and converting it into a curve to represent the numbers (if I'm not mistaken). However, that would result in curves that lack a specific format or the desired texture, in this case, the distinctive typeface of a digital clock (that you have to craft manually). So, imagine you create different textures for each hour, from 1 to 9, all in PNG format. How would you make them interchangeable as the sun rises in the object shader editor? It seems like it would involve one texture beind connected, then disconnected, followed by another texture image connected and so on... as the sun / or empty changes its elevation/rotation.
spikeyxxx Could you explain step by step from the beginning how you would do it? Sorry, I think I am missing the point. I believe that I understand what you meant though; you are talking about animating the sun's elevation with an Empty, then using the value of the position of that Empty and converting it into a curve to represent the numbers (if I'm not mistaken). However, that would result in curves that lack a specific format or the desired texture, in this case, the distinctive typeface of a digital clock (that you have to craft manually). So, imagine you create different textures for each hour, from 1 to 9, all in PNG format. How would you make them interchangeable as the sun rises in the object shader editor? It seems like it would involve one texture beind connected, then disconnected, followed by another texture image connected and so on... as the sun / or empty changes its elevation/rotation.
Your method is quite clever Spike. There would also be additional steps required, such as setting the value range from 0 to 24 and many other details, including assigning some arbitrary values that could probably lead us to the ultimate conundrum / Confusion.
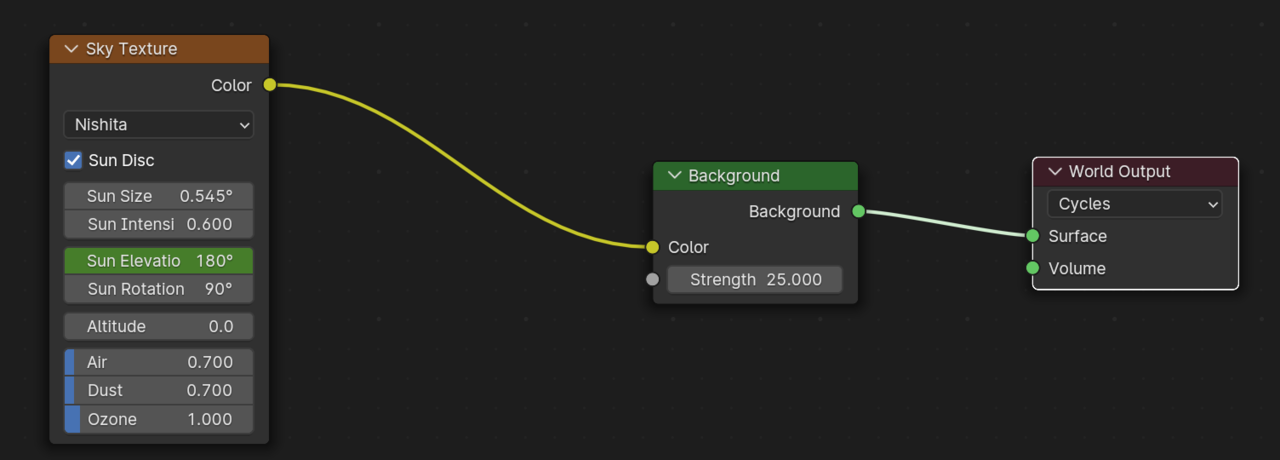
Findings: The Nishita Sky textures seems incapable of achieving this, there's no valid mapping input, therefore is impossible (as far as I'm concerned) to assign the texture coordinate of an Empty. You can do it with the Hosek / Wilkie sky texture but when you move your Empty you change the value of the geometry (Good!) but you don't change the sunset appearence (Womp womp!), creating then an unrealistic scenery...

Wanna give it a try and lend us a hand ![]() dostovel?
dostovel?
Thank you again guys!
![]() dillenbata3 I'm in awe. I needed some time to process all this information, but it is fantastic. I think that would solve the problem, but this raises the question... Would it work with different image textures? For value 1 this texture and so on...
dillenbata3 I'm in awe. I needed some time to process all this information, but it is fantastic. I think that would solve the problem, but this raises the question... Would it work with different image textures? For value 1 this texture and so on...
The geometry node is also marvelous, but with this set up we shouldn't care about it too much. Change the number given to a placeholder such a square plane for it to display the different textures crafted (the hours with the used typefaces in PNG) and that's it! Am i right?
You'd just plug the PNGs into the mixRGB/Color nodes. Top row would be for the image color. Bottom row would be for the image alpha. 01 would go into A of first node. 02 would go into B of first node. 03 would be B of the second node. Then B for each node.

HI Juan,
Here's a short description of my workflow, it's just a proof of concept and leaves a bit of work still to be done. But I think you prefer Dwayne's practical solution anyway.
I set two Keyframes on the (for instance) Elevation of the Sun in the Sky Texture, and also on the (for instance) X Rotation of an Empty). That results in two curves, that can be manipulated in the Graph Editor.. I think the GN part is straight forward, you can also set the Font there. You'd have to insert a few Math Nodes to convert the degrees into a time. (Most notably a Modulo 12/24 for the hours and a modulo 60 for the minutes...)
Like I said in the beginning, the biggest problem, is to convert the sun position (or, in CG, the Elevation and Rotation) into a time...it depends on the time of year and the location on earth as well...but it's still just a bunch of Math Nodes.
Another (easier) way could be:
let the sun rotate 'around the earth' at a constant speed (two Keyframes, Linear Interpolation) and in the time that the sun rotates 360°, let 24 hours pass (also at a constant speed). That would still leave the issue, that a Sun Light in Blender doesn't have a Location...but with a Bone (or an Empty), a Point At and a Copy Rotation Constraint, that could be solved relatively easy, I think...
I looove how this forum collaboratively works towards finding solutions that seemed a maremagnum (an inmense chaos) to me just a few days ago. Thank you all, and ![]() spikeyxxx, your solution is also possible! Instead of using textures, you can directly use the fonts from Blender, which is a practical solution to this problem.
spikeyxxx, your solution is also possible! Instead of using textures, you can directly use the fonts from Blender, which is a practical solution to this problem.
I’d just replace the clock display with a text object: then it should be possible to use Blender Python API to update its value based on time or the current frame. This example of writing into a text object is pretty old (Blender 2.6) but who knows: it may still at least suggest the right direction; this one isn’t much newer (2.81) but shows a workaround for a possible issue with updating a text object on every frame; and that one (9 years old - which version was current then?) shows several short practical examples of showing the current frame, etc.
The challenge would be to find a suitable font - but since the clock isn’t very close, it doesn’t have to be perfect.
![]() spikeyxxx and
spikeyxxx and ![]() Infoxicao just had a thought, another way to do it would to be to have a single texture with all the numbers 0 to 9 with exact number of pixels across for each number. Then use the UVWarp modifier with a UV Map just for the numbers on the clock or maybe a plane. Then use a driver for the x offset. Add a step modifier to the driver F-curve. How would one go about figuring out the math? Also I'm going to play with
Infoxicao just had a thought, another way to do it would to be to have a single texture with all the numbers 0 to 9 with exact number of pixels across for each number. Then use the UVWarp modifier with a UV Map just for the numbers on the clock or maybe a plane. Then use a driver for the x offset. Add a step modifier to the driver F-curve. How would one go about figuring out the math? Also I'm going to play with ![]() spikeyxxx Goenodes setup. I probably should finish the particles course or assembly course first.
spikeyxxx Goenodes setup. I probably should finish the particles course or assembly course first.