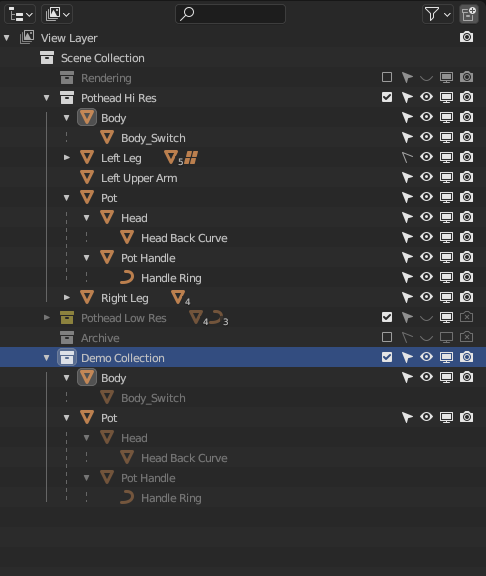
I don't know if this is something I've done unintentionally but I seem to have somehow linked my pothead feet to the blockout and can't unlink them.
The feet appear in the high res collection AND the blockout collection.
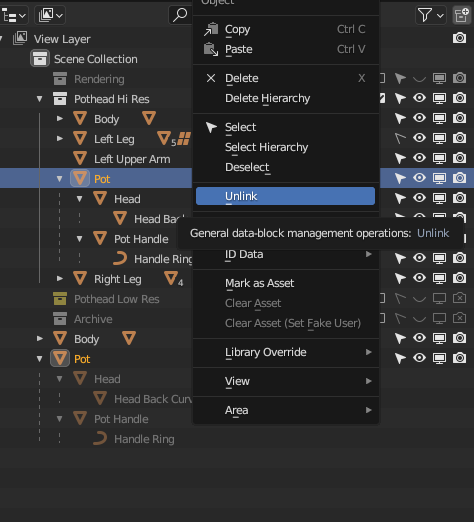
I can't seem to move, unlink or unparent them. If I right click and unlink or delete hierarchy it deletes the object from both collections.
I know it must be something simple but I'm at a loss as to how to sort it
Sorted it with alt P but that only works if your cursor is over the main viewport! I was highlighting the object parent in the outliner, hitting alt P and nothing was happening. Finally worked it out via trial and error
No idea how these new feet got parented to the blockout
Thank you all so much. I've played around with this in a dummy scene a bit and it's starting to become a bit clearer.
What's getting me each time is that I can't apply a single action to an object and have that affect ALL it's children. I have to remember to select the parent and each child before I move them otherwise it only moves the selected object(s) but the parent-child relationship persists. It does have a logic but a) if you move the parent in the viewport all the children follow so why not do it in the View Layer? and b) cos the children are nested in the view like they are in a folder this simply reinforces that I expect to be able to to move everything at once.
Is it possible to manually position the objects within a collection so you can keep related items together? eg I have an item called Head and a model called Pot and I'd like to move them so Head is immediately under Pot instead of being forced to sort alphabetically cos that separates them and makes it harder to find models.
Hi ![]() thehomme ,
thehomme ,
In the Outliner, you can right-click on an Object and then Select Hierarchy. This will select the Object with all its Children (and Grandchildren,. and so on).
There are a couple of things you can do.
1. Use multiple collection to organize your pieces. You can also select an object and press shift+g->collection->Then the collection name if the object is a member of multiple collection. This will select everything in that collection.
2. Use the [ and ] keys in 3D Viewport. If you have an object selected and press [ it will select the parent of the selected object if it has one. ] will select all children of the selected object. if you want to keep the original object selected then use shift+ [ or ]. Side note: you can use Shift+G-> Parent, Children, or Siblings if you want to select objects that have parent/child relation. To keep the original selected after you click, you will have to either expand adjustment box in bottom left corner of the 3D viewport or press F9 to bring it to the cursor and check extend.
3. Collection/Hidden collection instancing. First, basic collection. move all objects into a collection. click the check box next to the collection name this removes it from the view layers. So, it won't render this one and everything in won't be seen in the 3D viewport. Then with mouse cursor in the 3D viewport press shift+a->Collection Instance->then click the name of the collection you removed from view layers. This instance will move and act as one object. You can always active the collection and adjust the objects in it.(Move, rotate, scale, edit, sculpt, etc) Second, the more advance hidden collection. Instead of unchecking the view layer box you right click on the collection and click unlink. You can still add it with shift+a->collection instance->{Collection name}, but the collection no longer shows in the outliner. If you want to access the collection again you have to change the outliner mode(second icon on the header) to blend file. then scroll down to collections and expand it. Then right click on the collection name and click Link to Scene. Then you can change the mode back to View Layer and it is back.
Can I first say how blown away I am by the level of support and help shown here - I'm really grateful. So many places say they have a community but very few actually do. I'm still very new here but the courses & support are incredible value for money.
I tried to have a play following those instructions and immediately hit a wall of confusion.
My end goal here is to be able to easily show/hide the head and body while I'm working on the other pieces.
Shift+H is good but then Alt+H turns on everything even if it had previously been hidden ie Shift /Alt H is a toggle that applies to all objects regardless of their starting (viewable/hidden) state. Is there no way to toggle between one collective state and the previous state?
So... looking at the advice above I added the Pot and Body to a new collection. However only the parent was clickable in the new collection and all the children were instanced. I think this might be cos I only clicked the parent and dragged it to a new collection? The upshot was if I turned off visibility of the new collection only the parents were hidden and not the children.
So I tried to delete the collection and start again but all that did was delete the container and left the objects!

Now I had 2 copies of body and pot objects. This separated the parent from my hi res collection but the children stayed in the hi res collection and were instanced(I think?) as children of the parent outside of the collection.
So then experimented in how to delete the 2nd copy and instanced children without deleting the original parent & children.
Finally seemed to manage this by unlinking the original (if I try and unlink the parent copy it deletes everything!)

And then the really weird thing is that after unlinking the original parent / child object is removed from the collection and it's the copy that remains. So I then have to move them back into the original collection!
I'm sure all this makes sense eventually and there are good reasons for it working the way it does but from a UX point of view it's super confusing
Don't worry, it's not that the Outliner is perfect, there are quirks, such is the Blender way. One convenient thing is that the "eye" icon is for hiding in the viewport:

So when you hit Alt + H to un-hide objects, things that have the icon turned off will pop again into view. But the monitor icon is for disable in the viewport, so it not only hide things, it disables them:

So if you have the monitor icon set to off, the objects that are this way, when you hit Alt + H to bring things back into view, the ones that have the monitor icon disabled wont come back into view, because they are disabled altogether.
Also if your end goal is to show or hide the head or body while you are working on other pieces, you can turn this logic inside out and not focus on hiding them, rather isolate the piece you want to work with. You can do that with Local View:

Hot Key is Numpad slash. So if you want to work on a foot and everything is getting in the way, instead of hiding everything else, just select the foot and isolate it to local view.
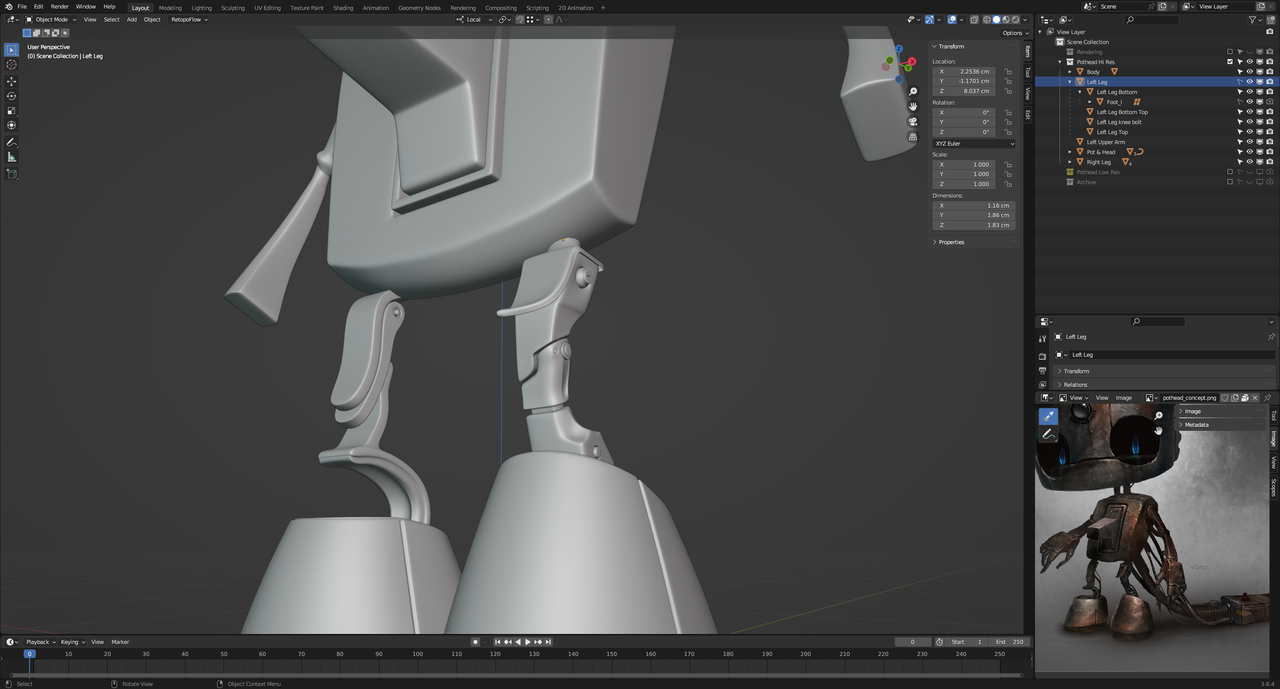
Thank you. Yeah I've understood and know of all those things but local view isolates to a single object and I might need another object(s) visible for reference so in the example below I would want to keep some/all of the other parts of the leg visible to help model the individual part but would want to temp hide everything else.
I also find the local view implementation odd!
If I hit / in on the top level object it won't isolate but it will if I'm in edit mode - but once isolated I can view it in object mode
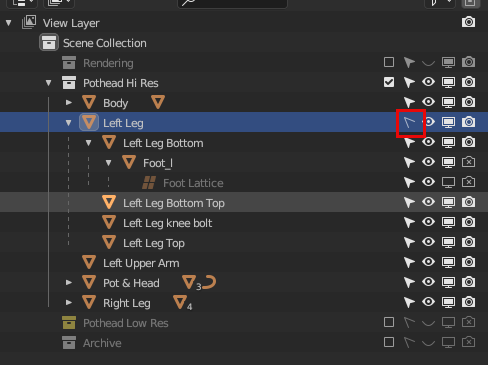
Hitting slash with Left Leg selected in object mode doesn't work

Hitting slash AFTER left leg is in edit mode does work

Any child object under the Left Leg parent will isolate from object mode though.

Are all these 'quirks' you just have to learn about and accept or am I missing something?
No those are not quirks, there's something wrong there. Going into Local View works every time, no matter if you're in object mode or edit mode. You do need to have the objects selected, the ones you want to isolated. So if you want to go into local view with one part of the leg, you select that part and hit slash. If you want to go into local view with the leg and three other parts, then you select those three parts and then hit slash to get those three parts into local view. That works with how many other objects you need. So in other words, local view is like a parallel dimension where things you select get to go there and those that are not worthy stay behind.
So in the middle of recording a video to explain this I figured it out. The top level object had its selection icon unchecked so that's why it didn't work!

And I didn't realise local view worked with whatever is selected... that's really helpful. Now I can do achieve what I originally needed to do although I still need to remember that slash only works once the cursor is in the Viewport - that's still catching me out
I will now go back and try and follow the instructions Dwayne posted

![]() thehomme thank you for the words of appreciation, we try our best to provide the level of support and help expected of a thriving community.
thehomme thank you for the words of appreciation, we try our best to provide the level of support and help expected of a thriving community.
I have shared your comment with the whole (small) cgcookie team that work behind the scenes for a morale boost,
we usually share a box of donuts for a boost, but these words are far more rewarding.
Thank you.
I see you found a solution. I'm going to add to it. The first 20 collections can be isolated in object mose. The order depends on how you have your collections ordered in the outliner. So top levels first. Then sub levels. The hotkeys are the numbers on the top row. 1 thru 9 and 0 for first 10. Alt+ 1-0 or 11 thru 20. Shift+ to toggle view instead of isolating. You can see the order and do the same thing through n-panel->view tab->collection panel. To isolate a collection click collection name. To toggle show hide click Eye icon. This combined with local(/) and show/hide(h, shift+h, alt+h) makes working on large scene a lot easier. Also when in local view. If you have an object that you want to remove from the local view you can select it and press m.