Hi I have two questions on this lesson for now
1- if there's anything else other then ambient occlusion and screen space reflections that's good to usually have on or change as a beginner and if it is best to save the file as its own to go back to or if there's a way to save eevee settings changed on startup
2- if it really does not matter too much where the sun light is placed and just angled as explained in the video
thanks for the help I am having fun learning!
Hi Brandon,
1. I don't use Eevee much (apart from some previewing and then I don't care about settings), but you can set them to your needs/likings and the go to File > Defaults > Save Startup File....(Don't forget to confirm!)
2. It doesn't matter at all! The Location of the Sun Light is completely ignored!
3. Continue having fun!
Hey Brandon,
Great question...
The main difference you will notice between Eevee and Cycles is the lighting and the look of materials and shaders, here are a few settings to be aware of...
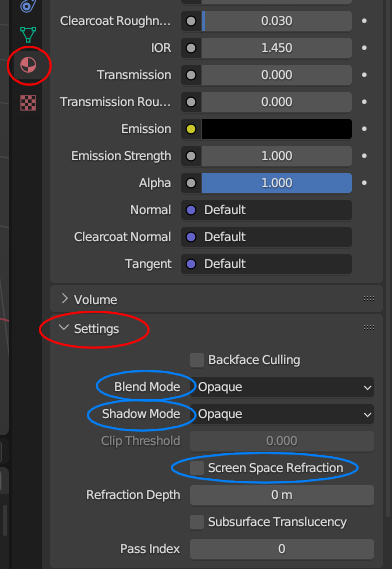
You will probably also need to enable screen space refractions in the material setting as well as enabling screen space reflections in the render properties.
The Blend Mode and Shadow Mode in the material settings are also something to be aware of and may need to be changed depending on the situation.

Bloom is another one you may want to use sometimes, found in the render properties.
If you are rendering a still image in Eevee, you may also want to consider light probes.
Check out the fundamentals-of-digital-lighting-in-blender and fundamentals-of-blender-materials-and-shading, next after the Blender Basics, to learn more.
The new sessions-minimalism course uses some of these settings.
An excellent, must do, Eevee course is create-realistic-industrial-environments-with-blender-and-eevee
Have a read of this blender-cycles-vs-eevee-15-limitations-of-real-time-rendering article.
Keep up the fun!
Also remember that these settings come turned off by default to make the best out of the computer's resources. Turning on all the settings is computational expensive, it varies depending on your hardware of course and the complexity of your scene. The point is you don't need to have all the setting on all the time and save it as the default start. It's a good idea to start turning them on as you need them. So if you notice your scene getting bogged down, remember you can work with it all turned off, until it comes render time.
thanks for the advice guys I will make a note of it! also is setting up lighting about the same as you would for a animation vs a picture? I only looked into a little on lighting for pictures like the three point lighting mentioned but I am not sure how to best suit it for animation yet, but that is down the road for me to look into!
I'd say it's not the same. With just a picture you can cheat a lot with the lighting in order to get what you are looking for, but the moment you move the camera the gist is up. So if the camera is going to be moving, like in animation, usually you're going to need a more robust lighting setup.
I have 2 more things to say on lighitng since it is a big subject
If the placement of the other 3 types of light doesn't matter (besides if you want a stronger power or not) as long as it is shining in the direction of your object and I was told about the contrast setting in the render properties and that seems to make a big difference in the lighting as well, is that recommended to change? I think that was all of my questions for now thanks!
The thing about lighting is that it varies so much. How you light your scene will depend on what you are trying to achieve, on your specific scene and camera placement, on your artistic eye, if it's a character, if it's a room, an exterior shot, etc, etc. There are generic setups like the three point lighting and such, but it's not like polygon modeling where there are rules that I can tell you and you have to follow them to get a good result, lighting is more ethereal and depends on what you want the mood to be like. And it's one of those things that can make or break a render. You can have modeled the best and most awesome model ever and your final image where you present it can fall flat because of bad lighting. So experiment a lot, move lights around, use HDRI's, turn off lights and turn them on one by one to see what is being influenced. It takes patience but it's worth it.
Two courses to follow, one right here on CG Cookie:
https://cgcookie.com/courses/fundamentals-of-digital-lighting-in-blender
And the Gleb one:
https://blendermarket.com/products/cinematic-lighting-in-blender