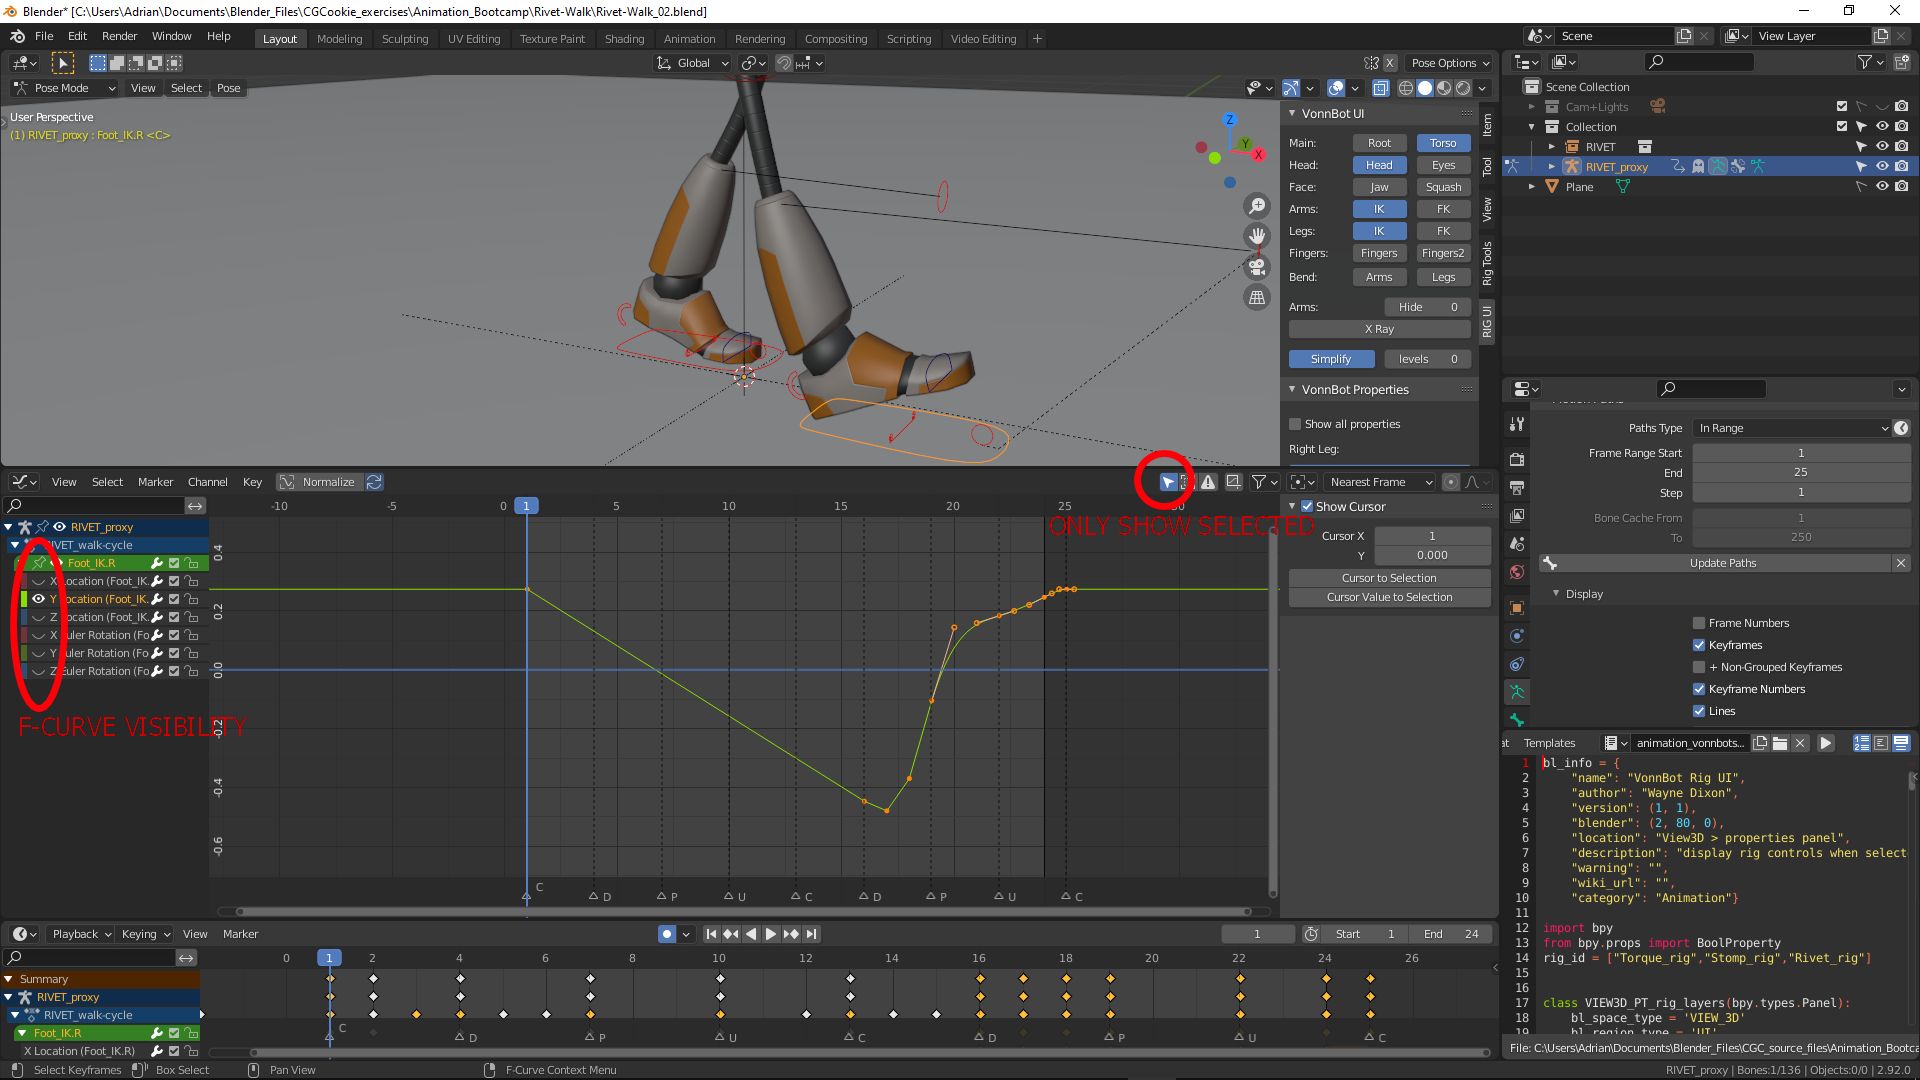
Hello Wayne,
i am doing animation for a while now and started out with your courses. Unfortunatly, the fast forward videos were never something i could get out of, so i stopped at this part and did my own projects.
My Problem is, even after some finished projects, i still can't get the hang out of the Graph editor when working with character rigs. A movement of a character rig is so complex and i always struggle finding out the right curve out of all the xyz Location, xyz rotation and xyz scaling. When i tweak one curve, another one disturbs the motion again and for example the arm does funky stuff. The result is that do alomst everything with the dope sheet and the its modifiers, watching my animations over and over again and playing around with the keyframes until it looks and feels right.
But that often eads to a point where I clearly see the problem (like a motion stops too early and the following motion which should be included into the first comes afterwards instead), but cant fix it technically because the damn curvenoodles are so confusing and i can't find the right curve(s) to tackle the issue. I often fix this by dragging the keyframes nearer to each other but its just a temporary fake trick. Do you have any tips (or maybe a video in this course i missed) how to work efficently with the graph editor if you are doing Character Animations and how to find out the right curves when the character is moving and using the whole 3D Space around him (not just moving in a 2D angle) ?
Hope you get what i mean.
Wish you the best,
Felix
Hey xxylef1 ,
The graph editor can be quite scary. Have you seen @waylow 's lesson Taming the Graph Editor in the Animation Bootcamp course.
Top Tips:-

Some key points I have learned from Wayne's courses,
Add key frames in the timeline for all key poses, then use the dope sheet to add in between poses where needed and refine key poses,
then use the graph editor to tweak the curve. Only moving to the next when I'm happy with the previous.
I'm sure Wayne can go a lot more in depth, I'm no master animator, but I hope these tips can help you.
Hello Adrian and thanks for the reply,
i know that Episode and it starts off really promising whith him saying, that it can be scary when you
are confronted with so many curves. But then unfortunately, he just explain how to read one single curve and stops there :/ .
Thanks for the tip with "Only Show Selected", thats something i didn't know! Very helpful. Still, for example when the foot of my character moves on three axis at once (for example character turns 180 degree left - foot goes up, rotates left and changes ground location), i don't know how to polish a wrong movement (for example it does a bezier movement on all axis when it instead should be starting slow and stopping instantly on all axis). It often happens when i fix a curve here, the animation looks broken because the others interfere. Maybe Wayne can go more in deph here. Until then i will figure out a way for me to use the Only Show Selected option, looks very handy.
If you want it to stop instantly , select the point on the curve where you want to stop, with the mouse in the graph editor press the T hotkey and change the interpolation to linear.
Hi Felix,
If you know how to read 1 curve, you know how to read all curves ;)
The Animation Bootcamp is all about practising your control over what you want the curves to do. Learning to control the right curve in the right way unfortunately just takes practice. But one thing you can do to learn is to edit the transform channels to see what they do (cancelling the edits of course). That way you can see, oh it's the X location that I need, for example.
Another tip that might help you out is to only add key frames on the channels that you are using.
For example, if you only need to animate the location and rotation, then don't key the Scale. This will just add clutter to the GE.
Also when you adjust 1 key frame, make sure you are not inadvertently changing another one by accident.
One thing that can be a little confusing when working with bones, is that the location transforms are always relative to the orientation of the bone in edit mode. Meaning that if the bone is positioned at a weird angle in edit mode, then those channels will always be in that same weird angle even after you rotate the bone. The X axis may never line up with the world X axis for example.
(hope that makes sense)
If you are having trouble with rotation - don't worry, you are not the only one. Rotations in 3d are really difficult. It's not you, it's the maths. Euler Rotations are prone to gimbal lock.
There are a couple videos coming out very about about this topic very soon however I feel your issue will be solved by practising with the GE to understand the handles more.
Okay, thanks for the quick and detailed answer! I'll keep practising then and take advantage of your tips @waylow @adrian2301 .
Looking forward to your videos aswell Wayne.
All the best,
Felix