Homework submission-week 1-grass
@theluthier
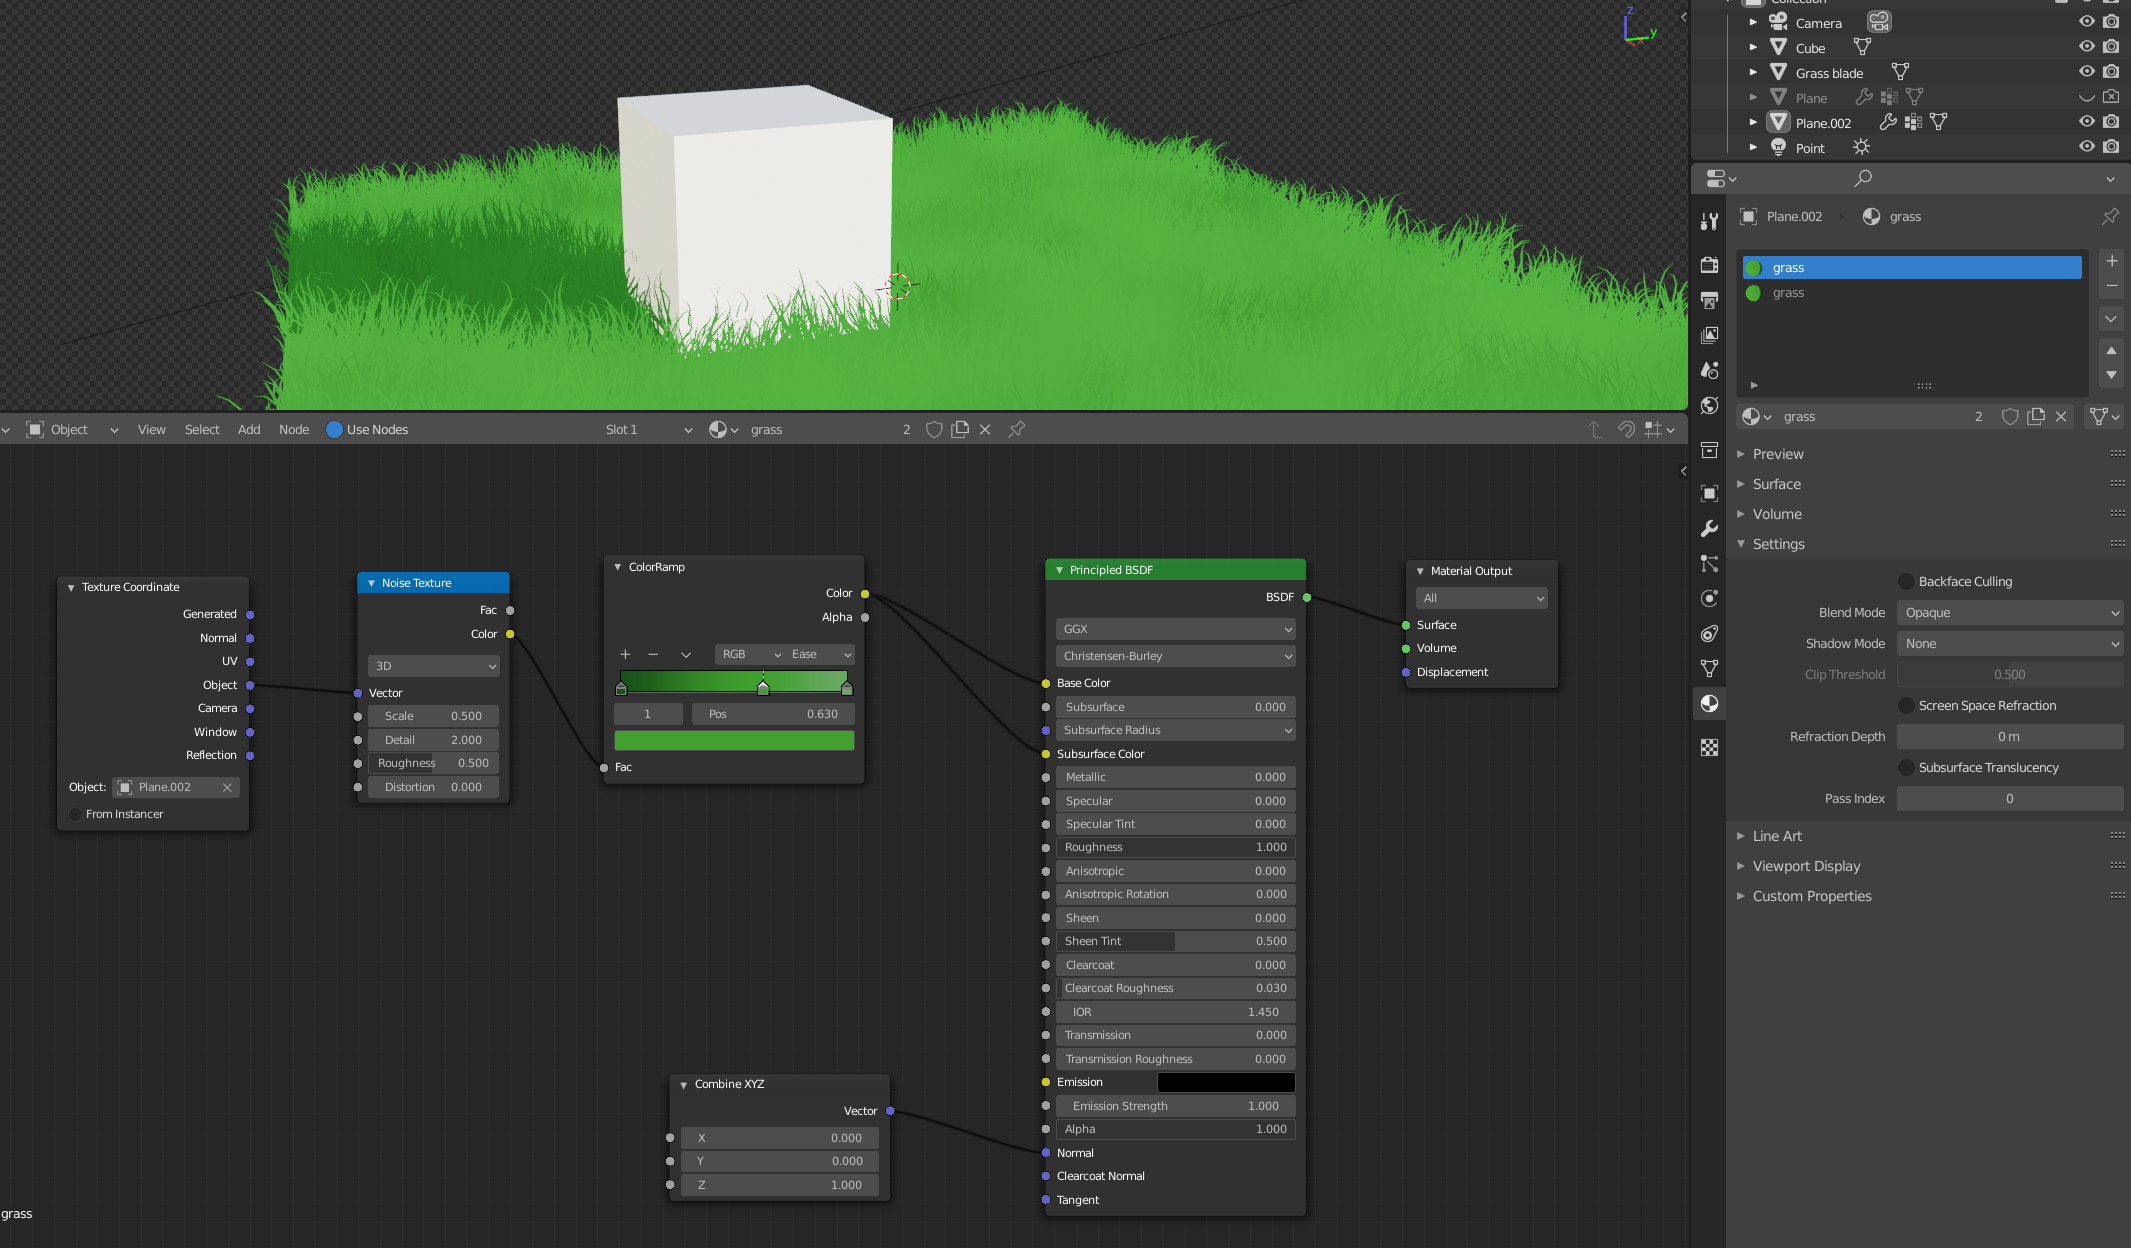
Tried all sorts of methods to create the grass, but after all this testing, I looked more closely at the artwork and I interpret it as just colors, with a few grassblades at some edges and where there is something in the grass (like rocks, fence, cart,...), which makes sense, because you wouldn't be able to easily reach those parts to mow the grass there...
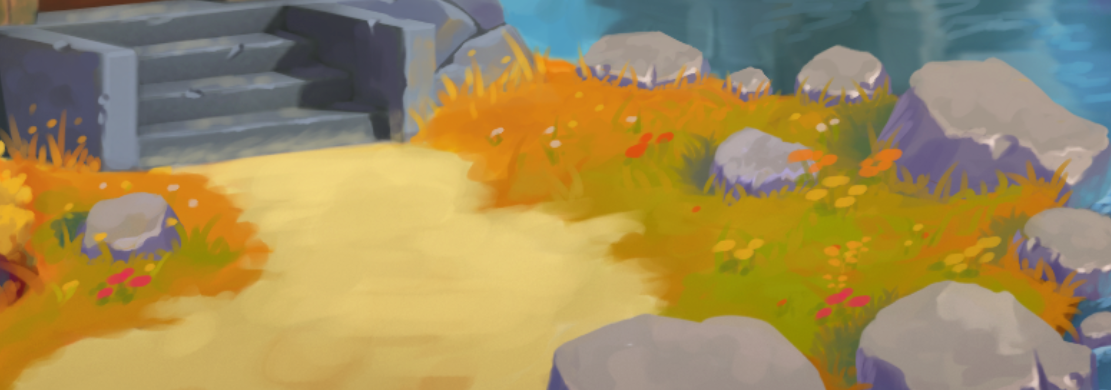
So my submission is not very impressive yet and the colors are just placeholders, this is block out phase after all:

grassroots movement!
; )
good to see some geometry nodes put to use... it was my favourite new toy, temporarily put aside for after the big collab...
lookin' g00d ![]() spikeyxxx !
spikeyxxx !
Thanks Peter!
I already feel very limited by using 2.92...especially in GN there are so many new nodes and improvements ;)
But we gotta work with the tools that are given to us...(it's already way better than the old Particle System, so I'm not complaining)
Good stuff for week 1 ![]() spikeyxxx! I definitely see where you're coming from with fewer grass blades where the ground color does most of the work. In a way the grass blades are primarily for breaking up the silhouette. Definitely a valid interpretation.
spikeyxxx! I definitely see where you're coming from with fewer grass blades where the ground color does most of the work. In a way the grass blades are primarily for breaking up the silhouette. Definitely a valid interpretation.
While I see how you got here, I still get a distinct "fluffy / plush / full" grass feeling from the art. Whereas with your 3D application it feels more like a bare ground with sparse grass. As if it's having a hard time growing.
Whether you go with more grass blades or fewer, I think the stylized look is dependent on a shadeless material like I used in the forest course. Seeing lighting and shadows per grass blade is inherently more realistic and bad for stylization in my experience. I would start by adding a shadeless (emission or maybe shader to RGB) material that inherits the ground texture.
A bonus of fewer grass blades is being optimized for scene performance, of course. For week 2 I'd like to see you tackle a larger area, like a field-size test.
Just testing possibilities:

Using two Vertex Weight Proximity Modifiers, one to get the area around objects and one to remove the inside of those objects.
The remaining grass is a hand-painted Vertex Weight Group.
Using 'From Instancer' in the Texture Coordinates, to color the instanced grass blades the same as the underlying grass field.
I had a problem...
when using a hand-painted Texture for the grassfield,, I couldn't use the 'From Instancer' trick tomatch the blades' color to the ground. Because that doesn't work with UV Coordinates 😣
But....never let Blender bring you down...I knew there must be a way!
And I found it (probably a well-known trick, but I found it by myself and am proud of it 😉)
Here it is (very simple, just the way I like it):
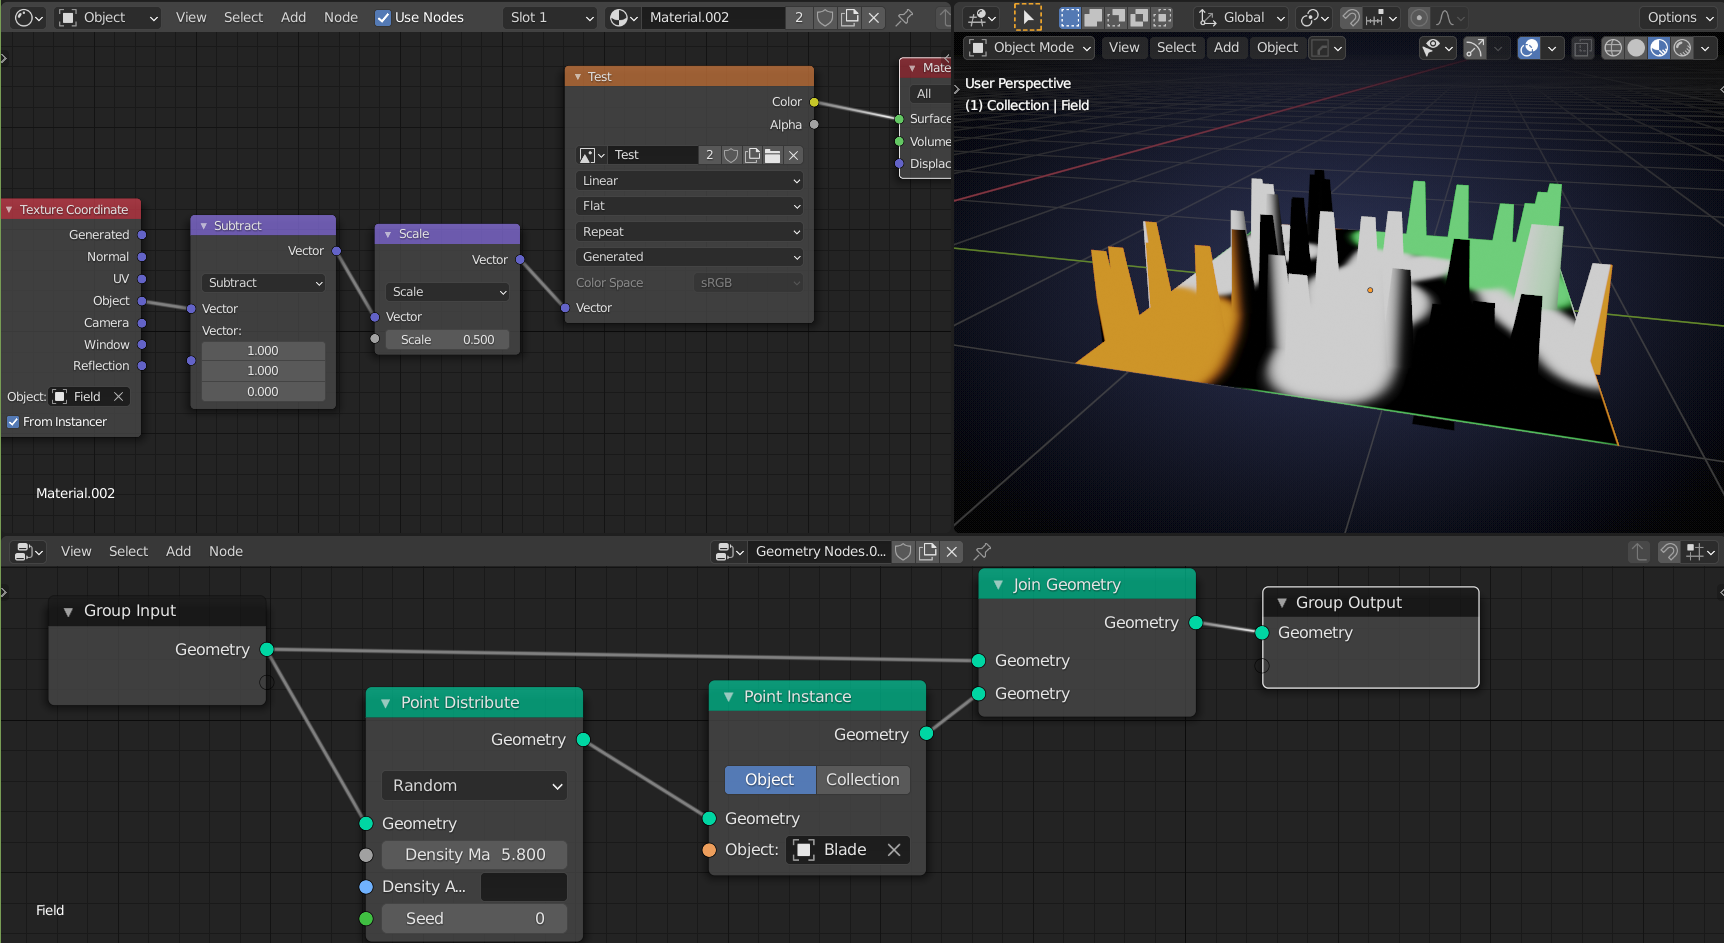
You can paint without UV's.
Now, this only works, because the ground is a 2 dimensional object; You can't use this to paint Suzanne, for instance.
There might be a way to get this to work on 3 dimensional objects as well, but I don't need that, so I can't be bothered to try and find that way, especially, because my gut tells me it isn't possible.
Somehow still black magic for me. I am impressed with your work with the Geometry nodes.
Testing if this technique actually works in practice:
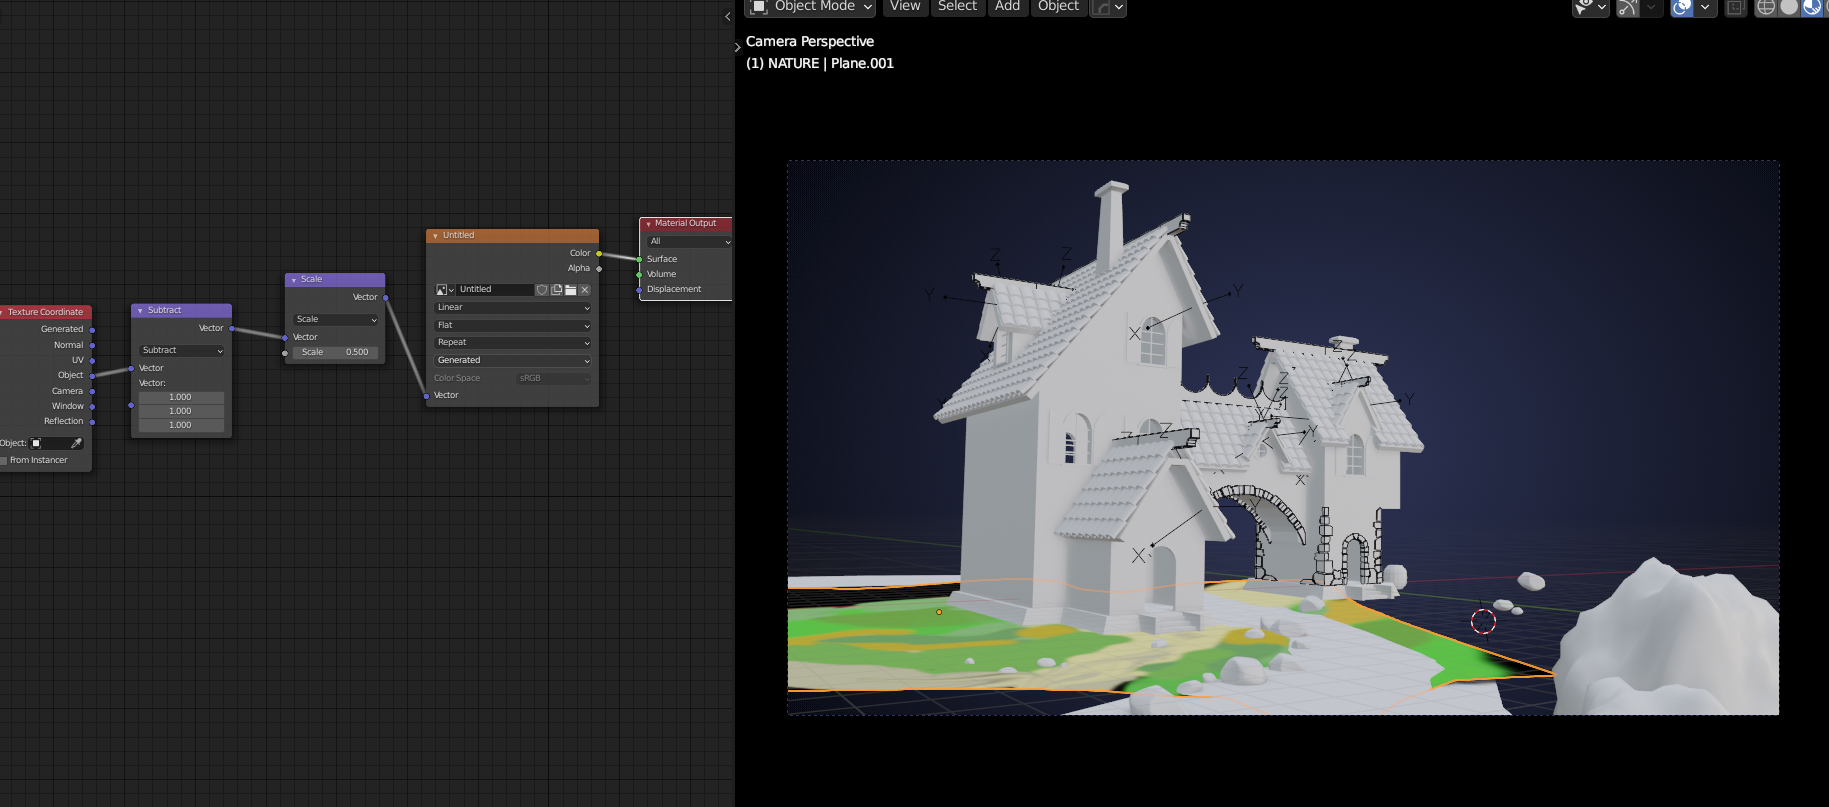
Note to self: Do not Apply the Scale (or Rotation) of your Plane!
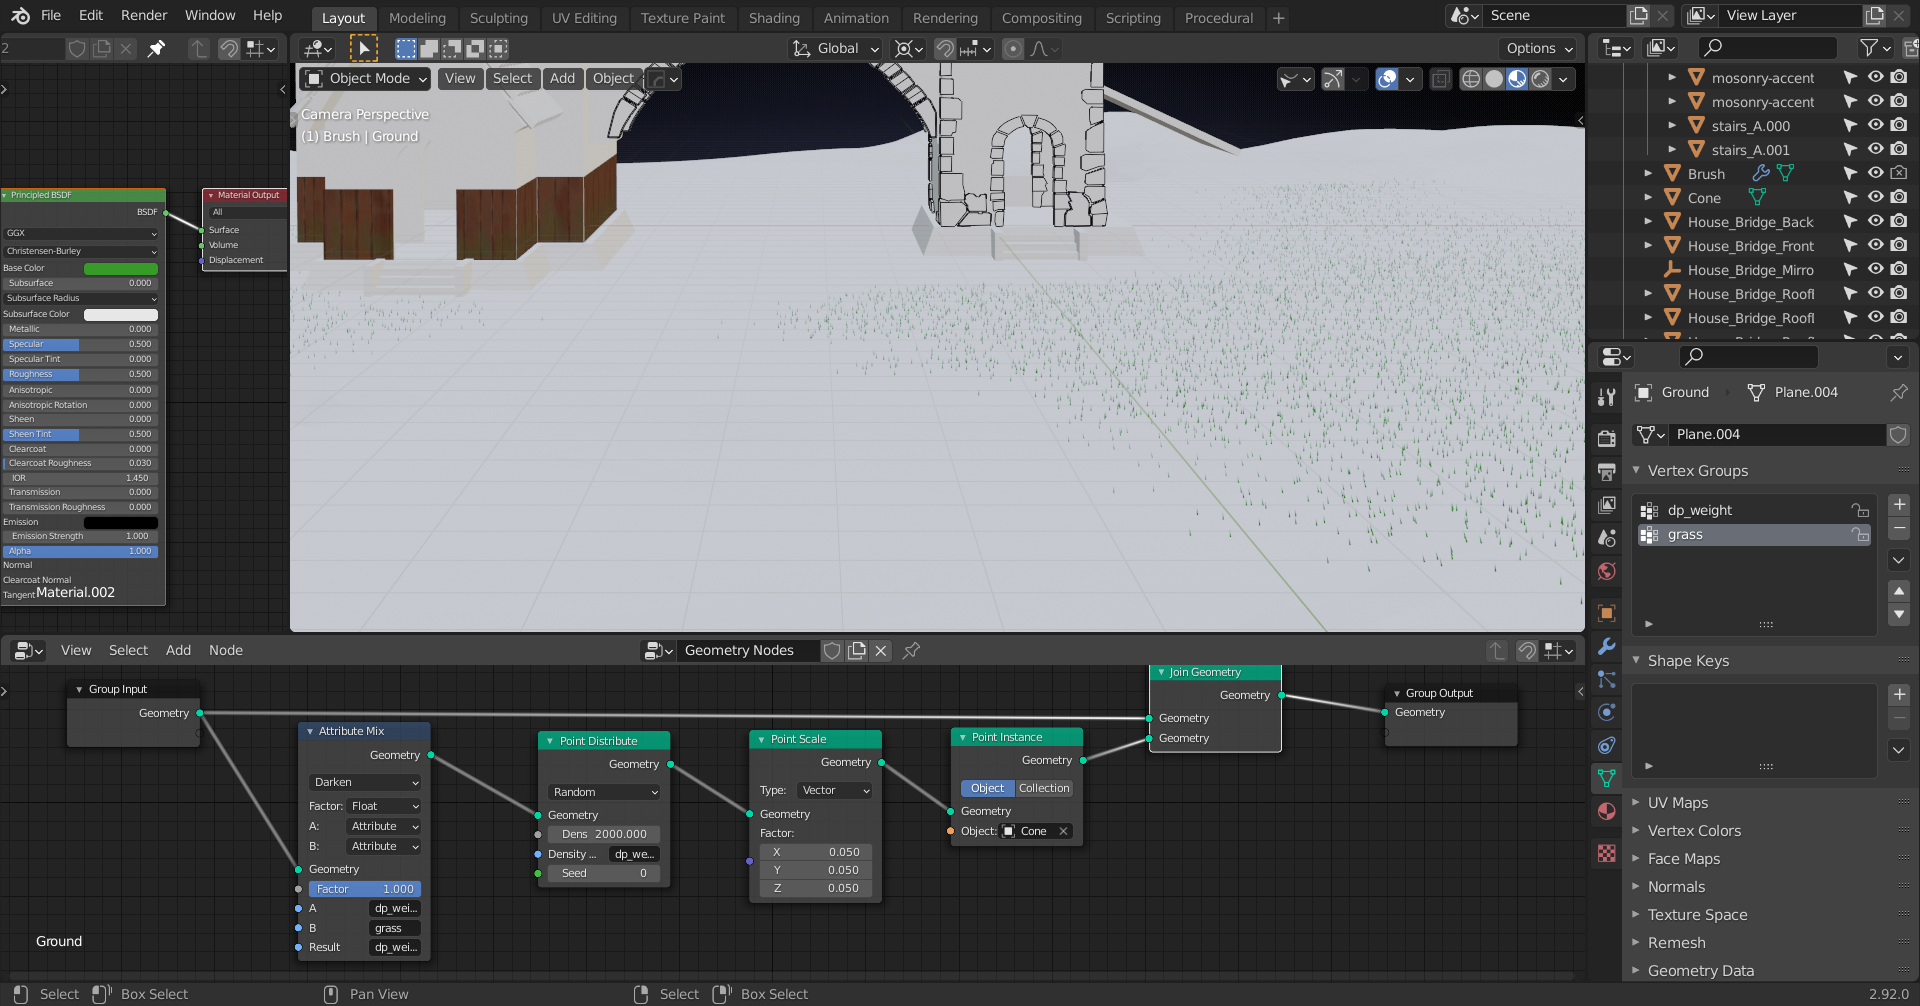
Homework submission-week 2-grass
@theluthier
Done some tests and this method seems to work great:
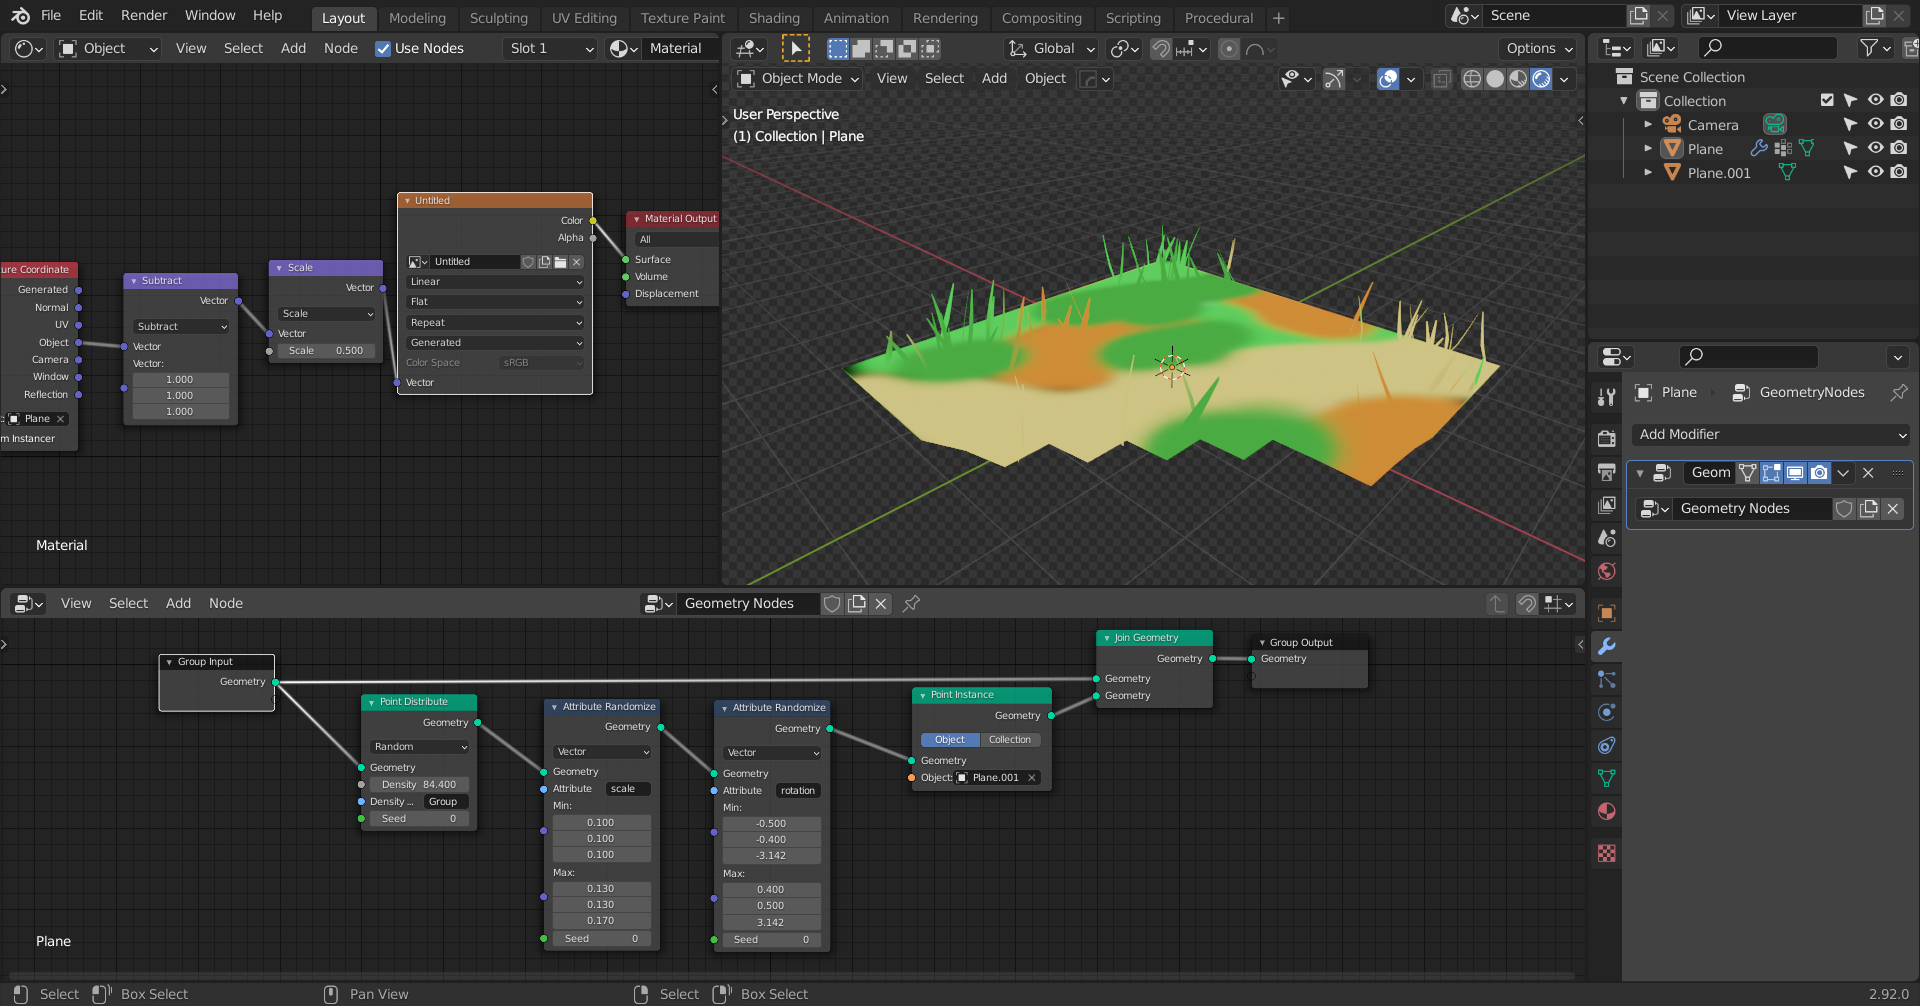
Not much to show, but all that is left is modeling a few grass blades and texture painting.
And some weight painting for the position of the grass blades ( I think I will do that by hand, that'll be just as easy).
So far, in the tests, I have not even used my Tablet yet, so I am confident that I will be able to get the Texture Painting done to my satisfaction :)
I am synced now, but my WIP file is still just a playground for me. (Can I delete the .00 WIP???)
Hey ![]() spikeyxxx, really great work here! Nice investigation to find a good method. I'm copy/pasting this from rrstich 's thread because my feedback for both of you is exactly the same. You guys can decide if you want to try your hand at it individually or as a team.
spikeyxxx, really great work here! Nice investigation to find a good method. I'm copy/pasting this from rrstich 's thread because my feedback for both of you is exactly the same. You guys can decide if you want to try your hand at it individually or as a team.
In order for this to look crazy good and be performant, we're going to need three things:
Grass is one of those things that seems simple but actually takes quite a bit of work to get right, but I have faith that you guys can nail it! Hopefully this older course can help you with the particle hair shapes and what I mean by grass clumps: Creating Grass in Blender - CG Cookie
Full points for this week. Keep up the good work!
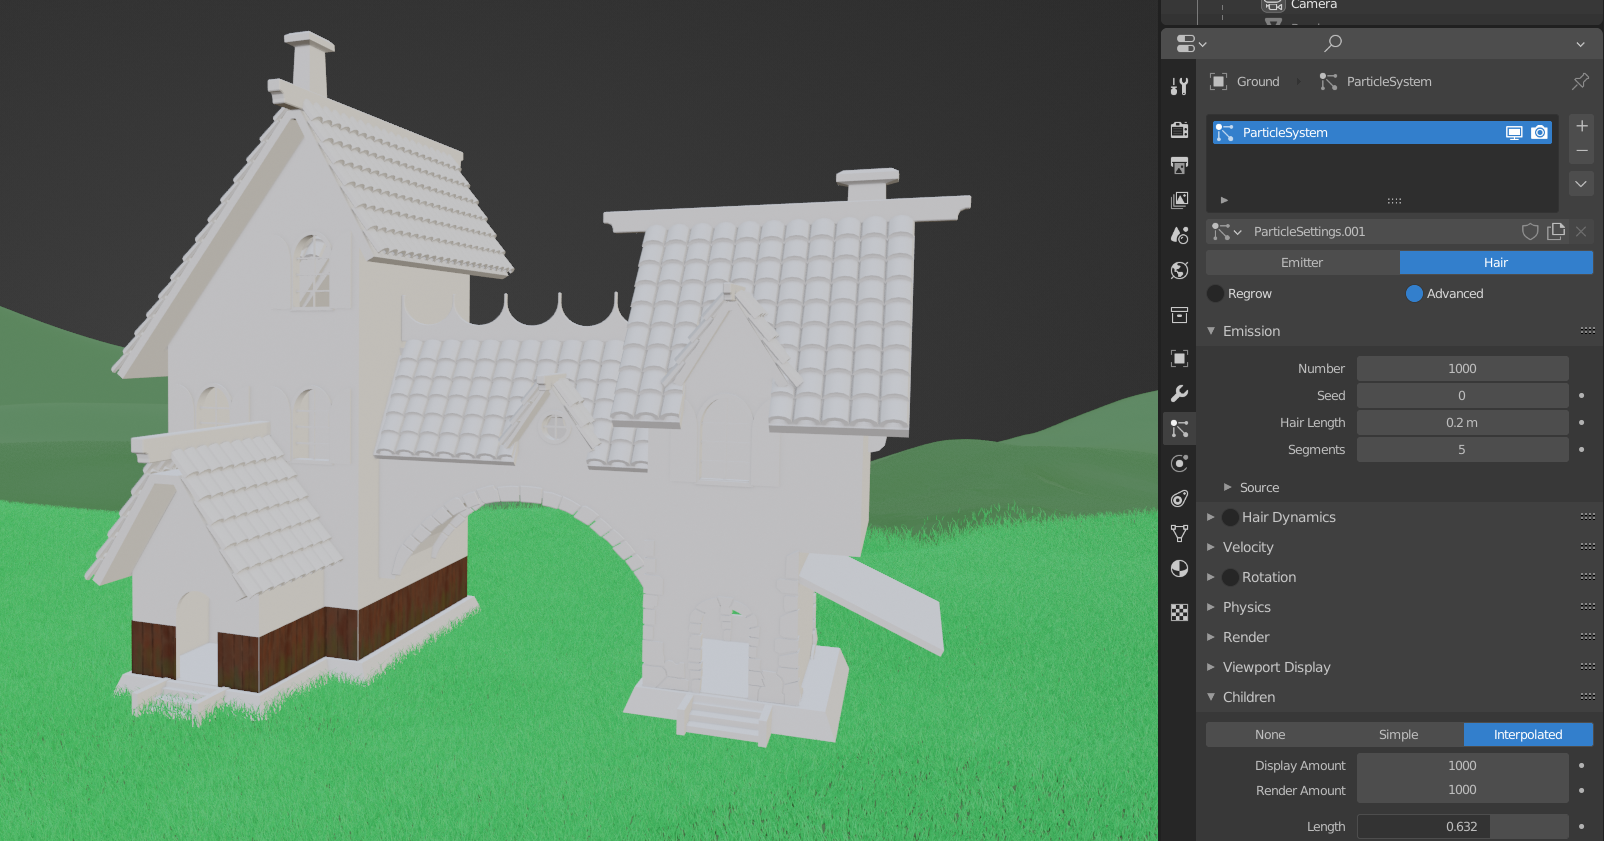
A base layer of particle hair grass, which renders blazing fast and can have different settings for viewport and rendering. This layer should be fairly dense
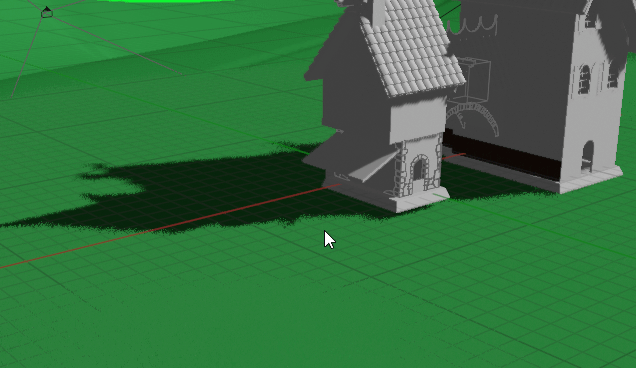
Have tested this with Geometry Nodes (and also with Particle Hair, but that updates even slower!) and I used Camera culling together with weight painting, but even with only a bit of all the grass rendered, I cannot get nearly enough grass before my computer starts lagging:
 So, unless you still think @jlampel that this is doable on a landscape of this scale, I'd suggest we stick to the method above, with only 'a few' blades or clumps of grass, strategically placed.
So some kind of moss/clover noise bump mapped to the green/brown parts of the landscape to give a kind of fluffiness that Kent is looking for, and use the grass to strategically cover up places where cart, fence, and rocks meet the ground perhaps?
Just an idea.
And a great idea ![]() vincav81 !
vincav81 !
That's a shader thing and not my greatest concern ;) I can do that, just tell me what style we are going for...in the artwork it looks more like flat colors, but that can be adjusted easily.
The problem appears, when trying to create grass with particles or other instancing, because of the sheer amount you'd need (10 million won't even be close to near enough...)!
You could make 'grass cards', but when the camera moves, it will at moments look at the grass from almost above and then the illusion breaks completely...
So that is why I came up with basically what you propose, apart from the bump shader trick.
Oh wait, so on your machine particles are slower than geometry nodes? Is this taking children into account? With children, I can push particle counts absurdly high and viewport navigation doesn't slow at all (not that we would want to go this high, just as an example). Editing is slow at this level, but for that you can set a lower viewport child count and render at a higher one. Viewport performance with geometry nodes slows to a crawl long before this even when not editing.
I agree that I was a bit too overenthusiastic at first though with how dense it could be. We should definitely do strategically placed clumps on top of textured detail as most games do. The most prominent clumps can be manually placed mesh instances, with the rest scattered around. randomly. I do still believe, however, that we can use shorter particle grass in addition to that (also strategically placed, in the foreground only) to achieve a result that is way more fluffy and detailed than we could hope for without it.
More importantly though, we're getting really close to the finish line and I don't see any modeled clumps of grass beyond what was used to test. That should be #1 on the priority list for this week I think.
Keep up the great work!
@jlampel I definitely need a new computer ;)
But on my machine, 1000000 hair particles perform the same as 100 particles with 10000 interpolated children; more Viewport lagging that in your GIF.
It gives about the same performance when using GN with visually the same Instances density. But when using Dynamic Paint, like I did, for the Camera Culling, Hair Particles update a lot slower than GN.
strategically placed, in the foreground only
I will try, but foreground is not really defined, as the Camera will be moving around...
Kent mentioned wanting this to be interactively real time, which is why he's even moving away from using volumes for the most part so that they don't flicker. If that's the goal, view based effects like camera culling will unfortunately not be a solution we can use for this one.
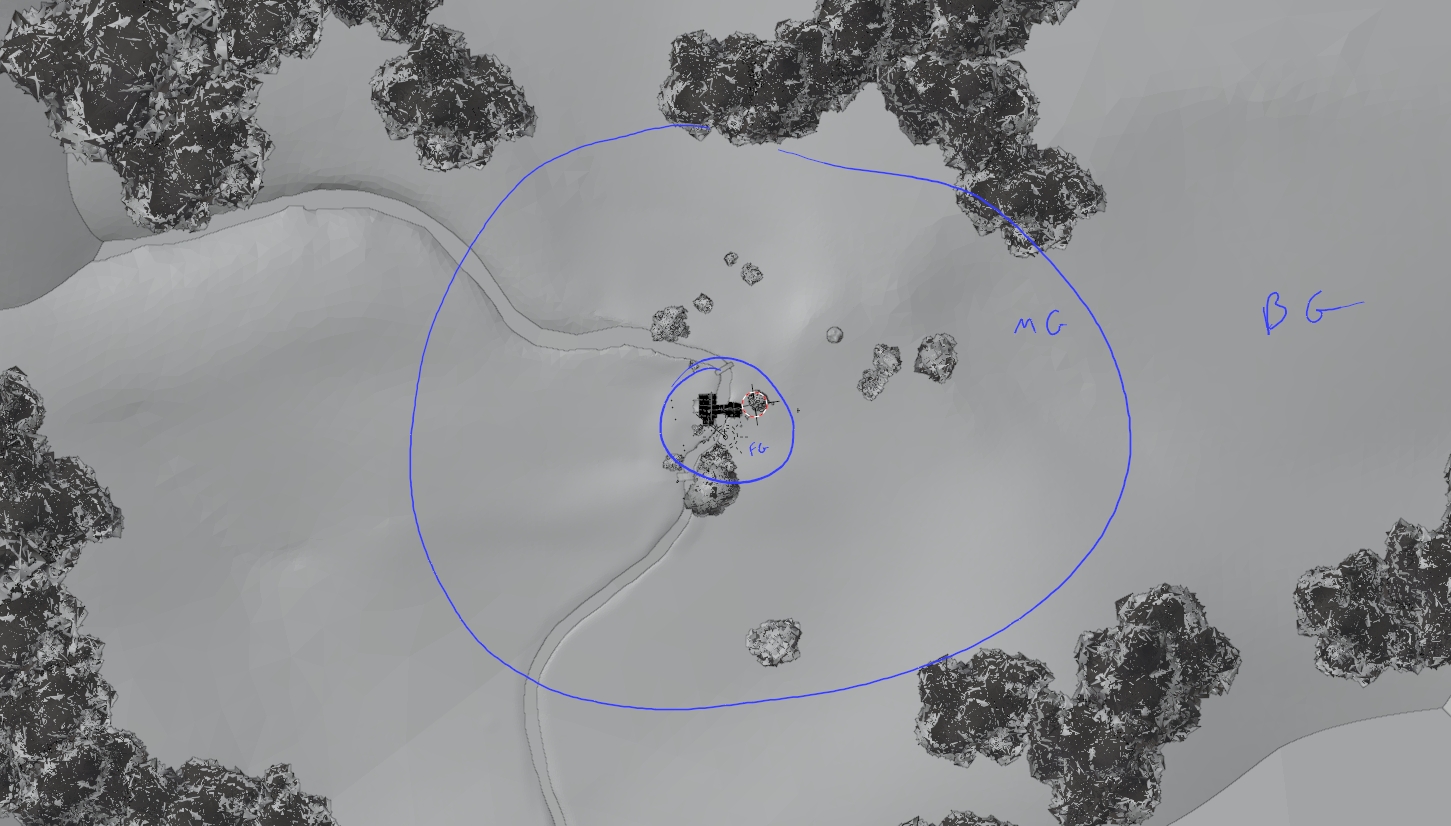
I can't find the clip with the exact boundary, but the way Kent explained it to me was that the foreground was everything directly around the house and we can assume the camera won't stray outside of that circle.
![]() spikeyxxx @lampel If GN is faster than particles, I wonder if you could influence the scale + visibility of populated grass cards based on the distance from the camera. Like culling so the ground doesn't show hair cards when they're too far away.
spikeyxxx @lampel If GN is faster than particles, I wonder if you could influence the scale + visibility of populated grass cards based on the distance from the camera. Like culling so the ground doesn't show hair cards when they're too far away.
Imagine grass cards are visible in the 50 meter radius surrounding the camera at all times. Beyond that 50 m radius the grass cards' scale falls off and eventually disappears entirely. The grass cards then update with these parameters wherever the camera goes.
If done right, in theory the illusion could be an optimized grass population
@theluthier theoretically, that could work, but the biggest problem with grass cards (I've tried that too ;) ), is that the illusion breaks when viewed from above. And when the camera is close to the grass, we will see it from above (especially with a small Focal Length of around 23mm).
And, like @jlampel already pointed out: ...If that's the goal, view based effects like camera culling will unfortunately not be a solution...the same goes for Distance from Camera.
I know I haven't posted a lot, but I have tested many different approaches and most have unacceptable drawbacks :)