
Hi Educators! 👋 We're working on an updated version of this teaching guide and would love your input!
https://autotroph.typeform.com/to/Zzo7UI7V
🍪 Looking for a printable version of this guide to take with you?
Download the PDF version of this Blender teaching guide, which also includes printable quizzes and Blender hotkey maps.
Who is this guide for?
Either you’re a Blender fanatic that has been given the green light to start your Blender class or you drew the short straw and have to teach it next week with no idea what you’re doing.😅
This guide is for you.
Don’t worry, this guide is designed to help you become familiar with Blender, its community, and guidance for teaching Blender to individuals or large groups.
We’ll be taking a 30,000 ft view to give you foundations to build your class, or simply gain a better understanding of Blender for yourself.
Learning 3D can be incredibly overwhelming, and a highly rewarding adventure for those who stick with it. Like anything it’s a skill that can be learned through repetition, taking things slow, and managing your expectations.
Let’s dive in. 👇
__________
SECTION ONE: Introduction to Blender
This section is about getting you familiar with Blender before we dive into tips and guides to help within the classroom.
- Why use Blender in the classroom?
- What is Blender's story?
- What are the hardware requirements?
- How to download and install Blender
- Navigating different Blender software versions
- Pop some popcorn and watch a few Blender films
SECTION TWO: Teaching Blender to a group
Next let's sketch out what the class looks like, what are you hoping to achieve by the end of it?
- What are your goals with your class?
- In-Person classroom teaching
- Online group teaching
- Managing students' work
- Supporting various learning styles
- Preparing for rendering
- Helpful tips for the classroom
- Three projects to get your students started
SECTION THREE: Additional Blender Resources
Additional Blender resources and how to be a positive member of the Blender community.
- Tips for being a positive member of the Blender community
- Online communities
- Online Blender education resources
- Frequently asked Blender questions
___________
SECTION ONE: Introduction to Blender
Why use Blender in the Classroom?
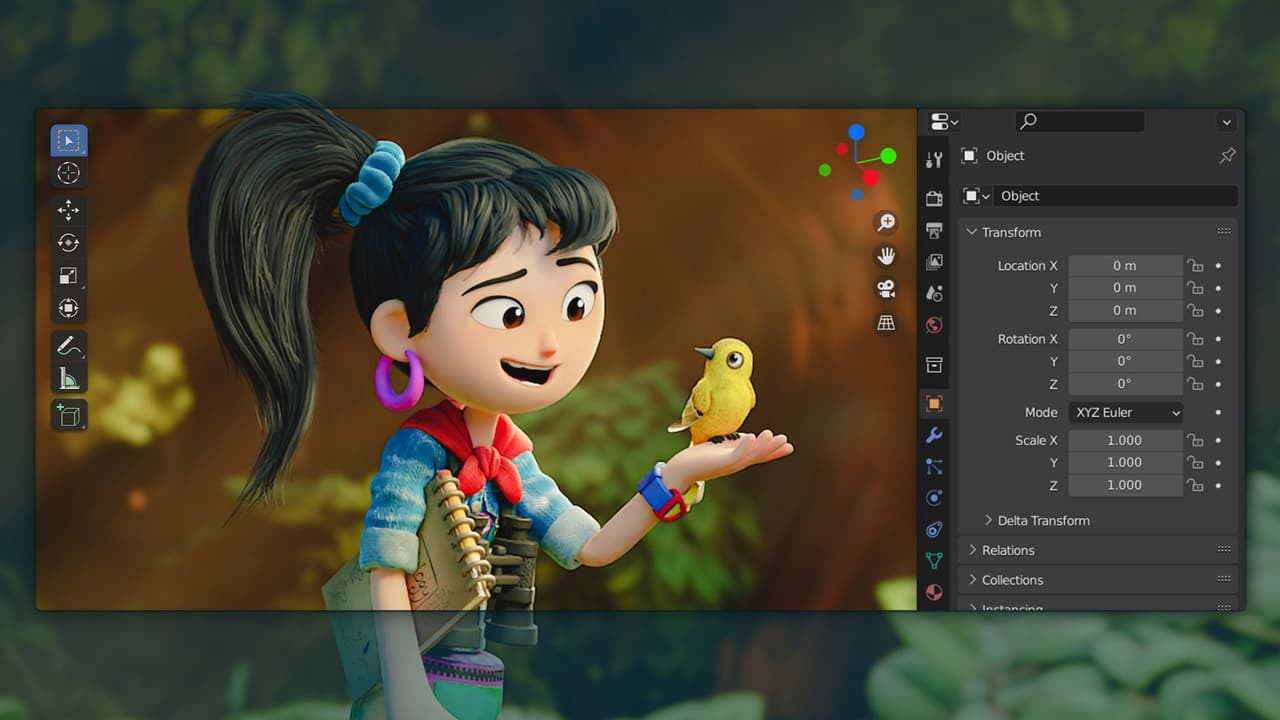
Blender is a free, open-source 3d computer graphics software that has been used by many educational institutions for teaching 3D modeling and computer animation.
It is a powerful tool that can be used for designing, modeling, texturing, animating, rendering, and compositing. It has a comprehensive set of features that makes it one of the best tools for beginners as well as experts in the field.
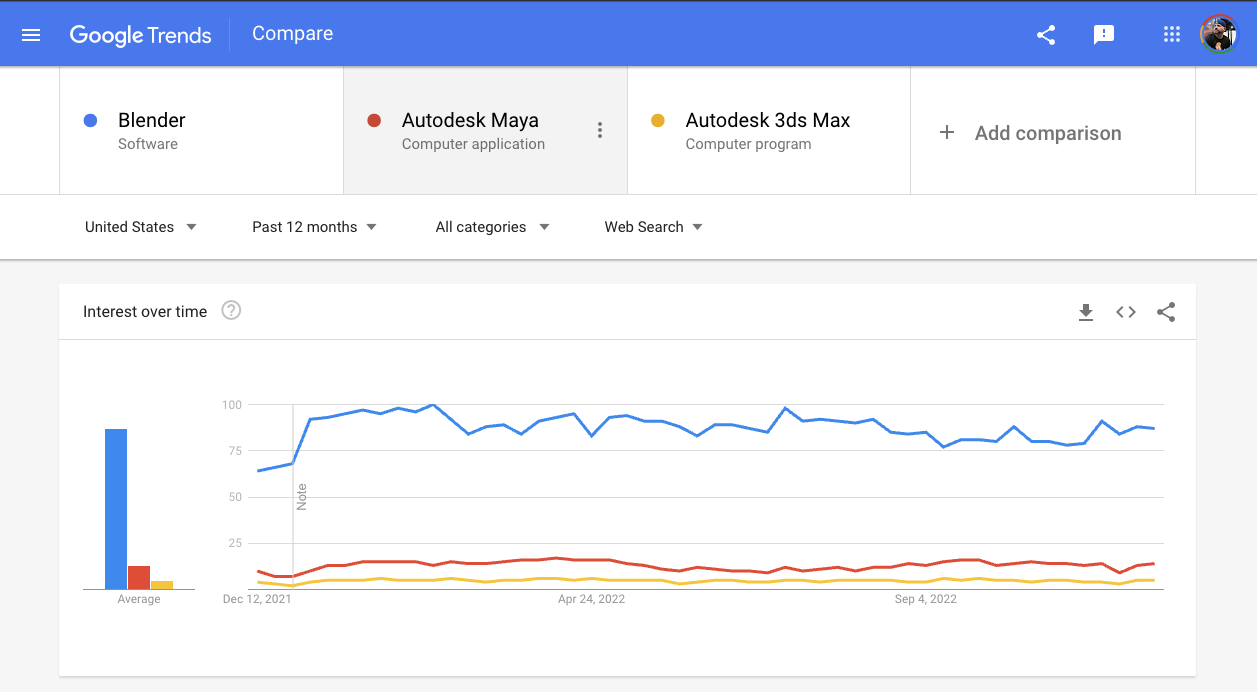
Blender has more search engine interest than other predominant 3D software in the industry. Blender is used around the globe to create feature films, animated shorts, assets for video games, 3D visualizations for the medical field and much more…
I mention this because you may experience push-back from parents, peers, or students arguing that Blender is not used in the industry. While in the end, it doesn’t matter what software (tool) is used to create something, Blender is actively being used across multiple industries professionally. 👍
Additional resources
__________
What is Blender's Story?
Understanding the origin story of Blender is important to help curate the culture, inspire how we create things with Blender, and support it for the next generation of Blender fanatics.
Blender is an open-source software program designed to get the best 3D graphic tools into the hands of artists all over the world.
Thanks to a huge(and growing) userbase of academics, professional artists, and volunteers who are contributing to the community, as well as plenty of full-time developers who are funded by voluntary donations from both people and companies, Blender has evolved into a popular powerful piece of technology that's worth learning.

Blender was born as an in-house production stool for a Dutch animation studio called NeoGeo (no relation to the gaming system developed by SNK). After some success in sharing the program with others, Blender was further developed in a spin-off company called Not a Number. At the time, Not a Number used a popular shareware licensing model whereby you could get basic functionality for free, but advanced features required purchasing a license key for about $100 USD. In an environment where most popular 3D animation tools had four-digit price tags, Blender's price and feature set turned a lot of fo heads.
Unfortunately, the rise of Blender's popularity couldn't compete with the "dot bomb" economic turndown of the late 1990s and, like many companies at the time, Not a Number went bankrupt. This was the beginning of the "Free Blender" funding campaign, one of the first practical examples of crowdfunding and one of the few examples of a community of software users organizing to get their application released as open-source software.
A deal was struck between Ton Roosendaal, the original developer of Blender, and the holding company that owned Blender's code after Not a Number's bankruptcy. If the community could raise €100,000 to pay for it, they would transfer ownership so it could be released under an open-source license. It was expected that this campaign would take six months to a year to raise that amount of money. The community did it in just seven weeks.
If you ever wonder why there seems to be so much passion around possessiveness within a group of people around a little tool for making things in 3D, this is why. This is the foundation. The community literally bought Blender. We own it. And now, anyone-including you-can freely uses Blender to make ideas come to life.
Welcome to the community.
__________
What are the hardware requirements to run Blender?
Blender is capable of running from a USB stick. Meaning - no installation or internet connection is required once you have a downloaded version of Blender. Having said that, there are some recommended hardware requirements.
Minimum Computer Specs to run Blender
- 64-bit quad-core CPU with SSE2 Support
- 8 GB RAM
- Full HD Display
- Mouse, TrackPad, or Pen & Tablet,
- Graphics Card with 2GB RAM, OpenGL 4.3
- Less than 10 years old (generalizing)
Recommended Specs to run Blender
- 64-bit eight-core CPU
- 32 GB RAM
- 2560x1440 display
- Three Button Mouse or Pen & Tablet
In general, Blender will run on updated Windows, macOS and Linux machines. No internet connection or installation is needed. Review additional recommended Blender hardware requirements and supported Graphic cards.
Note: If you're a 1-to-1 school offering Chromebooks, unfortunately, it's likely you won't be able to install Blender. We're testing some options that may help you offer Blender on Chromebooks, if that is of interest email us at [email protected]
__________
How to download Blender
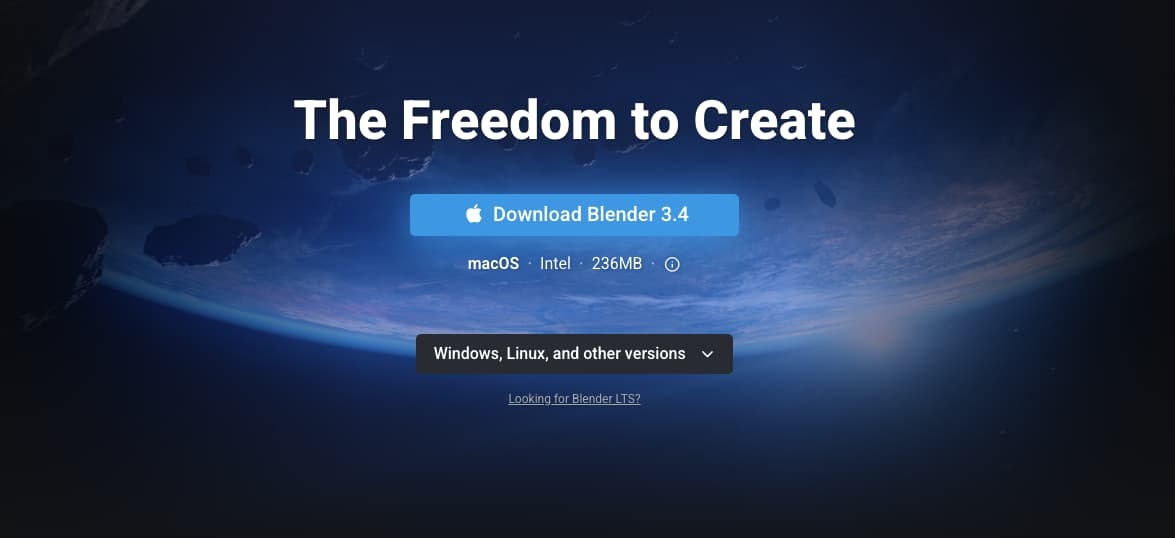
You may have already done this, but if you haven’t it’s the first task for you. Head over to http://blender.org and grab yourself a fresh download of the latest stable version of Blender.
How to install Blender
While some of the details may be beyond this guide, the Blender Foundation has you covered with a complete installation guide depending on what type of computer you have. Learn how to install Blender.
__________
Navigating different Blender software versions
The great thing about Blender is it’s updated all the time, the bad thing about Blender is it’s updated ALL THE TIME. 😅
This makes for an incredibly brief perceived shelf-life for a recorded tutorial, lesson, or year-long planned curriculum if you focus on the versions alone.

🍪 To avoid problems, it's best to always use the same version of Blender that is being used in the tutorial you are following.
Using the same Blender version ensures that UI buttons, settings, features, and addon compatibility are consistent. That way you can smoothly follow the videos and not be distracted by inconsistencies.
Furthermore, when scheduling an after-school program or a year-long curriculum, decide on a version of Blender and stick to it.
There is a whole lot more to discuss learning through various Blender versions.
- Learning 3D through various Blender versions.
- View all previous versions of Blender and download them
__________
Pop some popcorn 🍿and stream a few Blender films
A fun way to prepare for your class is to watch a few Blender films! It’s important to have an idea of what Blender is capable of to inspire yourself and those around you. It’s all about encouraging the self-motivator inside each of us.
While there are dozens - if not hundreds - more films containing Blender DNA, these are a few standouts worth a watch. Films from the Blender Studio, a counterpart to the Blender Foundation, release several open movie projects.

Here are a few Blender Studio Films:

Check out the Blender Foundations' full portfolio to watch even more 3D films.
There is also a cohort of feature films known to have used Blender in the production pipeline: The Midnight Sky, SpiderMan (2004), Westworld, Captain America: The Winter Solider and a slew of others.
__________
SECTION TWO
What are your goals with your class?Now that you have an idea of what Blender is capable of, let’s talk about what you’d like your students to accomplish. Avoid vague goals that may be hard to measure through rubrics (mentioned further down) or general assessments.
Be specific about what the outcome should look like.
A good goal is, for example, “Each one of my students will create a 3D Model of a chess piece in Blender that we’ll print on our 3D printers”, or “We’ll break off into teams of three students to create a 90-second animation using these assets to evoke an emotion.”
Knowing what you’d like your students to accomplish by the end of your time together will help you walk back the steps and resources needed for them to accomplish this.
Take a moment to write the end goal down.📝
Recommended Blender Student Ages: There isn’t a magic age that unlocks the mind to learn Blender. It largely boils down to overall interest in the subject. If a 7-year-old is interested, they’ll figure out a way to learn it. The same goes for a 20-year-old or an 89-year-old
In our experience at CG cookie, we see larger adoption of Blender at or around the age of 13.
__________
In-Person classroom teaching
The benefit of in-person learning is that you’re present. Students are in the same space, enabling you to pick up on social cues and avoid the communication challenges often present during remote learning.
Things you’ll need:
- Physical Space + supporting furniture for students
- Projection screen/capabilities
- Marker Board is helpful
Exploring Classroom Layouts
In group learning, the layout of the physical space directly impacts people's social interactions and focus and it helps communicate your intentions as the instructor.
Let’s discuss two desk layouts depending on where you’re at within your curriculum.
CLASSROOM LAYOUT: Galley Type
A nod to Roman warships, in this scenario the desks are grouped in twos and staggered in front of the instructor.

It seems counter-intuitive to be behind your students, though your students don’t need to be distracted by you sitting in front of your projection screen and clicking on your screen.
They need to be hyper-focused on what you’re doing on your computer.
Benefits of this layout
- The instructor has a clear view of the student’s screens enabling them to interpret how well the students are following along and mitigating any distractions.
- Most students can view other students’ monitors to better follow along, get inspired by other students, and self-police.
- Communicates the intent to focus on what’s in front of us as a class.
- The instructor, when delivering a demonstration, should move to the front of the class to take advantage of the marker board.
CLASSROOM LAYOUT: We're in this together
If your curriculum involves a team-building exercise, it's recommended to move desks into team structures. This mimics real-life production while encouraging group communication, and inspiration.

Benefits of this layout
- This layout works well for team-building activities, promoting cooperation and teamwork with students,
- Students may feel more comfortable sharing ideas in a smaller group setting,
- May encourage healthy competition, increasing overall classroom performance,
- Instructors are able to address smaller groups of students
__________
Online group teaching
Remote learning and online collaboration are becoming more commonplace than ever. this is partially due to technological advancements and a reaction to the global pandemic.
If getting together in person is not an option, or you're looking to reach students outside of your local area, online learning is a great option to consider.

Things you'll need
- Video meeting software and hardware,
- Solid internet connection,
- A way to communicate/collaborate with your students through a community forum, chat software, or LMS.
Software for online learning:
- Slack - Online communication with video calls + text chat,
- Zoom - Online video streaming service with screen sharing + recording,
- Canvas - Class organization, assignments, assessments, and grading,
- Google Meet - Online video conferences,
- Miro and or Figma - Online white-boarding software,
- Google Classroom - Free for schools to create classes, grade, and distribute assignments,
- Schoology - Online LMS platform for classrooms, grading, and student communication.
Online Learning Tips
Teaching Blender online is quite different from teaching in person. It's harder to create a connection with your students and gauge if they understand what you're teaching. Here are a few tips to help mitigate the challenges.
- Don't try to mimic in-person education. It's different. Avoid trying to copy 1-for-1 what you do in person to do online. Think how you'd like to receive the information, would you like to join a zoom with 20 other people, not likely,
- Instead of a large Zoom or Google Meet call with the entire class, disseminate the knowledge asynchronously. Then meet with your students either one-on-one or in smaller groups of less than five to review,
- Set the expectations of the class and the typical reply time from yourself to avoid burning out. It's okay to say, "I'll typically respond within 24hrs during the week, if a request comes in over the weekend I'll respond by end of the day Tuesday".
__________
Managing students' work
It can quickly become overwhelming managing the instream of submitted work and questions. Work to set up naming conventions, file structures, and best practices upfront to save you time and headaches.
Read: Building a Workflow | Finding one that works for us.
Before students open up Blender for the first time, take a moment to discuss the importance of organization within a 3D workflow. For themselves in their projects and the classroom that is mimicking a studio setting.
There are a few ways to have students submit work
- Students render an image from Blender and submit it to their student drive following the naming conventions you set up. Or email it to you with a specific subject line, or lean on your LMS features if it's supported,
- If students submit a copy of their .blend file to the classroom drive, keep in mind this will take up space and may take longer for you to fully grade each model. Instead, stick to renders and screenshots when able, reserving the .blend review for larger assignments,
- Rendering from Blender at the beginning can add a layer of complexity. As an alternative, simple screenshots serve as quick proof of work. Submitting screenshots instead of the .blend file can be a significant time and space saver.
__________
Supporting various learning styles
Humans tend to learn things differently from each other. While it adds a challenge to the process of teaching Blender, there are a few things we can do to help give our students the best opportunity for personal success.

Let's overview the various learning styles you may run into.
_____
Students already familiar with Blender
These tend to be students who are great at helping others and you can lean o them to keep you and the entire class up to speed with Blender. They're passionate about Blender and will have a lot to contribute.
Have caution, as this type of student may also have learned bad production habits that could be taught to other students. These students may be susceptible to the Dunning-Kruger effect.
Be supportive and clear when communicating the expectation and organization of the class.
_____
Students who are curious and tend to get distracted
It's normal to bounce around the software. There are so many buttons to press to see what they do! A curious student will tend to get lost in the software during a lesson. They'll be three steps ahead playing with a different part of the program as you cover another section of Blender.
This can be distracting to fellow students and the student themselves could be missing out on key fundamentals.
Assure these students that there will be plenty of built-in time to explore and click around on their own. Encourage them to keep focused on the current lesson it will save them hours in the future.
_____
Students who are nervous they're going to break something
The software is overwhelming. The cautious student tends to look for approval, "Am I doing this right?". These students require persistent encouragement and will be timid to try new things.
If you're able to, it's a good idea to sit them next to other students who have more confidence and are willing to help out.
__________
Preparing for rendering
One of the challenges of working with animation software is that it typically requires a rendering process to review the work done in the classroom. Keeping students and yourself aware of this workflow is crucial to avoid situations where students are sitting and waiting for an animation or model to render.
What is Rendering?
In its simplest explanation, it's turning your 3D assets into 2D images. Think of it as taking a photograph of something.
Explained another way, imagine you're having people over and you'd like to bake them a homemade pie.
As you prepare the pie for the oven, you're organizing the ingredients, shaping the pie crust, and making sure it's all going to look right. You dial in your oven and place your pie in there to bake (render).
Hoping the final output (animation, image) is going to look amazing.
Rendering is similar to this process, just within the digital space. If you were to create an apple pie in Blender, you'd have to model the pan, the crust, and any ingredients you'd like to be seen. Create the room, table, and lighting where your pie will be on display.
A word about real-time rendering: Blender is capable of offering real-time rendering through Eevee. This topic is beyond this guide, but it's important to be aware of the concept.
Video games rely on real-time rendering. Meaning, what you see on screen is being visualized in real-time by the computer hardware. To learn more about real-time rendering in Blender, read more about it in the Blender Manual or readCG Cookie's essential features in the Eevee blog post.
__________
Helpful tips for the classroom

1. Start with a bellringer
Think about beginning each class with a bellringer: a brief activity, sentence, or question to prime your student's brains for the concept you will cover that day.
Post a Blender question on your market board or video screen for students to think about and answer as they get settled.
For .e.g What could you create with Blender?
2. Offer end-of-class surveys
It can be challenging to realize if what you just covered in class is being absorbed by your students. A simple hack is to create a brief survey that must be filled out before students leave.
This could be a single question or a brief few-question online Google form that students get in the habit of submitting at the end of each class.
3. Build in free time at the end of each class
It's ideal to budget for 15-20mins of free time at the end of each class. Giving space for students to explore on their own, ask questions, and have time for them to submit their end-of-class surveys.
As you get further along your curriculum, it's normal to expand the free time block
4. Play Simon Says
This is a simple game to pay that has worked well for Tony Sharpe, a Blender educator, and contributor to CG Cookie.
Start the class with a version of Simon Says with Blender. The drill is designed to get students comfortable and proficient with navigating Blender. Typically this drill works best when covering the less exciting, but necessary aspect of Blender: understanding the interface.
How the game could work: have every student open Blender in it's default state. remind each student to keep one hand on the keyboard and one hand on the mouse. Run through a series of commands, each time walking around viewing screens to see who is following along. Make it just for fun or create a competition for those how can make it to the end.
For e.g. try this series of commands to play with
| Step to take (Hotkey) | Description |
| Numpad 7 | Change to the top view |
| Tab | Toggle edit mode |
| Select the cube | Cubes are selected |
| Press R and rotate the cube | Cubes are rotated |
| Shift A, Select mesh object monkey | Inserted a monkey head |
| Turn the monkey upside down | <-- final step to see if they were following along |
5. Avoid updating Blender versions during your class and keep the default settings
We tend to perk up when there is a new update available for the software we're using. Though in a classroom setting this can introduce more questions and confusion.
- Decide which version of Blender you're going to use for the entire class and stick with it. If you must upgrade, schedule this during classroom holiday breaks or in between semesters,
- If possible keep all students on similar hardware. Again this helps reduce time you're troubleshooting hardware issues, vs teaching Blender,
- Do not change the default Blender setup. Blender is very customizable which is great. In a classroom setting, it can introduce an unnecessary layer of complexity.
6. Integrate Rubrics
A great tool for grading, rubrics help communicate to the student where they stand and the administration understands students' progress. Below is an example format.
| Beginning | Developing | Accomplished | Exemplary | |
| Creating Objects | Student's project shows no ability to create new objects | Student's project shows some ability to create new objects. | Student's project shows a good ability to create new objects. | Student's project shows excellent ability to create new objects. |
| Modifying vertices, edges, and faces | Student's project shows no manipulation of edges, vertices, and faces. | Student's project shows some manipulation of edges, vertices, and faces. | Student's project shows good manipulation of edges, vertices, and faces. | Student's project shows excellent manipulation of edges, vertices, and faces. |
| Fundamental modeling tools | Student's project shows little or no use of fundamental tools. | Student's project shows some use of fundamental tools. | Student's project shows good use of fundamental tools. | Student's project shows excellent use of fundamental tools. |
| Project completion and creativity | Student's project shows no creativity and project is not complete. | Student's project shows little creativity and the project is mostly complete. | Student's project shows some creativity and the project is complete. | Student's project shows a lot of creativity and the project is completed |
Additional Tips
- It's okay to not know the answer to a student's Blender question. Have a place for students to write out questions, either a public clipboard or an online Google form. Your end-of-class surveys could help with this by inserting a question, "Any questions from today's lesson?".
- Streaming videos are a great tool for the classroom, don't fall into the habit of simply hitting play and sitting back in your desk. Work through these videos together as if you're on the team with your students,
- It may be helpful to establish classroom leads that have additional responsibilities to help others, and help keep the classroom (production) organized
- If students have completed assignments and are looking for more things to do, encourage personal projects and the exploration of more Blender courses.
__________
Three projects to get your students started
There is a phrase you've probably heard, "those who cannot do, teach." A silly phase typically vocalized by emerging artists who are eager to cut their teeth at studio. Instead, I prefer to subscribe to, "The best way to learn(succeed) is to teach".
If you can teach it well, it means you truly understand it.
Tip: have a student teach something in Blender once a week to the class.
Below are three projects for homework to get you started in the world of Blender. Running through these projects yourself will help you gain confidence, spark some curiosity and hopefully have some fun!
PROJECT ONE: Watch the Blender Basics
This free Blender Basics course is a great first step to familiarizing yourself with Blender.
Teaching this course in the classroom
Understanding the basics of any software isn't the most exciting thing to learn, but necessary to go on to create assets for video games or feature films. Have a conversation at the beginning of your class, "We cannot fly a plane until we understand the controls".
Instructor focus and tips
- Bellringer topic: "What could we create with Blender?" Once the expected answers (films and video games) are given, dig deeper with your class. 3D is used for VR experiences, pre-visualization for home builders, medical field, and used to visualize large sets of data,
- Spend a moment talking about why Blender is free. Explain the ethos of open-source and the possibilities to make a living with Blender. Mentioning http://blendermarket.com is a great place to start,
Student activities and assignments
- Have students become comfortable opening, closing, and navigating Blender,
- Assignment: Have students open Blender, add a Suzanne model, take a screenshot and submit it for grading. It's simple enough to edify the class on how to submit homework and receive feedback.
- Assignment: If able, have students download Blender at home or access it outside of the classroom. Blender doesn't require a license, this makes it super easy to have students progress outside of the classroom.
Exit prompts and survey questions
- How comfortable are you opening, navigating, and closing Blender? (1-10)
- Any questions from today's lesson?
PROJECT TWO: Your first Blender Modeling Project

Typically a coffee mug, pawn chess piece, or a dish from your kitchen will work well here. While not terribly exciting, these objects can be unexpectedly challenging.
This lesson can be streamed for free on our YT Channel.
Teaching this course in the classroom
Be aware of the environment the object is within. If the student has a chess piece in front of them, analyze why you can see this object. This will help prepare your mind for the things you'll need to create in Blender.
- Our eyes = we need to add a camera to the scene,
- Sunlight or lightbulbs = need to mimic these lights in Blender,
- Chess piece material = need to add color and surface details to instruct how light reacts to it,
- Gravity = need to tell everything we create in Blender its weight, mass, viscosity, and more if we want to mimic the real world,
Instructor focus and tips
- Bellringer topic: "What is lighting the room you're in?" This should open up the conversation surrounding the various types of lights, light bounce, color, and temperatures of lights.
Student activities and assignments
- Assignment: Have students go home and model a simple object from their house, ready to share for the next class. Review these in class, and talk about the challenges and tricks the students learned along the way.
Exit prompts and survey questions
- "What makes a good 3D render?"
Note: During this lesson you may notice a few students begin to struggle. To help keep the class unified encourage the fast students to get up, walk around and help fellow students. Because... the best way to learn is to teach. 😎
PROJECT THREE: Making something move in Blender

Making something move inside Blender is one of the most gratifying things to experience as a newcomer to 3D. It's not too complex and can have a powerful impact on students' excitement about the subject.
Similar to your first model, I encourage you to remain uncomfortably simple. Avoid the temptation to animate a character walk cycle, or orchestrate an epic space battle. Take a single object in Blender and make it move across your screen.
This lesson can be streamed for free on our YT Channel.
Teaching this course in the classroom
This tutorial is about getting your students comfortable animating things within Blender and understanding a few key animation fundamentals to apply to future projects.
Instructor focus and tips
- Bellringer topic: "Watch a scene of a popular 3D film, and make a list of things that were animated.". This helps practice the visual breakdown of a scene and understand how much is actually animated in any given 3D scene. For e.g. characters, lights, vehicles, dust, leaves, water, and the camera itself.
Student activities and assignments
- Assignment: Have students re-create their own render of the Pong game. Encourage simplicity, though it's okay to get creative with materials and camera angles for their homework submission.
Exit Prompts and Survey Questions
- Are you having any problems saving or submitting your Blender homework for review?
__________
SECTION THREE: Additional Blender Resources
Tips for being a positive member of the Blender community
Let's take a moment to talk about how you can help the Blender community. Remember the Bender story above?
Note: To be clear none of these suggestions are not required to happily use Blender. If you don't do any of these things you won't be shunned, or looked down upon. Simply creating amazing things with Blender, sharing the results, and teaching Blender to others are already helping the community. ❤️
If you'd like to take your relationship with Blender one step further, there is an entire section on https://blender.org dedicated to getting involved.

Remember creating your own Blender content and sharing it with the community is a path. This could be creating your own YouTube Channel, sharing experiences and knowledge of Blender, to building Blender assets, and add-ons.
Online communities
While Blender is developed by Blender, they prefer to defer support to the community. This means you cannot email blender.org to help you troubleshoot how to get something to work in Blender.
Done by design, this encouraged independent solutions to be created by the community serving the community. Below are a few sites worth bookmarking.
- Blender News - http://blendernation.com
- Blender Community forum - http://blenderartists.org
- Blender Stack Exchange - https://blender.stackexchange.com
- Blender support Chat - http://blender.chat/channel/support
- Enterprise Blender Support - https://orangeturbine.com
- Blender Reddit - https://www.reddit.com/r/blender/
Use the #b3d hashtag on Twitter, Instagram, and other social networks to connect with other Blender users. There is a full list of Blender communities here http://blender.org/community
Online Blender training resources
A decade ago there were maybe two to three education resources actively creating Blender content. Thankfully today, there are hundreds, if not thousands of Blender creators with the community creating fresh Blender content daily.
We'd love to have you as a member of CG Cookie, though we're just one piece of the amazing Blender community. It's full of talented artist and training resources.
Youtube
There is a ton of Blender knowledge being shared on YouTube. Simply give a quick search for Blender tutorials to find out. The rub it is hard to recognize the quality of that knowledge from a thumbnail. Typically the number of followers or likes is a decent indication of others have found them valuable.
Here are a few YouTube Blender Creators worth subscribing to
- CG Cookie 🍪 😎
- CG Geek
- Chris Bailey
- Andrew Price
- Chunck Trafagander
- Curtis Holt
- Ducky 3D
- SouthernShotty
Blender Training sites
The Blender Market is a great source for 3D Models and tutorials.
__________
Frequently asked Blender questions
Q: How much progress could I expect from my students?
Depending on how long your class is, you could expect a varying degree of comprehension and performance. The amount of time you have with your students will have an impact of course.
By the end of a two to three-month class, students should be able to render out a personal object of their choice, amongst completely several tutorial projects along the way.
If you have your students for an entire year, creating a 60 sec animated short with the assets they've created is doable.
Managing students' expectations are crucial. If they expected they'd be able to create Halo, Avatar, or Buzz lightyear on their own, they will end your class feeling frustrated and demotivated. The goal is to have students achieve reachable goals quickly and often to earn that early confidence and motivation to keep going.
Note: Watch the Blender and feature CG films with your students. Take a moment to review the credits. Noting the number of departments, and people that were involved in making the film.
Q: How do I get the keys I'm pressing to show up in Blender?
Download Blender Screen Cast - Once installed, this will display the keys you're pressing for students to follow along.
Q: Who is Suzanne?
3D software will typically have a default shape, or 3D model unique to itself. This is typically used to test materials, lighting, and or physics. For e.g. 3D Studio Max has a teapot as its default shape.
Blender has a 3D Monkey Head named Suzanne
The origin story of Suzanne according to Wikipedia derived from an easter egg attempt, a lasting artist mark when the original company behind Blender was closing its doors.
Q: How can somebody make money with Blender?
There are numerous ways to begin earning an income with Blender. From teaching others how to use it, offering your services as a freelancer, selling 3D models online to creating your very own add-on to sell on the Blender Market.
If that is of interest, we wrote a complete article on how to make money with Blender.
Q: Where can I find support for Blender?
The Blender Foundation does provide a wealth of information, including a comprehensive manual, however by design, the Blender community largely provides Blender support solutions.
From Blender Forums, Discord Servers, news sites, online educators, consulting, and commercial paid support exists today. Whether you’re an individual or enterprise studio we, the community have you covered.
Learn more on how to find Blender support.
Acknowledgments of those that helped make this guide possible.
Articles like this do not come together without the collective effort of amazing humans. This one is no exception.
I'd like to thank Tony Sharpe, for his collaboration and dedication to authoring CG Cookie's original Blender Curriculum. The fragments of its DNA made their way into this guide.
To the crew of CG Cookie who helped edit, suggest, and write content that made its way into this guide. 🙏
Ton Roosendaal and the entire team behind Blender, thanks for creating an amazing piece of software we get to teach and create with daily, surrounded by a massive (not-cult-like) 😅 Blender community.
Happy Blending!
Wes
__________
🍪 Looking for a printable version of this guide to take with you?
Download the PDF version of this Blender teaching guide, which also includes printable quizzes and Blender hotkey maps.