It’s been just a few short months since Blender 4.5, but Blender 5.0 is here already with a massive number of upgrades. What excites me the most is not just the new features, though, but the fact that so many of the changes are in direct response to long-standing feedback from the community. Once you try it, you’re not going to want to go back!
Because there are so many changes, we’re only going to cover the biggest ones here for each section. For a more comprehensive list, check out the video we made below for the official Blender channel in partnership with our friends Harry Blends, Károly Zsolnai-Fehér, Aidy Burrows, and Martin Kleckner.
Modeling
Six new modifiers are here, and they’re all based on Geometry Nodes. The plan for the past several years has been to replace the existing modifiers with more flexible Geometry Nodes versions. The first one was the Auto Smooth modifier that was introduced back in 4.1, and now we have a few more:
- Array
- Instance on Elements
- Scatter on Surface
- Randomize Transforms
- Curve to Tube
- Geometry Input

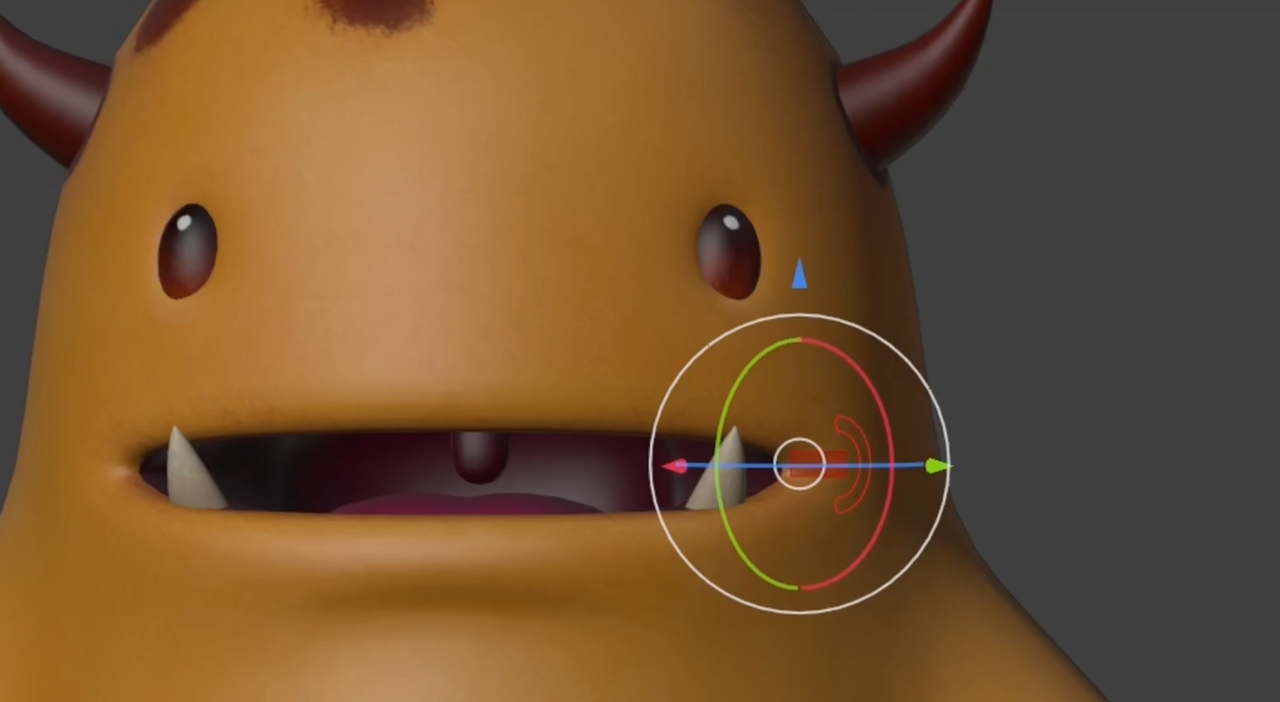
The new Array modifier implements several features that users have been requesting for decades, such as circular arrays, randomization, interactive gizmos, and improved support for instancing along curves.
Not all features of the original Array modifier were ported over yet due to the current limitations of Geometry Nodes, so the old array is still available as Legacy Array and the new one will be improved as Geometry Nodes becomes more powerful.
The Curve to Tube modifier is also quite nice since it makes it easy to add rounded caps.
Instance on Elements, Scatter on Surface, Geometry Input, and Randomize Transforms were all fairly easy to implement in a simple way in Geometry Nodes already, but these modifiers are very comprehensive and make those common tasks incredibly easy.
One of the main goals of Geometry Nodes is to allow power users to build tools that beginners can use without having to touch nodes at all, and these modifiers are a great example of exactly that. Plus, more experienced users can modify them at any time. It’s a workflow win for everyone!
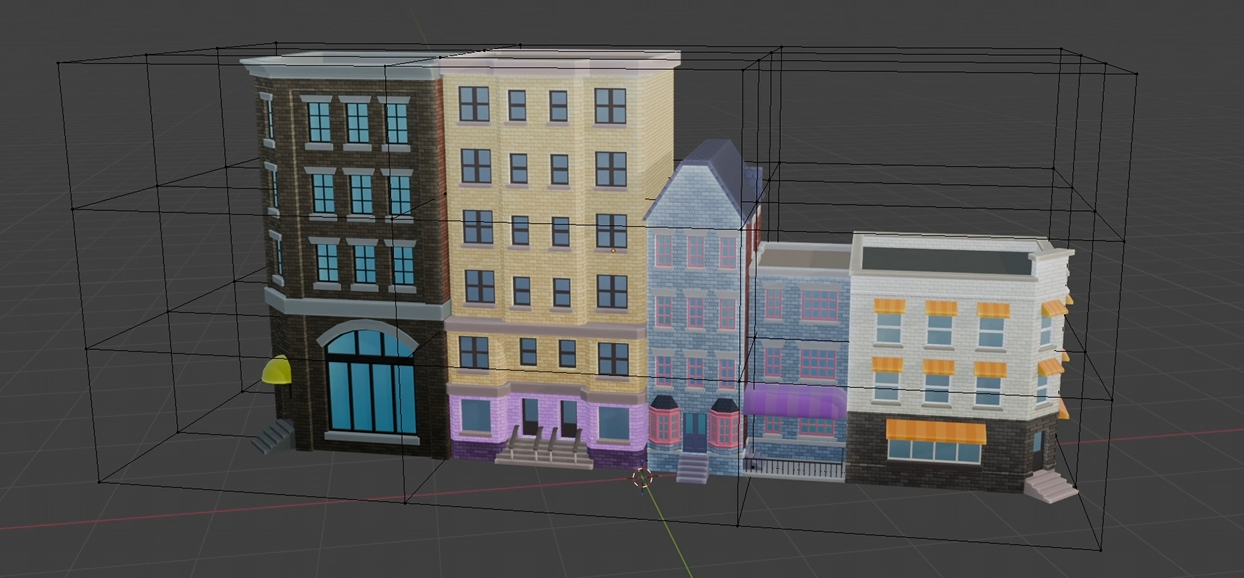
Some other hotly requested modeling features in Blender 5.0 include a new Lattice Deform Selected option in the Add menu, which automatically wraps the selected objects in a lattice and adds the Lattice Deform modifier to each of them, a Conform Base operation in the Multiresolution modifier to move the base vertices to their subdivided positions, and improvements to Merge by Distance.
UV Editing
The whole UV selection code has been overhauled so that Sync Selection, which syncs the selected points in the UV Editor with the vertices in the 3D View, now works much more intuitively.
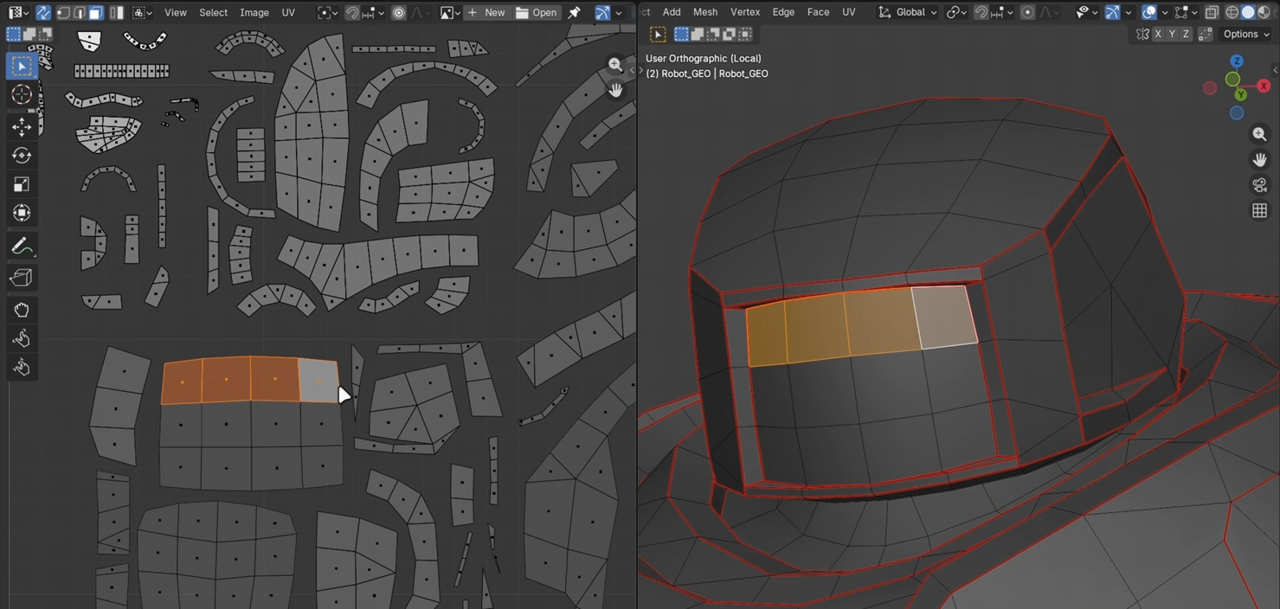
Selecting a point in the UV Editor no longer selects all other points that are attached to the same vertex in 3D space. This change allows true face selection and island selection while Sync Selection is enabled and makes all operators compatible with Sync Selection mode. UV selection has been a pain point for many artists switching over to Blender from other software, so it is amazing to see this finally addressed!
In addition, you can now pack islands to a custom region, arrange and align islands, and quickly shift islands around using the number pad arrow keys.
Sculpting and Painting
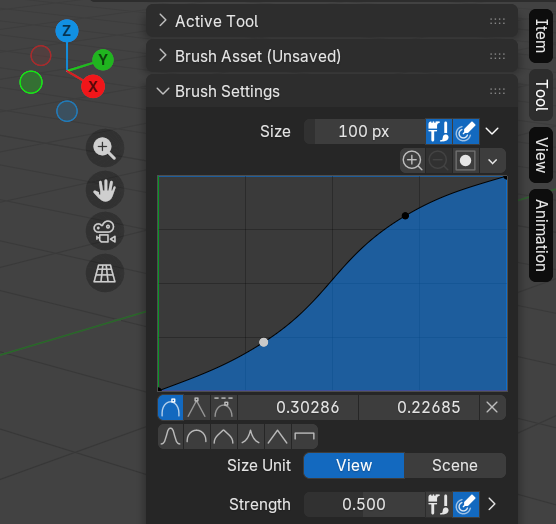
In Sculpt and Paint modes, the size, strength, and jitter options now have a customizable curve for tablet pressure.

The Grab, Snake Hook, Elastic Deform, Pose, Boundary, Thumb, and Rotate brushes no longer show a pressure sensitivity toggle since they did not work well when that was enabled. That will come back again when the issue is fixed.
Undo for sculpt mode deformations has been optimized, which reduces memory usage by about 10%!
Texture Paint mode got new Pixel Art brushes, which are mainly intended for use in the Image Editor, but they will be improved for better use in the 3D View later on.
Grease Pencil
The Pen tool from Curves Edit Mode, which is awesome for creating precise lines and curves, was added to Grease Pencil Edit Mode.
New corner types were added, which really helps Grease Pencil feel like a great system for creating vector art.

Motion blur now works with Grease Pencil objects if you enable it in the Grease Pencil render settings. The quality can be adjusted with the steps settings, and the only limitation now is that it doesn’t composite well when overlapped by mesh objects that are also being motion blurred.
Bezier, Catmull Rom, and NURBS curves can now all be exported to SVG, and the Interpolation tool now supports Bezier and Catmull Rom curves.
Rigging
A new constraint, Geometry Attribute, allows you to sample attributes from other objects. This means that you can now directly use Geometry Nodes to assist your rigs!
Bones with custom shapes can now have their gizmo and pivot point be at the displayed location of the custom shape rather than the origin of the actual bone. This especially helps face rigs, which have a lot of custom shapes, be a lot more artist-friendly to use.
Working with instances of armature objects is easier now, thanks to bone visibility and selection state no longer being linked between them.
Shape Key editing has been dramatically improved. The list now supports drag and drop, the basis is now set in the dropdown menu rather than by (potentially accidentally) moving the top entry downwards, you can apply flipped versions of Shape Keys, and you can now Alt-drag on values to modify multiple selected Shape Keys at the same time.
Animation
The Copy Global Transform add-on is now integrated into Blender itself and can be found in the sidebar in the Animation tab.
The animation playhead has a new shape now and it finally lines up perfectly with keyframes. Also, the numbers in the scrubbing region are now spaced according to frame rate so that it is easier to animate based on seconds.

All animation editors now have an optional footer with playback controls, so you don’t have to keep around a Timeline editor just for that. Also, the Timeline has been simplified while the Dope Sheet has been beefed up.
A new Jump Time operator, whose hotkeys are Ctrl Left and Right Arrow, lets you jump forwards or backwards in the animation using either a set number of frames or seconds.
Geometry Nodes
There seems to be exciting changes to Geometry Nodes in every Blender release, but, in 5.0, they really take off and have become significantly more powerful.
First, you can now package multiple noodles into one using the new Combine Bundle node and split that out using the new Separate Bundle node. This helps keep complex node graphs a bit more tidy.
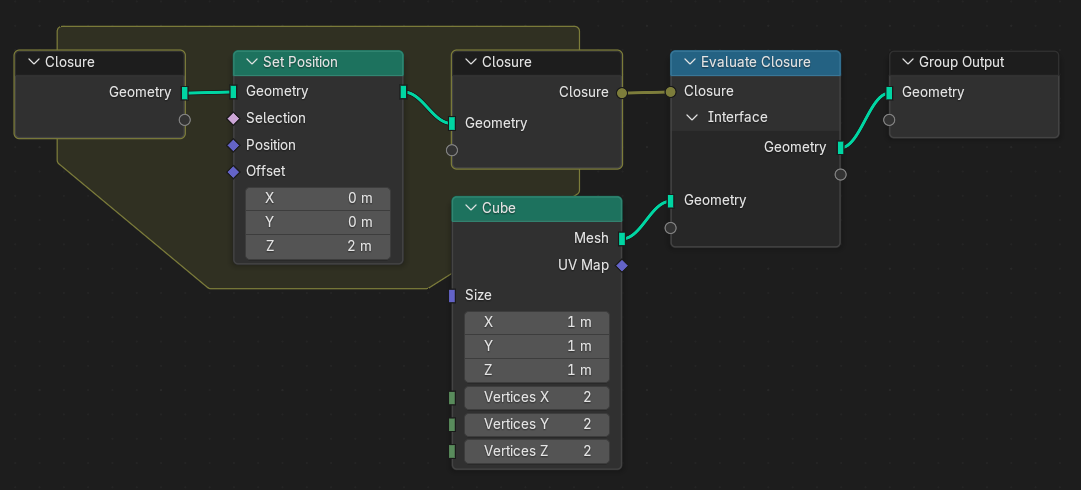
Closures are another new concept for Geometry Nodes. They allow you to inject nodes from one node group into the middle of another node group. This allows for building amazingly customizable effects and will be especially important when Geometry Nodes implements physics systems.
There are 27 new nodes related to volume grids in Blender 5.0, along with a new volume grid socket type. This unlocks possibilities in everything from fluid and smoke simulation to SDF based modeling.

The Viewer Node can now display single values, is better updated when using Ctrl + Shift + Click, and its numeric data is now more cleanly displayed in the viewport.
A new UV Tangent node allows for quickly getting the rotation of face corners in UV space, which can be used for effects that nicely flow across the surface of objects.
New nodes (in addition to the new modifiers) were added to the Essentials Library. They include operations for selection, smoothing, displacement, getting topology info, and manipulating vectors.
A new String to Value node does the opposite of the existing Value to String node, many nodes with menus now have menu sockets, and the Gamma node from the Shader Editor was added.
The Manage panel in Geometry Nodes modifiers can now be hidden using the modifier dropdown menu.
Rendering
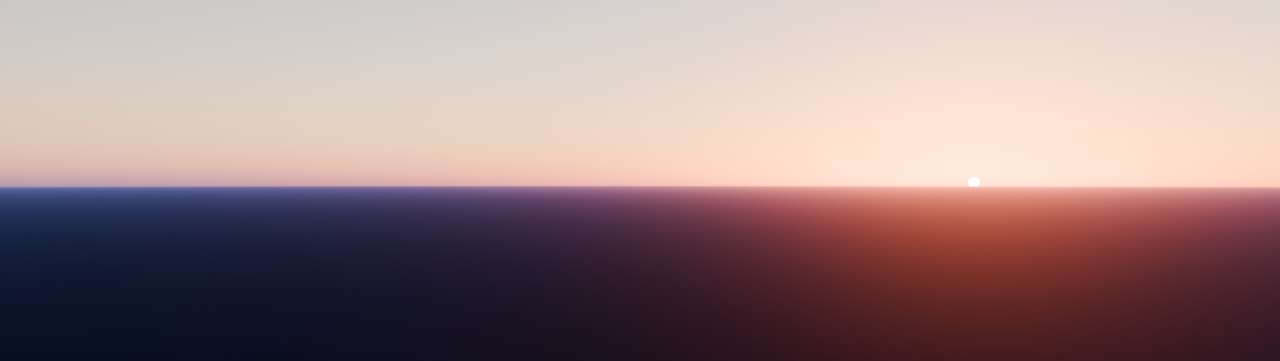
The Sky Texture node has a new default mode, Multiple Scattering, which is both more accurate and more beautiful - especially around sunrise and sunset.
A new procedural node, called Radial Tiling, now lets you create all sorts of shapes and tile patterns with rounded corners.
The Point Density texture was removed, since everything it used to do can now be done much better with Geometry Nodes, and good ‘ol Voronoi is now several times faster than it was before if you’re rendering on the CPU.
And lastly, light linking can now be overridden with library overrides.
Color Management
Blender 5.0 has gotten a huge upgrade in the color department. First, you can now output to HDR displays and save images in HDR formats!
To go along with that, you can also use HDR view transforms. There is a new HDR version of AgX, as well as full support for the ACES 1.3 and ACES 2.0 transforms.
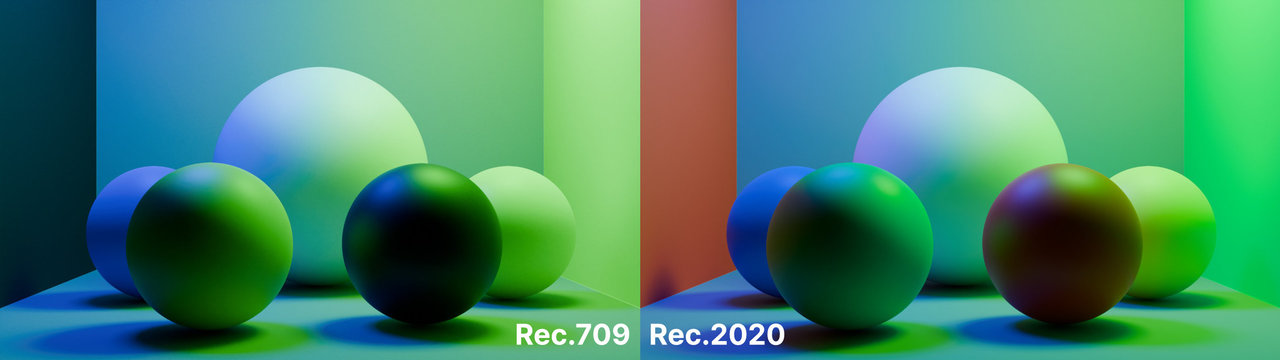
The full ACES color pipeline, for those who are working with images from other applications that use ACES, is now supported because you can also change Blender’s working space to ACEScg. Though if you’re not importing and exporting ACES data, it would be better to use Rec.2020 if you’re going to use a wider gamut as it introduces fewer complications.
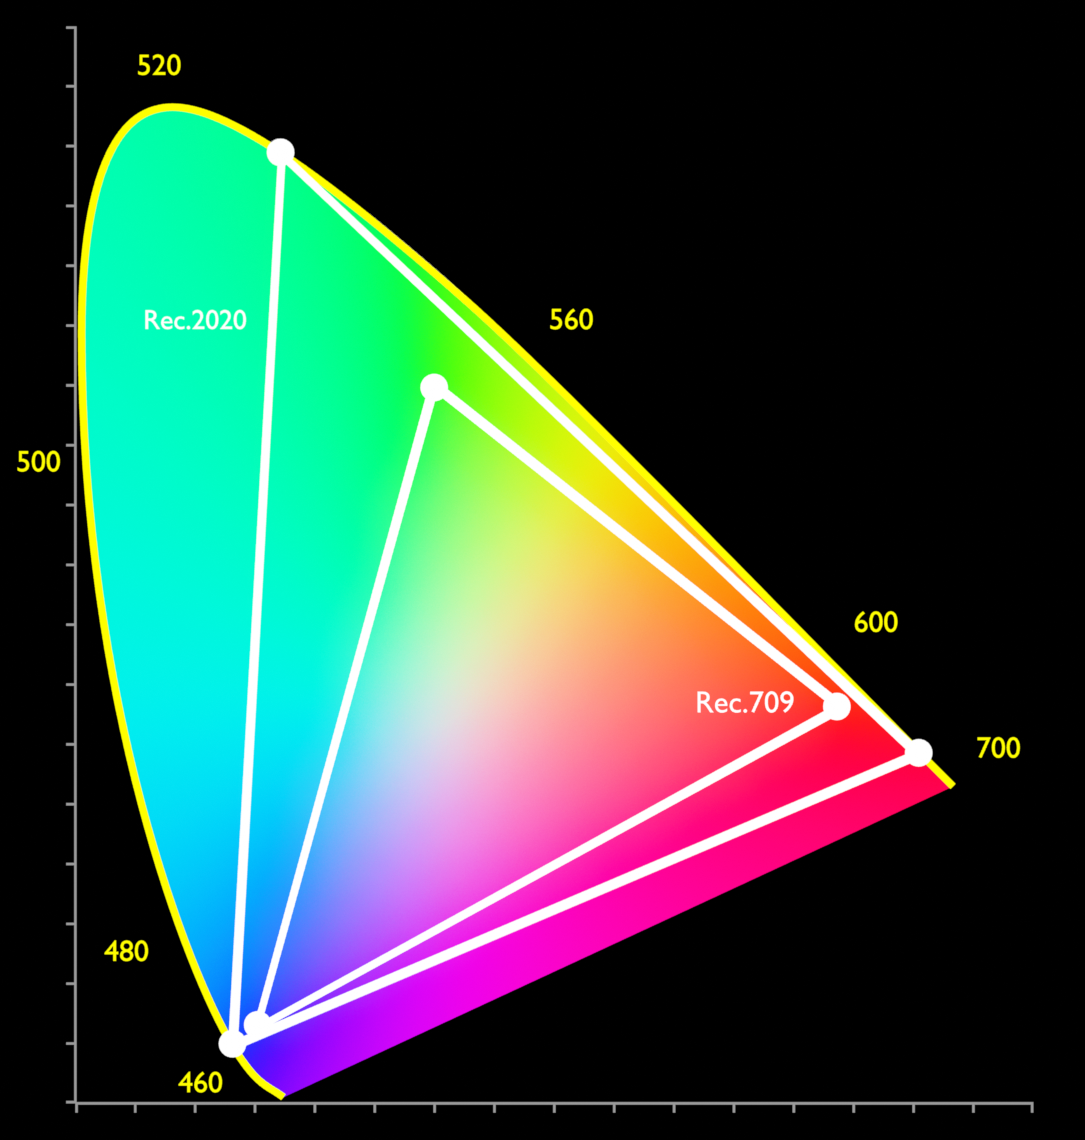
Rec.2020 can allow Cycles and Eevee to mix the colors of bounced lights a little more accurately, closer to spectral rendering, though not quite that good. Just be aware that if you change to Rec.2020, view transforms that weren’t built with it in mind, like PBR Neutral, can be a source of clipping. AgX works great, though.
Also, do know that larger working spaces change what color results when you input raw RGB values into nodes, which is why colors need to be converted when you switch. It can also allow you to get negative values in the color picker, which might be confusing.
This is because the new linear side of the color picker shows the color as related to the linear working space, while the perceptual side of the color picker shows the color as related to sRGB. When picking colors for materials and lights while using larger working spaces, I would generally recommend sticking with the perceptual side of the color picker, since otherwise you won’t get as much of the color mixing benefits that I mentioned earlier.
Cycles
In Blender's path tracer, Adaptive Subdivision has received another round of improvements and is finally no longer considered experimental. It is now always displayed in the Subdivision Surface modifier if you are using a render engine, like Cycles, that supports it.
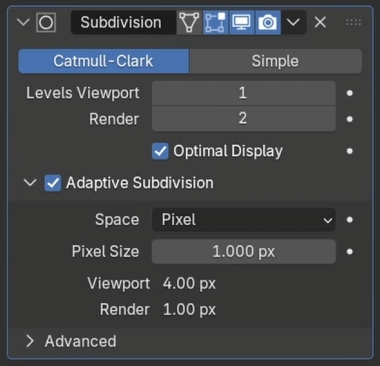
It now works properly with normal maps and there is a new option to slice in object space, which allows for using it on instanced objects without the performance loss that comes with realizing the instances.
Volumes are now rendered with a new unbiased algorithm, called null scattering, which removes artifacts when two volume objects overlap. It works better in most scenes but can have worse performance in others, so you can always get back to the previous biased method in the volume settings. Volumes also render with a bit less noise on the GPU thanks to more advanced sampling and a better optimized volume library.
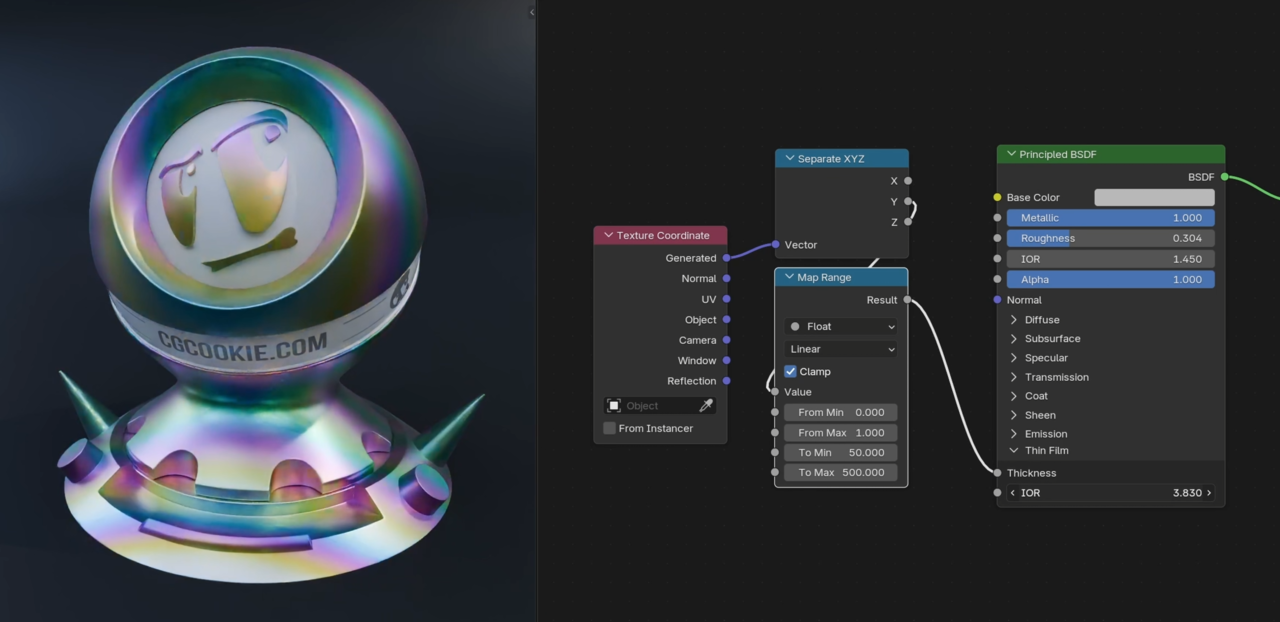
Metals can now use thin film interference, which allows you to realistically simulate the beautiful colors of oxidized, anodized, or tempered metal.
Subsurface scattering is also improved and is no longer overly darkened near object intersections.
OSL cameras, which allow you to design your own custom lenses for rendering, now support more types of inputs in the interface. They also no longer depend on the Blender focal length for the aperture size, which adds much more flexibility for the depth of field effects.
Baking from the multiresolution modifier was also significantly improved and you can even bake vector displacement maps from it now. And for baking in general, you can now choose to bake to only the selected image nodes rather than all active nodes.
Curves can now be rendered as linear 3D curves, which is not as nice looking up close, but looks good from far away and can cut render times in half or more in some cases when a character has lots of hair.
There is also a new pass for render times, which can be used to pinpoint and fix the parts of your scene that are rendering slowly.
The option to render without tiles is now gone so that massive, 16k renders do not crash when they run out of memory. But you can still set the tile size to larger than your render if you really want to.
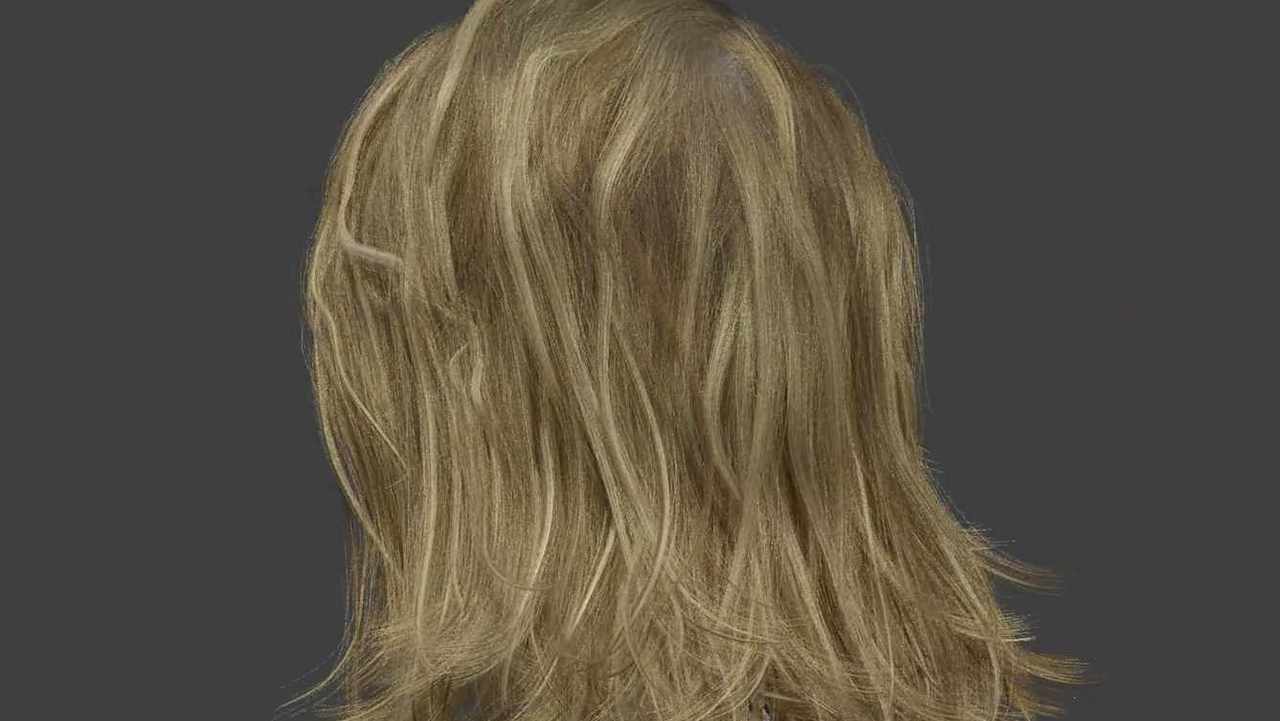
EEVEE
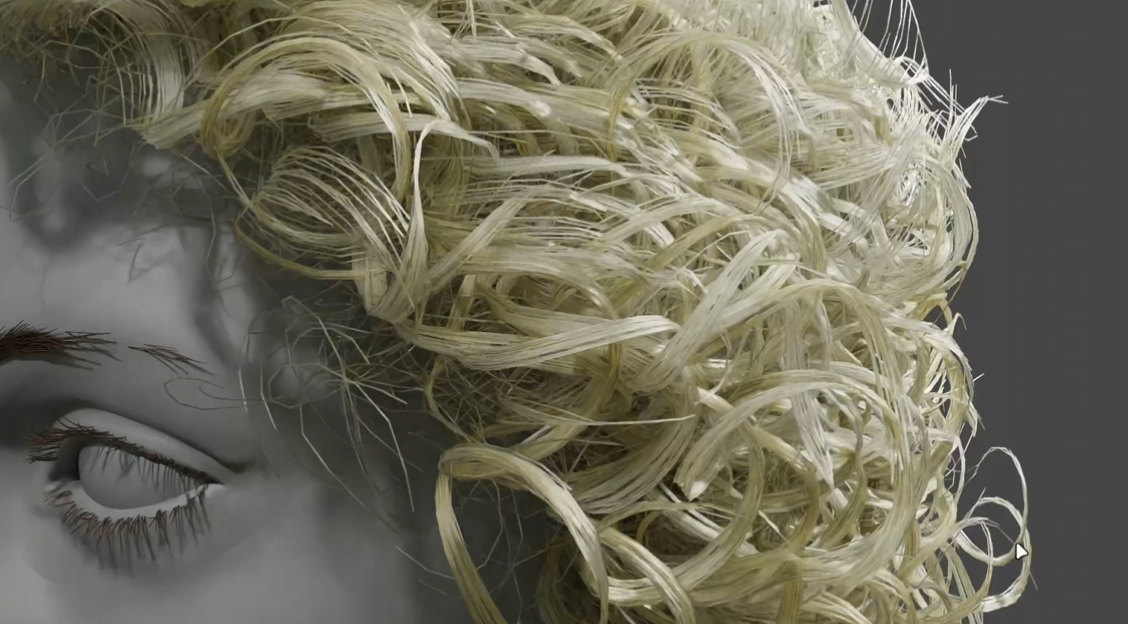
In Blender’s real time render engine, curves and hair are now rendered much more realistically, with better thickness, smoother interpolation, and improved self-shadowing. They also now respect the radius, cyclic, and resolution attributes just like Cycles.
Baking light probes, which are used to pre-compute complex bounced lighting in real time renderers, is now faster and the UI remains responsive while it’s working.
Also, overriding materials in EEVEE per view layer is now supported.
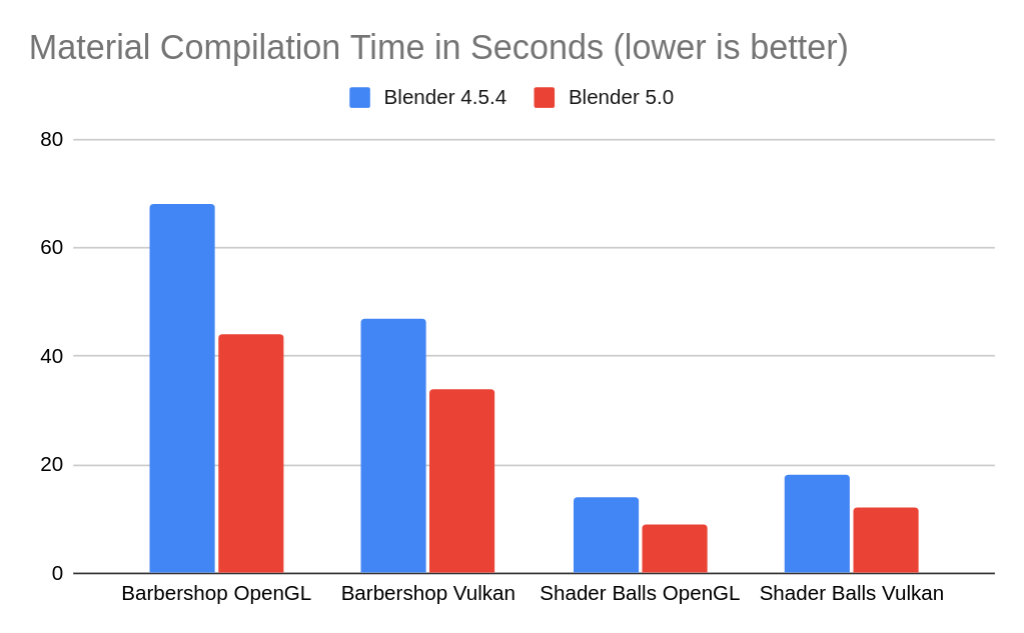
Material compilation times were improved for both OpenGL and Vulkan.
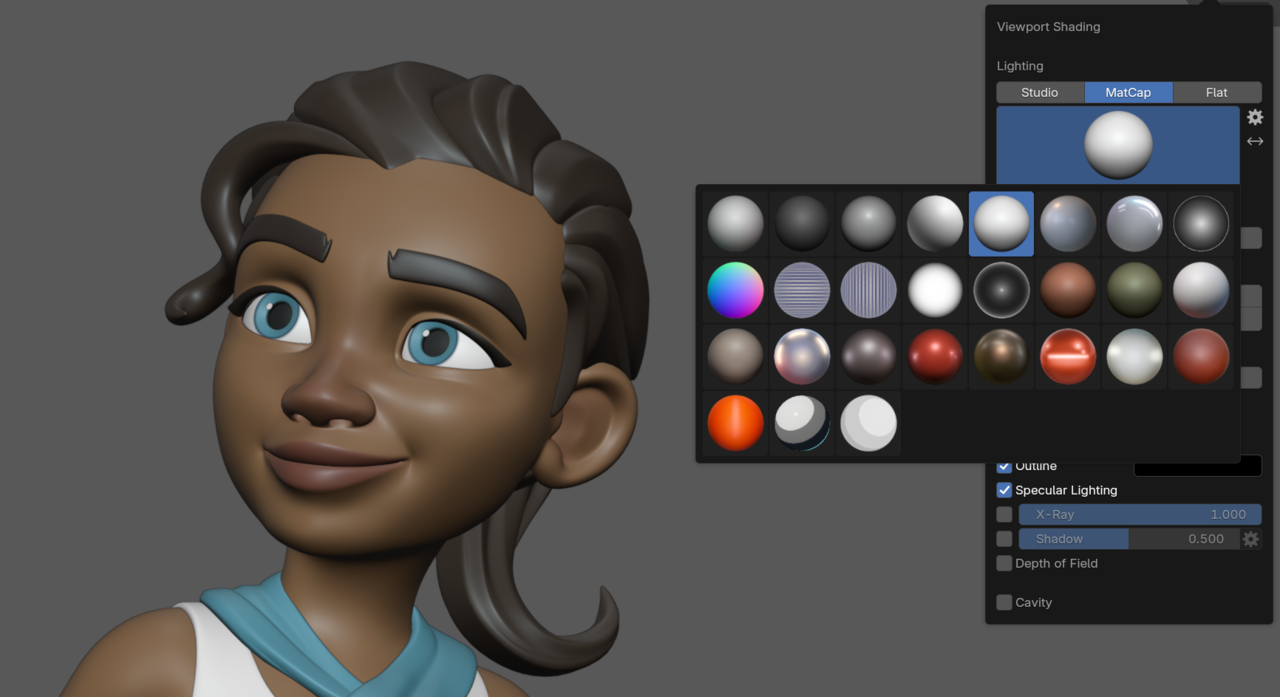
Workbench
Blender’s viewport renderer also got some love in Blender 5.0. The Matcap materials have been completely overhauled in response to user feedback and are now looking better than ever. Whether you’re modeling hard surfaces, sculpting characters, or previewing scans, your objects are going to look amazing.
And it’s not all style - scenes that make heavy use of instances are now rendered 150 - 300% faster!
Compositing
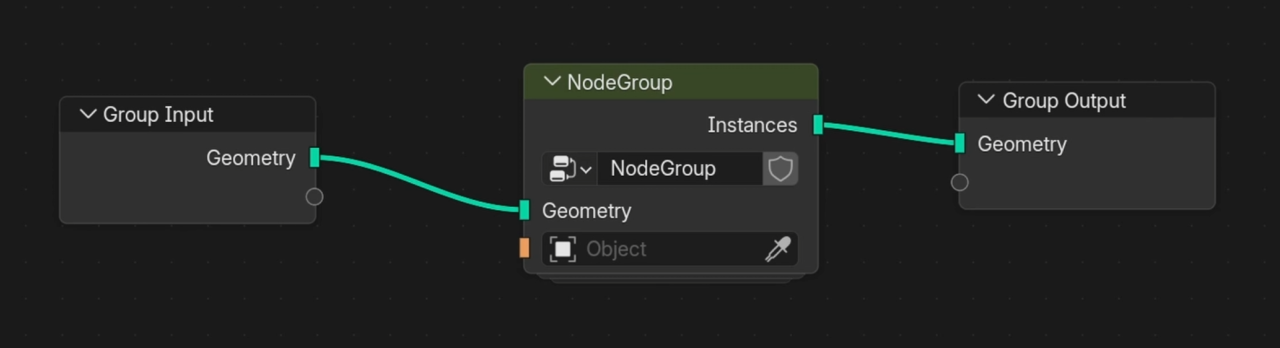
The Use Nodes checkbox is finally gone in the compositor and has been replaced by a data block selector just like in the other node editors. This allows you to easily share top level compositing setups between blend files. To go along with this, the Composite nodes were replaced by Group Output nodes.
The legacy Texture node was also removed now that all of the textures from the Shader Editor are now supported.
The Split node now supports rotation.
Lots of new nodes got extension and interpolation options as well as had their inputs and outputs aligned.
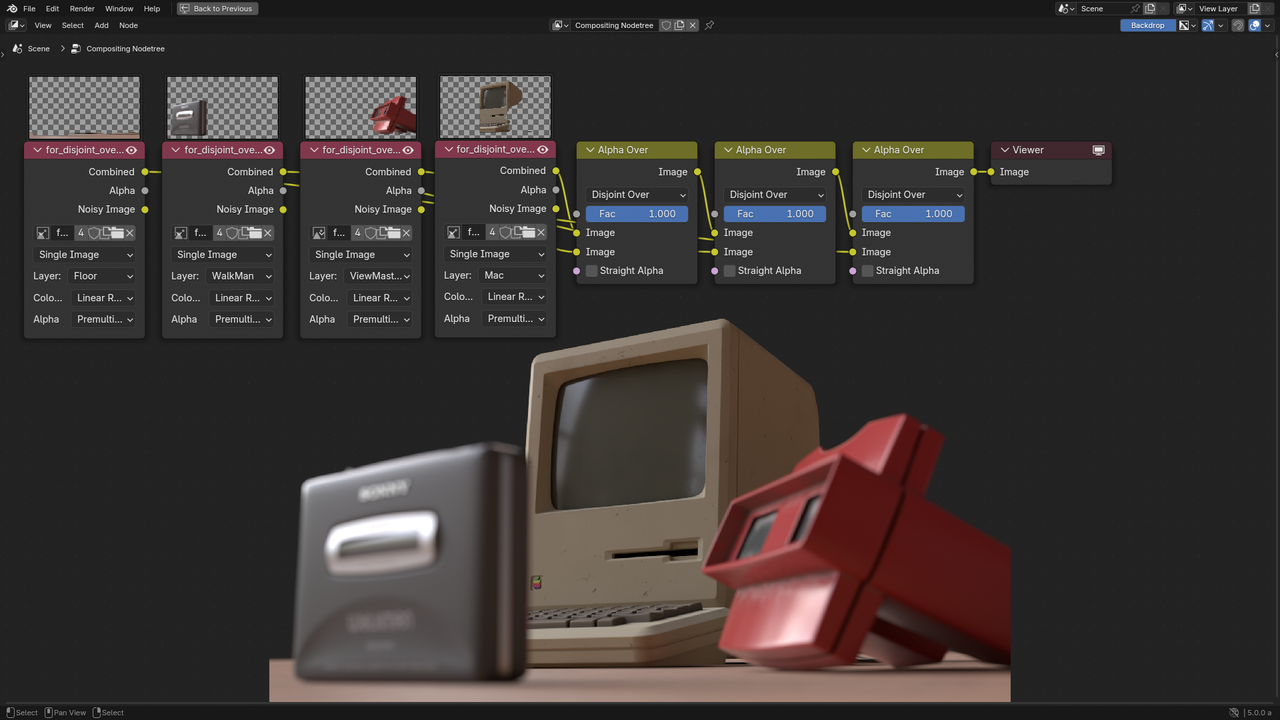
The Alpha Over node now has Disjoint and Conjoint operations, which help when compositing blurred objects on top of one another.
The Sun Beams node was merged into the Glare node as a glare mode and is now both faster and higher quality. The Fog Glow mode is also more realistic now, and the Low and Medium quality settings were improved for all modes.
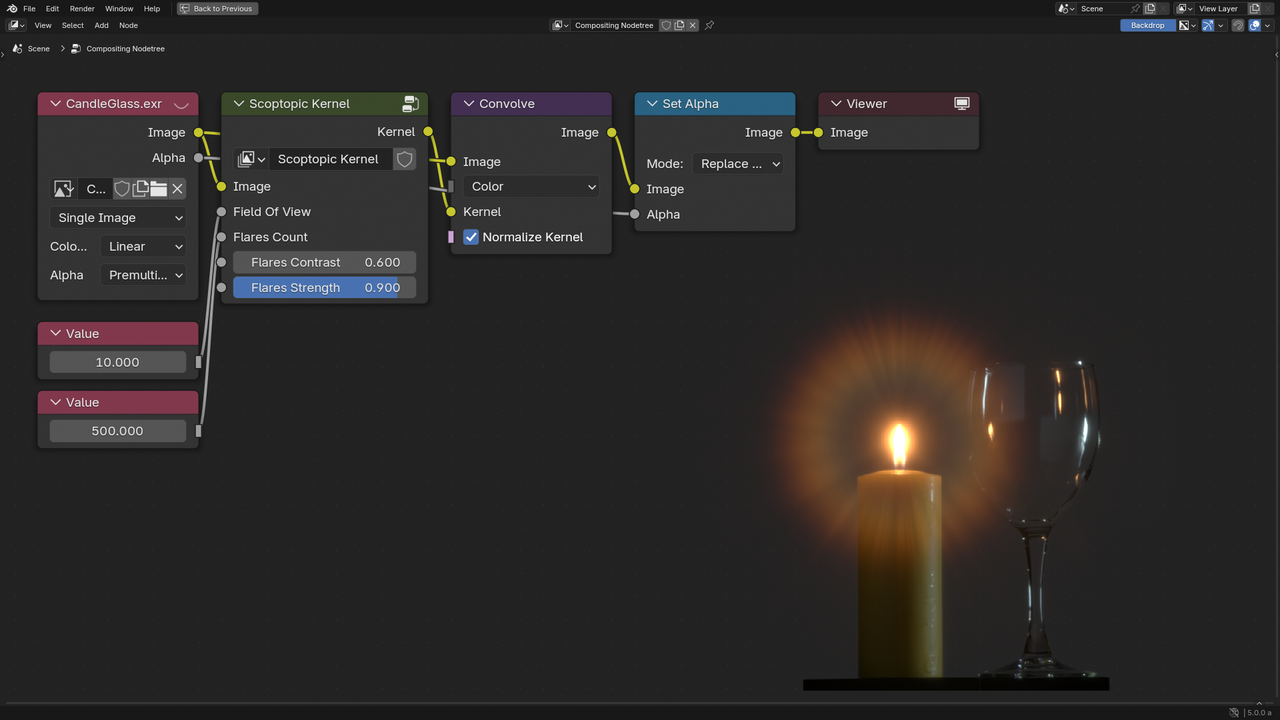
A new Convolve node allows for replicating image effects over certain pixels. One great example of how to use this is the physically based glare that was created by the compositing dev, Omar.
A new Kernel option was added to the Glare node, which is essentially the Convolve node but applied to bright areas.
Menu sockets and the Menu Switch node are now available in the Compositor.
The Asset Shelf was also added, along with several built-in assets for basic effects, such as:
- Chromatic Aberration
- Film Grain
- Sensor Noise
- Vignette
- Sepia
- Split Toning
- Clarity
- Unsharp Mask
- Retime

Another new node, Convert to Display, allows using view transforms in a simpler way than the Convert Colorspace node.
The File Output node was completely redesigned and is now much easier to use.
Lens Distortion now supports transparency, the Z Combine node was renamed to Depth Combine, and the Lift/Gamma/Gain node now operates in linear space.
Video Editing
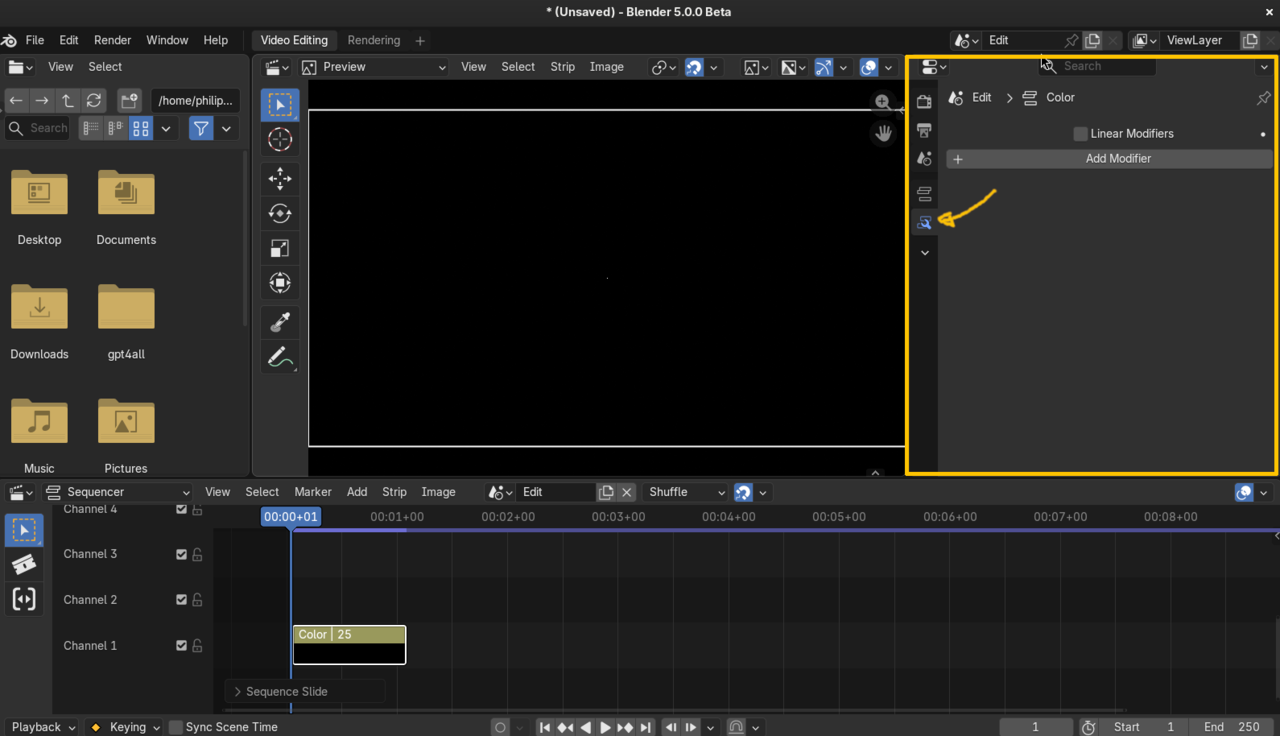
While we’re still on the topic of compositing, one crazy new feature for the Video Sequence Editor is the ability to apply compositor effects as strip modifiers. That is amazing! It is only CPU for now and does not yet support group inputs shown in the modifier stack, but this system will be improved in the coming versions.
The strip properties and modifiers were moved out of the VSE sidebar and into the Properties editor.
A second wild change is that the VSE now has its own scene, which means that you can edit scenes live while adjusting the strips that reference them in the VSE. It’s a crazy workflow that is intended to significantly speed up storyboarding and short film editing.
Retiming audio now retains the pitch by default.
Adding strips with Shift + A now places them at the mouse cursor and multiple files can now be dragged and dropped at the same time.
Text strips now have boundaries that act like proper text boxes.

Keyframes can now be added or removed for selected content in the preview area.
All of the color scopes were polished a bit, are much faster, and now support HDR content.
Frame prefetching is on by default now and significantly improves how smooth playback feels while editing.
Virtual Reality
The built-in VR scene inspection add-on has significantly improved the UI and locomotion to help avoid motion sickness. There are new options for that at the bottom of the Navigation tab in Preferences.
Pipeline and I/O
The asset workflow has been improved with the introduction of packed data. Just like how images could be packed in a file, regular data blocks like meshes and node groups can now be packed too.
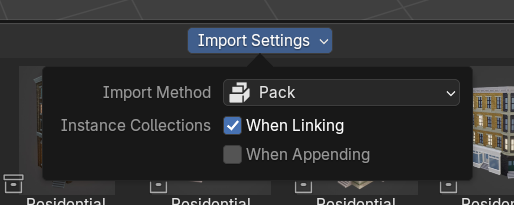
Data blocks that have been imported as packed cannot be edited until they are unpacked. The advantage of this is that it helps Blender avoid unnecessary duplication when importing many things that all share references to the same data. This is helpful for the essentials library, for example, so that multiple node groups that are imported at different times can all share the same underlying sub-groups.
Blender files can now store data blocks that are bigger than 2 gigabytes, which makes it possible to store meshes with hundreds of millions of vertices... though the rest of Blender might still struggle with that. In addition, data block names can now be longer and blend files are compressed by default.
Physics caches are now both smaller and faster. Nice!
More path variables were introduced, such as the scene name, camera name, and current directory, so you can split out your renders to different file paths much more easily.

OBJ import better handles name collisions and the exporter got an Apply Transforms option for exporting objects in local space. Curve data handling was also improved to support more complex Bezier and NURBS curves.
For FBX, the dramatically faster C++ importer that was experimental in 4.5 is now the default. It also handles name collisions and imported actions a bit better now.
The USD importer and exporter now properly imports NURBS curves and you can now import point cloud attributes from Alembic files.
Collada .dae files are no longer supported by Blender since the format has been abandoned for six years. This change apparently removed 21 and a half thousand lines of custom code from Blender core, shrunk the Blender .exe file by 4 and a half megabytes, and saves 95 megabytes from each install.
User Interface
Blender’s UI got a nice new coat of paint in this update. While none of the updates are overly obvious, they all work together to create a better overall experience. I won’t list every single update here since there are dozens on tiny tweaks, but here are the highlights:
Theming
The default theme has gotten some tweaks, panels now have a crisp outline, and areas that can be scrolled now have a nice fade effect.
Editing themes is now significantly easier thanks to editors now sharing common controls such as panel color, keyframe color, tab color, etc.. Many redundant theme settings were removed, and many previously hardcoded colors are now themable, such as the background and curves in curve widgets.
Example from my theme, Minimal Dark
Editors can now show grab handles and number inputs can always show their arrows, which is a step towards making Blender work better with touch input.
Properties Editor
The properties tab filter now has icons and can be accessed by a little dropdown arrow below the other icons.
You can now change the active scene and view layer from within the Properties editor.
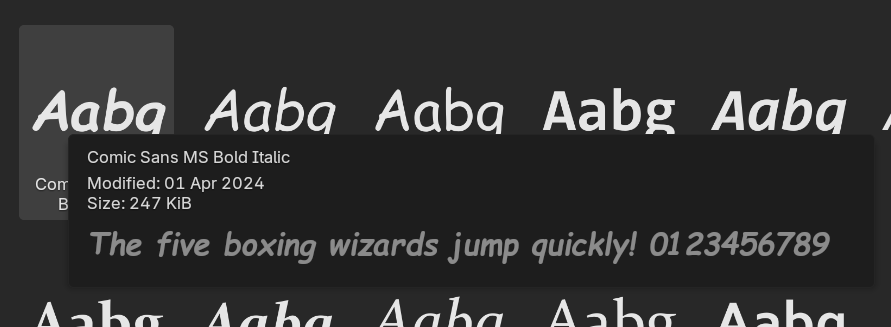
Font tooltips now show a nice large preview.
3D View
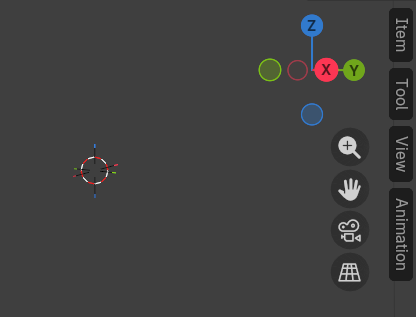
In the 3D View, the 3D Cursor now has colored tips to show which axis is which.
Sidebars can now show just the tabs, for when you want easy access to your tools but without the menus being currently in the way. Also, the tabs are now drawn as pills and panels now collapse a bit more gracefully.
Full screening an area with distractions removed is now called Focus Mode (and the hotkey is Ctrl Alt Space if you haven’t used it before).
Adding an image as an empty is now in the Add Image menu rather than the Add Empty menu. Along with this, reference image backgrounds in cameras now use the Fit type by default.
When it comes to organizing objects, you can now move and copy things to specific collections right from within the search menu.
The information about modal operators, like the numbers when moving, rotating, or scaling an object, are now displayed nicely in the center of the header. Also, when transforming, the overlays toggle now affects the visibility of the constraint axis. 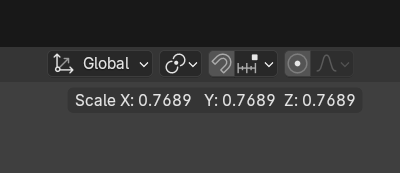
The composition guide overlay color for cameras is now per camera instead of a global preference.
The Outliner
When you Shift drag and drop to make a parent in the Outliner, it preserves the transform so the objects won’t jump around.
The number hotkeys to isolate collections now only works in the outliner, so you won’t accidentally use it in the 3D View.
Node Editor
Nodes are a bit flatter now, with a crisp outline and less strong of a shadow. Their headers can also be made more colorful. Collapsed nodes are drawn as a rectangle rather than a pill shape.

For developers, tooltips on nodes now show their python ID name. On sockets, the tooltips are much more descriptive.
There are now tools in the toolbar for muting links and adding reroutes.
Node groups are drawn without icons and as a stack of nodes. It’s also now possible to enter them with a double click and exit them with either the breadcrumbs or a double click in empty space. The breadcrumbs also now indicate if a node group is linked or packed.
Nodes can be swapped with Shift + S, which was an old Node Wrangler command that is now in Blender by default.
Multiple group inputs can be combined with Ctrl J. When selecting a group input or output, the group properties are now shown in the Node tab of the sidebar, so you don’t have to keep switching to the Group tab. You also can turn off labels in node group inputs if you want.
Search in the node editor now supports searching for nodes that have references to strings, data-blocks, and specific group inputs.
There’s a new node called Enable Output, which allows you to turn outputs on or off depending on some input.
You can add more items to switch nodes with the plus button, and the menu switch node has a Boolean output for each item that says whether or not it was chosen.

The add menus of all the different node editors were reorganized to be more consistent.
Misc.
Temporary windows, such as the Preferences and rendering Image Editor, now remember their previous size and position!
The option to enable the region toggle pie menu, which lets you toggle any region with the n key instead of just the sidebar, is now a normal option in the user preferences.
Menus now stay open unless you click elsewhere. This prevents it from disappearing while you’re still using it, but if you find this slow you can enable the old behavior in Preferences.
Compatibility
Support for loading animation data from Blender 2.49 and older has been removed. For migrating files to Blender 5.0, it is recommended to first open and save them with Blender 4.5.
Support for Intel Macs and Big Endian machines were both removed and the GPU requirements were increased to hardware from about 2014 or newer. Older GPUs can probably still run Blender, but they won’t get official support from the devs.
Also be aware that there are a ton of breaking changes in 5.0 when it comes to the python API, so don’t necessarily expect all add-ons to support it right away. And if you’re an add-on developer, definitely check the full release notes!
What’s your favorite feature?
And that, alongside hundreds of bug fixes and other minor improvements, is everything that’s new in Blender 5.0. Download it today from blender.org, and don’t forget to support the dev fund while you’re at it, to help make future updates even better!