
Blender 4.5 LTS has just been released, and it comes with a lot of quality of life improvements in basically every area.
The LTS, which stands for Long Term Support, indicates that this version will continue receiving bug fixes for two years. So if you’re looking to start a project and want to stick with one version throughout, an LTS release is a smart choice!
✨ Just a heads up: If you're looking to learn Blender with the latest LTS Version, our updated Blender Basics course is built for the current 4.5 LTS version and is free to watch. It's a great place to start fresh.
- Modeling
- Sculpting & Painting
- Geometry Nodes
- Animation & Rigging
- Grease Pencil
- Rendering
- Compositing
- Video Editing
- Pipeline & I/O
- User Interface
Modeling
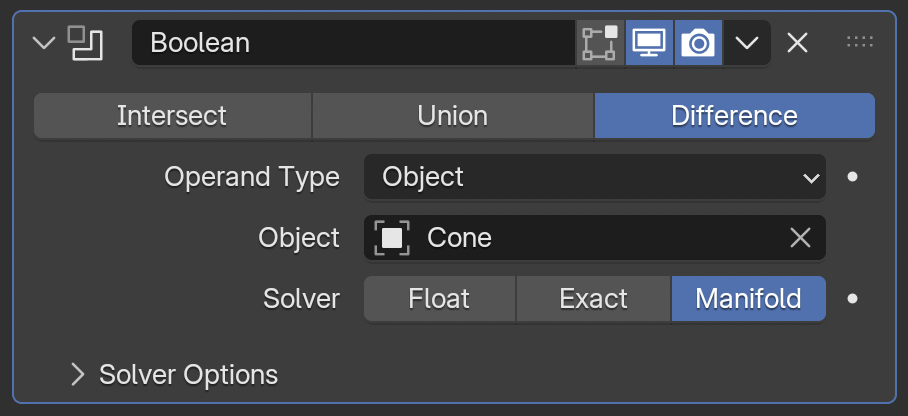
A new Boolean algorithm, called Manifold, has been added to the Boolean modifier, geometry nodes, and sculpt mode. As the name hints at, this option only works on manifold objects, I.E. watertight meshes with no loose geometry and all normals facing outwards. The upside of that tradeoff is that it’s both very fast and very accurate. It’s even faster than the old fast method, now called Float, and is as precise as the Exact method.
When snapping to the 3D Cursor, you can now optionally take into account the cursor’s rotation. You’ll probably want to snap this to surfaces most of the time, which you can do in the 3D Cursor tool by setting it to Geometry, or if you like using the Shift Right click hotkey you can go into your keymap preferences, search for 3D Cursor, and set that to Geometry.
If you parent an object to a vertex, you can now explicitly set which vertex without going into Edit Mode for the other object, and you can choose whether you want to pick the vertex of that index before or after modifiers have been applied.
The Separate, Split, Join, and Convert Attribute operators are now available in the new Curves type Edit Mode. We also now have statistics for the new curves.
Curve and Grease Pencil dimensions are now listed in the sidebar.
On traditional curves, the active spline panel has moved from the Properties Editor to the Item tab in the sidebar, similar to where you already find info for the active vertex or edge for meshes.
The default distance of the Retopology Overlay now places it at 1cm above the surfaces instead of 20cm, which was way too big for most cases.
The new Point Cloud objects are now fully supported and even have their own Edit Mode.
Last but certainly not least, UVs can now be seen in Object Mode in the UV Editor. It even works for multiple objects and the active object is drawn with more opacity to help it stand out. They’re also visible in the Image Editor in Paint Mode. To adjust the settings for how they display, just head to the Overlays menu.
Sculpting & Painting
Over in Sculpt Mode, you can now mask by color from the Mask menu.
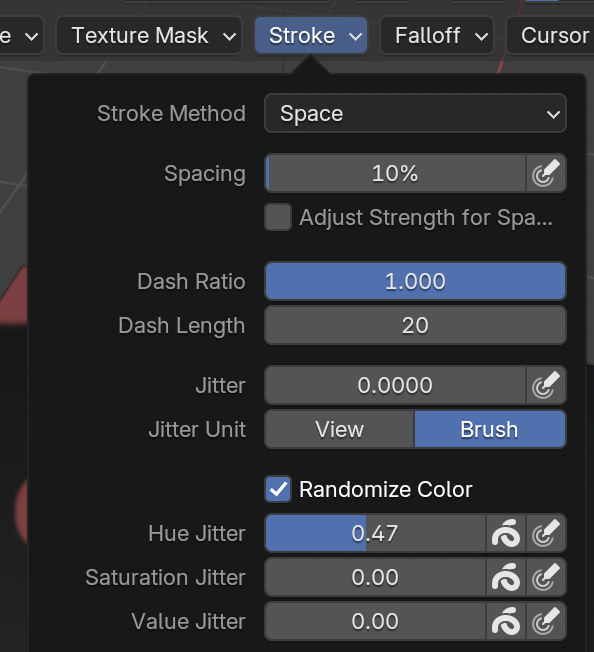
Sculpt, Texture, and Vertex paint modes have new jittering options for randomizing the Hue, Saturation, or Value along the stroke or per stroke.
When it comes to brush assets, you can now duplicate them to the current file if you don’t want the new one to be added to any of your asset libraries.
The Draw, Draw Sharp, Plane, and Clay Strips brushes can now respond to pen tilt if your tablet supports tilt. And the Clay Strips brush is now about 22% faster.
Sculpting performance has improved when using brushes that are small compared to the total object size, which is especially great when sculpting detail on characters. Also, using node tools in sculpt mode, especially when dealing with masks, face sets, or deformations, is significantly faster now.
Geometry Nodes
The changes to Geometry Nodes in Blender 4.5 really show how the system is maturing. There are both lots of powerful new nodes and many welcome workflow enhancements!
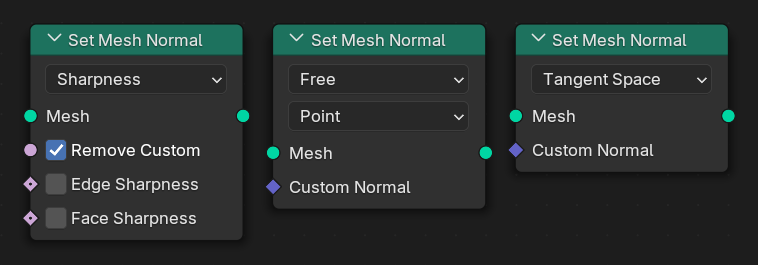
You can now manipulate custom normals using the new Set Mesh Normal node. It accepts tangent space normals, sharp edges, or simple vectors. The new vector format for simple vectors, Free, is extremely fast and great for animated setups.
Import nodes were added for importing OBJ, STL, PLY, CSV, and TXT files. The file path in the nodes supports variables, so you can easily import an animated mesh sequence by passing in the current frame number using another new node, Format String.

Along with Format String, we also got Match String, which lets you search a string for a given character or word.
There are new Grease Pencil nodes for controlling render depth, color, and softness, and all related nodes now have a more official spot under Grease Pencil in the add menu.
You can now add zones using the link drag search.
A new operator, Visual Geometry to Objects, can convert instances to individual objects that retain the instance's origin, scale, and local orientations.
A new Camera Info node was added for accessing the active camera, as well as Instance Bounds for getting the dimensions of instances without realizing them, Bith Math for bitwise operations, and Attribute Statistic for finding information about fields.
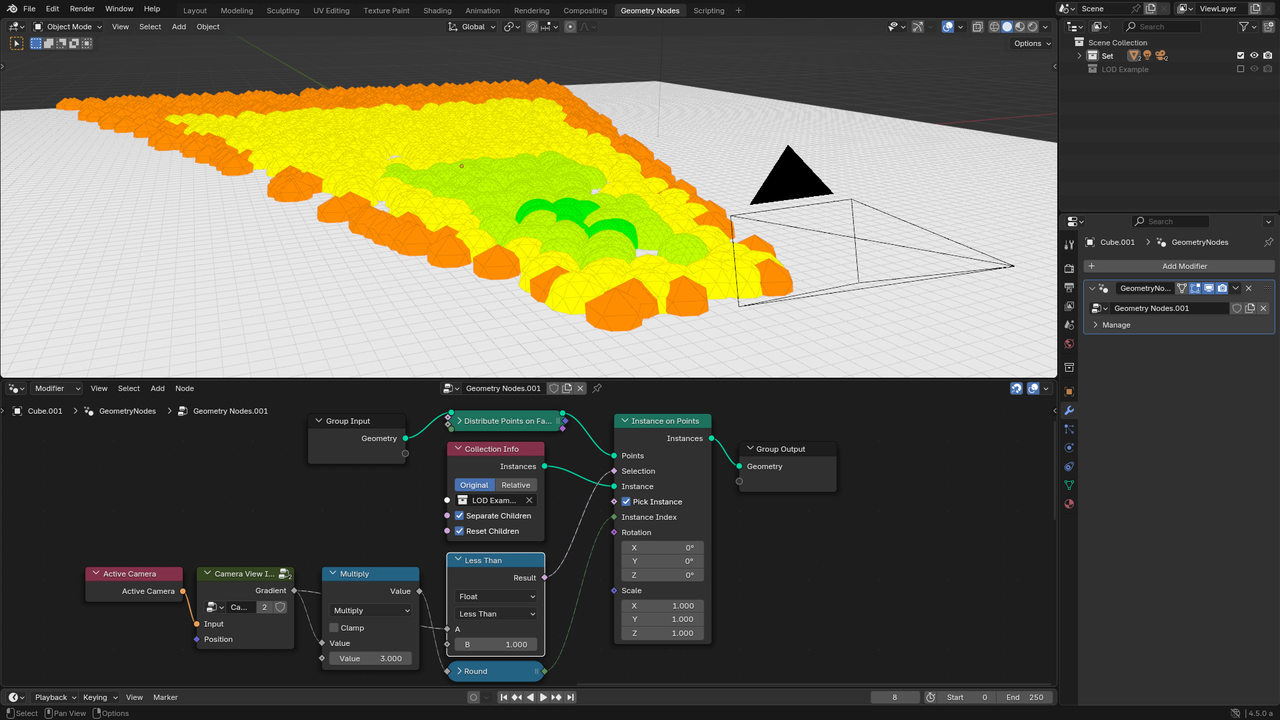
The Mesh to Curve node can now convert each face into a cyclic curve. For the Curve to Mesh node, there's a new Scale control to adjust the radius.
The Viewer Nodes can now be assigned shortcuts by using Ctrl + 1 - 9. To jump back to it at any point, just tap the same number you assigned to it.
Performance was also a big focus in this release. Domain interpolations are now paralellized, which make conversions 40-70% faster and can drastically improve playback frame rates. In addition, face corner normals and custom normals are calculated over twice as fast.
Rigging & Animation
The bone viewport display type can now be overriden per-bone. This is especially nice for complex rigs with a few long thin bones!
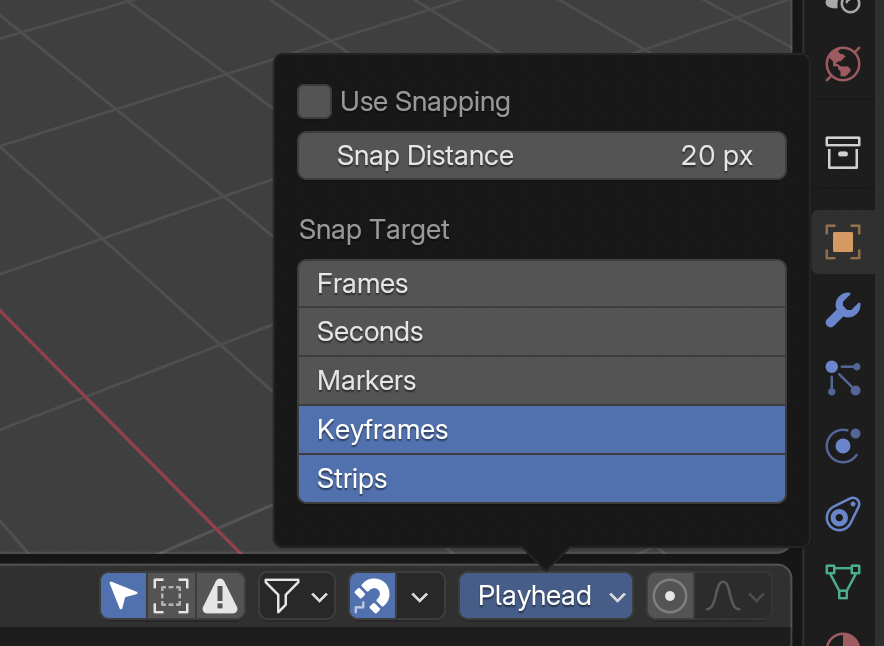
In animation editors, you can now snap the current frame indicator, a.k.a. playhead, to frames, markers, seconds, keyframes, and / or strips.
Shape keys can now be duplicated, and a new operator, Update from Objects, updates the shape key data with the positions of the selected objects if they have a matching shape key name.
In Pose Mode, you can now easily select a bone's children, immediate children, parents, or siblings from the Select Grouped menu.
On the simulation side of things, liquid sims can now be 25-50% faster and their viscosity is much more stable.
Grease Pencil
Grease Pencil finally has its own render pass! This drastically simplifies working with it in the compositor. Along with that, you can now optionally disable rendering for Grease Pencil per view layer.
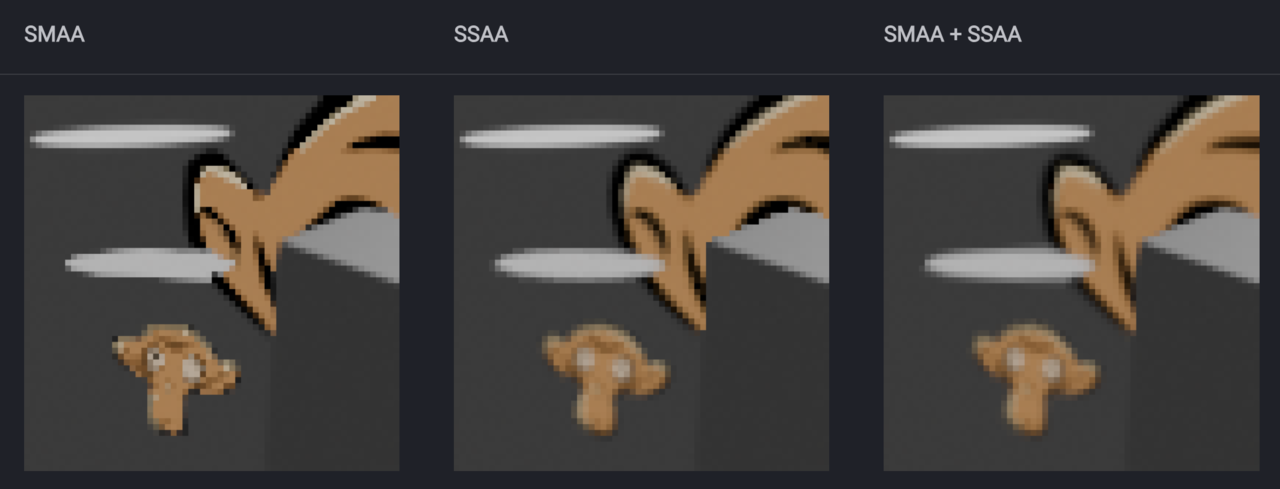
There is a new anti-aliasing method, SSAA, which is higher quality than the current SMAA method. It does not work well for compositing though, so if you are combining Grease Pencil and 3D objects, you may want to use both. Additionally, there is no longer a minimum thickness for rendered strokes since SSAA can handle any scale just fine.
Any modifiers that support layer filtering now also support layer group filtering.
Grease Pencil objects can now use Node Tools built with Geometry Nodes.
Boundary Strokes have been converted to Fill Guides, which can be now drawn with Alt LMB and automatically removed after filling.
Onion Skinning can now optionally be done for just the active object so that you can better focus on one thing at a time.
Grease Pencil also recieved several new operators:
- Mask with Layer Above and Mask with Layer Below
- Split (Shift + V)
- Remove Fill Guides
- Outline
- Convert Curve Type which replaces Set Curve Type
Lastly, the SVG exporter can now export animated frames which can be played back in any browser or app that supports the <animate> tag.
Rendering
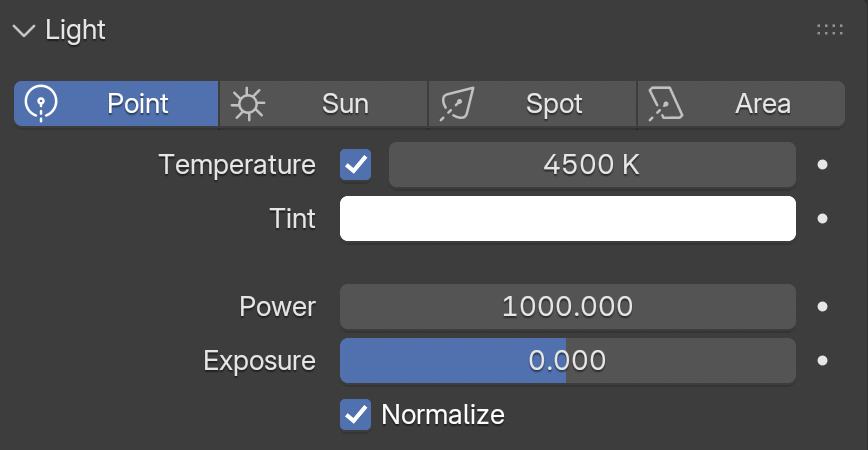
Lights in both Cycles and Eevee get a solid upgrade in Blender 4.5 and now have a control for color temperature. There’s also a new Exposure slider to change their strength in a more user friendly way and a Normalize option that keeps their total output the same regardless of their size.
The Watts unit was removed from the power, since it was referring to output watts but kept getting confused with input watts that lightbulbs have listed on their package, but those are drastically different and not necessarily correlated.
Both Cycles and Eevee got a new volume shader called volume coefficients, which allows for easily inputting real world data to get physically accurate absorption, scattering, and emission.
When it comes to exporting images and movies, auto-detecting color spaces was improved, ProRes videos can now be written, OpenEXR can now read and write ACES metadata, BMP images can now have an alpha channel, the FFV1 video codec can now render to 10, 12, or 16 bits, and rendered images can now store pixel density metadata such as pixels per inch or non-square pixels.
Cycles
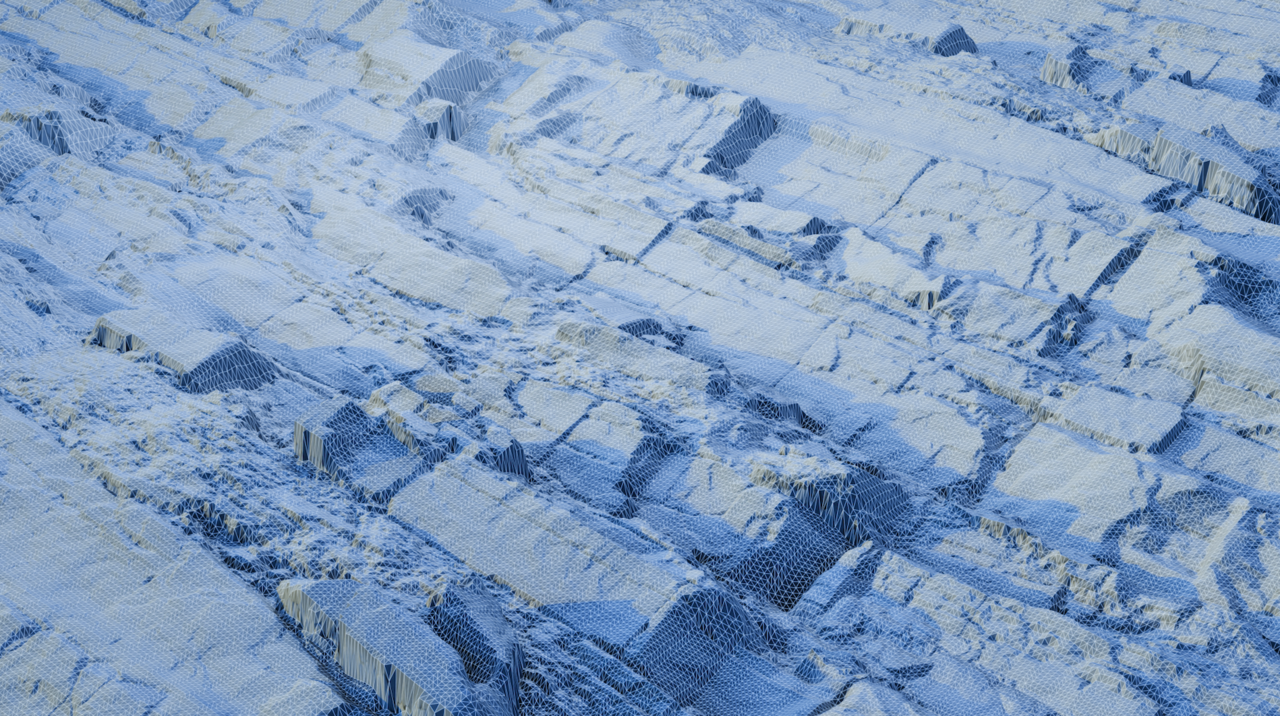
Adaptive subdivision, which allows you to subdivide meshes depending on how close they are to the camera and therefore achieve efficient displacement with ultra-realistic detail, has been an experimental feature in Blender for years. In Blender 4.5, it has received a huge upgrade. It now properly subdivides attributes, smoothes the UVs, and supports motion blur. It’s also significantly more performant with multithreading and other optimizations making it 10 to 15 times faster to render.
Normal mapping also helps to achieve realistic detail when polygon counts need to be kept lower. In Blender 4.5, the bump filtering of normal maps was improved to preserve more detail near the edge of shadows.
The bump map node was also improved. A new Filter Width input can be used to control how sharp or smooth the transitions between large height differences are. The default distance was also reduced to a value that makes much more sense for adding small details to realistically sized scenes.
Cycles can also now use custom scripted cameras using Open Shading Language. This allows for recreating gorgeous, real world camera lenses without introducing more noise to the scene. Camera OSL does not need shader OSL to be enabled and does not have the same limitations, though it is currently limited to CPU and OptiX rendering.
Lastly, AMD devices now use AMD’s HIP ray tracing hardware acceleration by default, which can improve render times on newer AMD GPUs by up to 30%.
EEVEE & Viewport
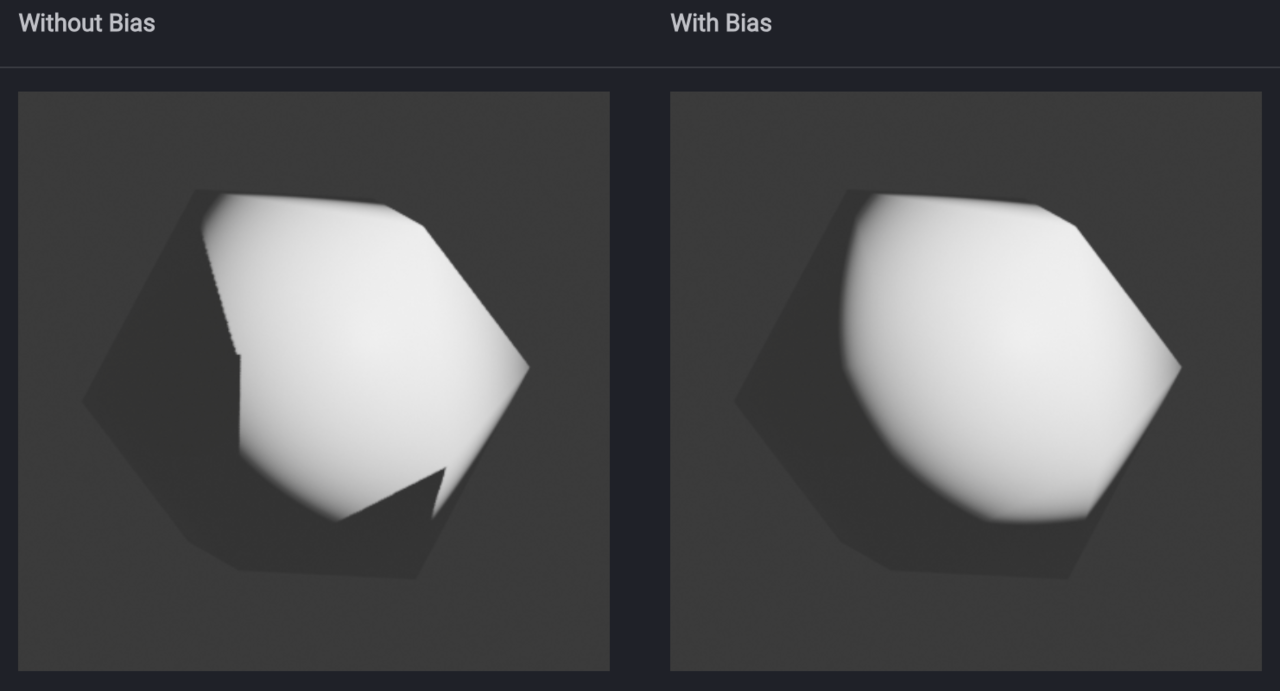
EEVEE now has a shadow terminator bias, which helps remove jagged edges on low poly geometry.
Z-fighting has been significantly improved when viewing really large scenes, shadows artifacts were reduced, and large light sources no longer cause so much light leaking.
Texture loading was improved to be about 250% faster. That's even before mentioning...
Vulkan! The OpenGL shader backend alternative, Vulkan, is now officially supported by Blender. Performance across all of Blender will improve when you enable it, from frame rates when animating subdivided meshes to the time it takes to enable the material preview in large scenes. It's not perfect yet, so it is likely still less stable than OpenGL, but definitely give it a try and report issues if you encounter them.
GPU subdivision is now available for Metal (M series Macs) and Vulkan, which can massively improve frame rates in scenes with densely subdivided meshes. In one test case, even jumping from 3 FPS to 11FPS!
VFX & Compositing
Selecting keyframes in the Movie Clip Editor is now 50% faster and the preview range is now displayed.
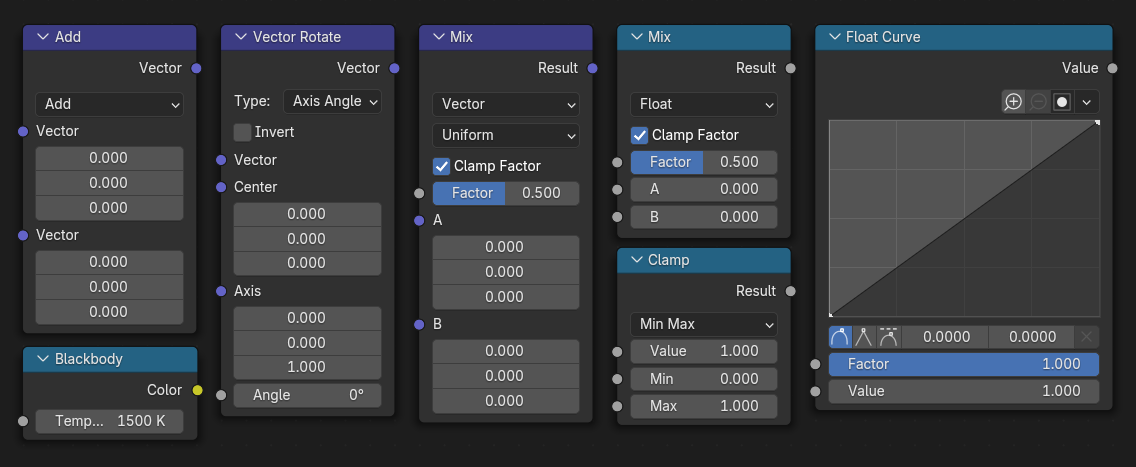
Many basic nodes were completely overhauled or added to match the Shader Editor nodes, including all texture nodes and the Vector Math, Vector Rotate, Vector Mix, Value Mix, Clamp, Float Curve, and Blackbody nodes.
Also similar to the other node editors, most node options are now input sockets. Including some boolean checkboxes!
Many nodes were removed, since their functionality was fully replaced by these new nodes.
New Image Info and Image Coordinates nodes were added to provide important information about the render size. Since the new compositor can work in exact pixel dimensions, a Relative to Pixel node was added to convert sizes from percentages of the image to number of pixels.
Interpolation options were added to the Scale and Corner Pin nodes.
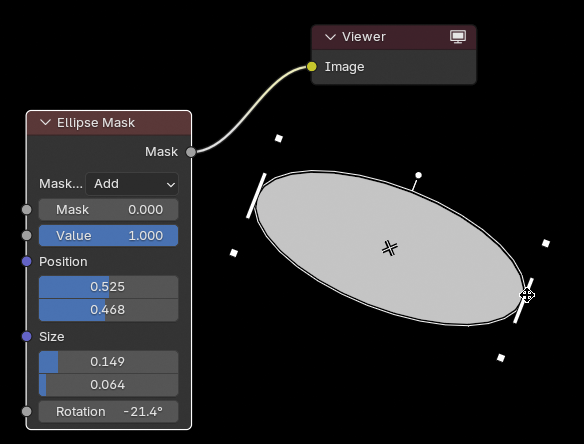
You can now control Box and Ellipse masks as well as the Split node using gizmos.
The Denoise node can now use the GPU!
The Mix Color node can now seperately clamp the factor and the result and the Map Range node no longer has an upper limit of 10,000.
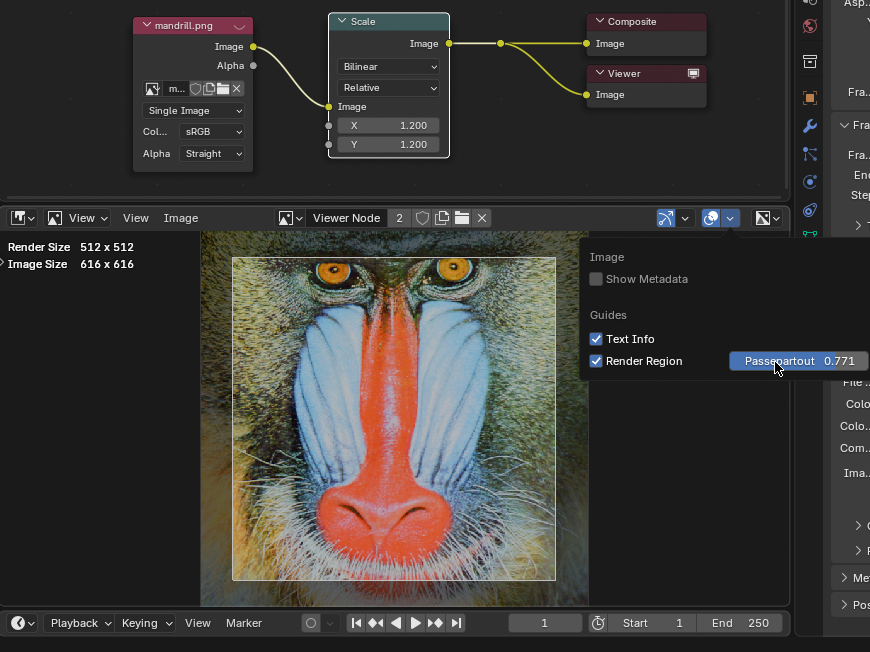
And, a passepartout was added to the result of the viewer node in the Image Editor so you can better see what lies outside the render region.
Video Editing
Blender, being the jack of all trades that it is, is also continuing to make strides in the video editing department. In Blender 4.5, videos rotated by their metadata play back much faster and regular videos play back a little bit faster.
The slip operator was completely refactored and is now smooth and precise while also giving more info in the header and status bar. And, when slipping, any keyframes on the strips also move along with the contents.
The Blade tool for slicing clips now has its own cursor.
Adjusting strip handles now affects all of the selected strips. And if you lock a channel, the time adjustments for those strips also gets locked.
You can now snap strips to the start and end frames and snapping is enabled by default. The 2D Cursor can now be snapped in the preview area.
Ctrl + M can now be used in the preview area to mirror on the X or Y axis.
H and Alt + H can now be used to hide or unhide.
You can also now move the anchor point of a strip without moving the image.
The preview area now supports HDR footage, just like the 3D View and Image Editor.
Resizing the timeline now reveals more channels instead of stretching the existing ones.
Scene strips now update more reliably and no longer have to have their caches cleared.
If you import a strip to a blank timeline and it updates the framerate, you now get a warning in the status bar.
A few things also got removed in this release, such as the ability to add a preview backdrop behind the strips, the old cache system, and a few old effects that were already replaced by newer effects.
Pipeline and I/O
In the Asset browser, you can now take a screenshot of Blender for an asset preview so that you can easily get a nice rendered shot. And as long as the whole capture is within the 3D View, the background will be transparent. You can hold down Shift to toggle between a square and non-square preview or use Space to move it around.
Also, the Generate Preview or Remove Preview options now work on all selected assets.
Labels are now drawn with up to two lines, and the spacing has been improved a bit.
You can now choose to display your assets as a horizontal list, which is great for browsing less visual things like geometry node setups.
The import method has been moved to a new Import Settings popover. This is also where you can find the option to disable importing collections as instances if you want them to show up as editable geometry right away.

Dragging and dropping collections into the 3D View now snaps them to surfaces or the grid just like objects.
Tooltips for assets are nicer and include more information.
When it comes to importing and exporting files, you can now import and export PLY, OBJ, STL, VDB, CSV, and TXT files using geometry nodes like Harry mentioned earlier.
Dragging and dropping from the file browser now works on all selected items and not just the active one.
Importing USD now supports animated camera properties, skeleton rest poses, new shape primitives, prim variables, and more dome lights. Exporting USD now supports text objects, the MaterialX OpenPBR Surface, prim variables, and the experimental point instancing option can now work with geometry node instancing setups.
With glTF, you can now import scenes as collections, decide whether or not to import unused materials, and choose whether or not to merge duplicate material slots. For exporting, there are new options for vertex colors, saving the workbench viewport material, and using ambient occlusion color as a base color. glTF also works great with Blender’s new light temperature and exposure settings.
When exporting, FBX can now write proper smoothing groups in addition to normals and sharp edges. The importer for FBX has been completely rewritten in C++ and this new version is marked as experimental. It’s 3-15x faster and uses less memory. ASCII files and Binary files older than 7.1 are both supported, and there are a ton of improvements including but not limited to:
- Better handling of rotations in object hierarchies
- Better importing of material parameters
- Better importing of leaf bones
- Importing layered animations
- Importing animated diffuse colors
OBJ also better exports smoothing groups.
The SVG importer can now handle multiple files at once.
User Interface
As always, there are a lot of miscellaneous improvements to the UI that are really starting to add up over time.
Tablets
Using a pen tablet with Blender is now a bit nicer overall!
There’s a highlight when dragging regions and areas to let you know when you’ve grabbed it, and the hit box for corners and area borders are a bit bigger. You can also customize the area border size. Hit boxes for gizmo parts are now a bit larger too.
Tooltips show up even if your pen jiggles a little and they stay put so you can read them. Selecting tools with a pen will no longer sometimes accidentally bring up the tool alternatives.
And, as mentioned before, Blender can now read pen tilt and it's consistent with other apps.

3D View
In the 3D View, Cavity was moved to its own section at the bottom of the shading panel, and the panel overall got a small facelift.
If you have a mouse with a sideways or secondary scroll, it can be used to pan the 3D View, the outliner, or any other editor.
In the overlays, you can now see the axes in Orthographic View even if you turn off the grid.
The 3D Viewport now shows the object data name in the text info overlays.
In the sidebar, you can now use numberpad period to jump to the current tab if you have a lot of add-ons enabled.
Selection menu titles and status bar hints are now more specific.
It’s news to me that you can click and drag on the toolbar and sidebar region arrows rather than just click them, but that’s been improved.
The scrollbar for left aligned regions like the toolbar are now on the left, so you won’t accidentally grab them while trying to resize.
The layout of search boxes is now pixel perfect.
2D gizmos can now use custom icons.
Timeline
In the timeline, the markers region no longer conflicts with the scrubbing region when compressed.
Scrollbars with handles now shrink when your mouse is not near them like regular scrollbars.
Properties
Over in the Properties, individual tabs can be hidden in the options dropdown. And you can no longer drag to hide this region, which… generally happened by accident. If you want to do that on purpose, you can do it in the context menu.
The collection visibility panel was reorganized.
The default height of nested lists was increased, the extra padding on the right was removed, you can now drag and drop to the end of the list, and they have improved scrolling behavior.
You can now remove all materials from an object in one click.
You could already hold Ctrl and scroll while hovering over numbers to increment or decrement, but now you can do the same over text fields. Though it doesn’t change anything after a period, so I wouldn’t use this for renaming duplicated objects or anything complex.
The new presets icon makes you feel more like a DJ.

Outliner
You can now see grease pencil vertex groups in the outliner, as well as action slots.
Spreadsheet
In the Spreadsheet Editor, domains that are empty are now grayed out.
You can also now manually adjust column order and width. And, double clicking on a column edge makes its width fit the content.
In the View menu, you can now display internal attributes such as whether or not a component is selected.
The context path for the viewer was moved to the left to make room for more header menus in the future.
Status Bar
The status bar spacing has been tightened again, so more hotkeys can be visible at once.
Hints for more operations are now shown, including when editing text and soloing in the VSE.
There are new icons for trackpad gestures and the page up, page down, and hyper icons have been improved.
Misc.
The color for warnings and errors across the app can now be themed.
The icons on alerts are now less extreme.
Improved line breaks mean less long tooltips and more readable file paths.
When loading new windows, the background color is now the theme titlebar color.
And now what you’ve all been waiting for.. the light theme got a couple of improvements from better text for hidden items in the outliner to improved scrollbar handles. Special shoutout to whoever used the light theme long enough to notice this.
The RGB channel icons are now colored red, green, and blue.
On Linux Wayland and X11, crisper cursors now show on High DPI monitors, and the Hyper modifier key is now supported.
On Mac, custom cursors now display at the correct scale, the busy but clickable cursor is now used during long operations, and you can use Option + Arrow key to jump words or Command + Arrow to move to the start or end when editing text.
On Windows, the startup background no longer flashes white, and dragging and dropping files is now more reliable.
It's a big one!
And, along with hundreds of bug fixes, that’s what’s new in Blender 4.5. Download it today from blender.org, and don’t forget to support the development fund while you’re there, to help make future updates even better.
Frequently Asked Questions
Where is Adaptive Subdivision?
Despite the huge improvement in 4.5, it is still experimental. You'll need to switch the Cycles feature set over to Experimental in the Render tab.
Will all my add-ons work with Blender 4.5?
It's not guaranteed that all add-ons will work right when a new version of Blender is released. You may need to check for updates if one does not work in newer versions.
Do I need to update?
No! If you're in the middle of a project, it's best to stick with the same version you started with. And if you're watching a course, it's recommended to use the same version that the course was recorded in. New versions are exciting, but it is not going anywhere and will still be available when you're ready for it.
space waves game https://spacewaves2.io is the perfect game for players who enjoy speed and precision. I recommend it because every successful run feels like a real achievement.