How to Optimize Your Blender Preferences: 10 Tips For the Best Experience
Apr 20th 2020
Blender’s Preferences interface is the red carpet that leads into the Blender palace. CG Cookie author Metin Seven accompanies you across the carpet for 10 settings to improve your Blender workflow.
Note that these shortcuts and settings are available in the latest Blender 2.8x versions, but might not be present in Blender 2.7x versions.
Tip 01: Open Blender Preferences - fast
You can access Blender’s Preferences interface in multiple ways:
- Go to the Edit drop-down menu and choose the Preferences entry.
- Press the F3 key for the search window, and start typing “pref” until “Show Preferences” appears, then choose it.
- In the header of any Blender viewport area, click on the Editor Type icon and choose Preferences from the pop-up menu.
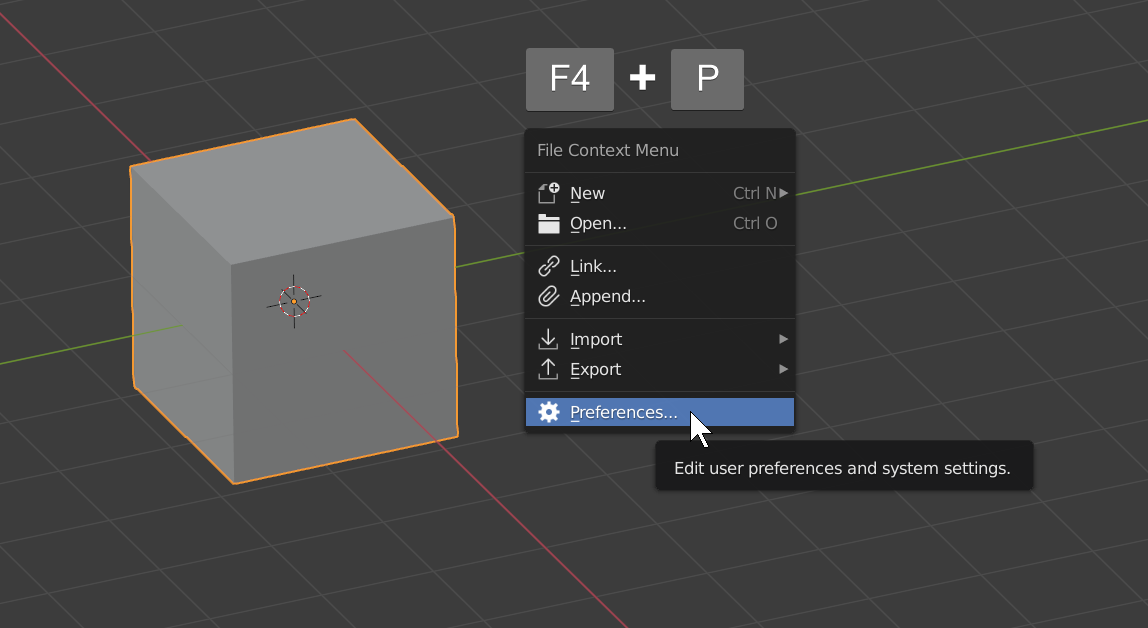
But there is another way: the fastest way to open the Preferences is by pressing the F4 key for the File Context Menu, immediately followed by the P key, which is the menu’s keyboard shortcut for the Preferences entry.

Tip 02: Turn off viewport navigation icons
Most Blender users prefer keyboard modifier keys + mouse gestures to navigate in the 3D view.
If you do as well, the navigation icons in the viewport become superfluous UI clutter. So let's hide them!
In Interface ➔ Editors, uncheck Navigation Controls to turn off the icons.
(This can be slightly confusing, as you might expect this to be located in the Navigation section instead.)

Tip 03: Change render view and file browser display
Slightly hidden in Interface ➔ Editors is an unfold-able Temporary Windows subsection containing two drop-down menus.
Here, you can change the look of your render view and/or the file browser window.
For example, you can tell Blender to always render in a full-screen view or in the Image Editor.

Tip 04: Set node connections to smooth curves
Don’t you get all nostalgic if you think of the smoothly curved noodles that connected nodes in Blender versions before 2.8?
If you're over the new straight lines, there's a way to go back.
You can revert to those smoothly curved node noodles. Just head to Preferences ➔ Themes ➔ Node Editor and set Noodle curving to 5 (average value).

Tip 05: Change the 3D viewport axis appearance
Following tip 02, if you’re a keyboard + mouse navigation ninja and don’t use the reasonably prominent 3D viewport axis control gizmo in the top right corner of the 3D view, you can reduce its presence to a subtle 3D axis without controls, or turn it off completely.
Go to Viewport ➔ Display ➔ 3D Viewport Axis and make your choice from the drop-down menu.

Tip 06: Improve your viewport navigation
There is a number of settings in the Navigation section that can improve your viewport navigation.
- Check Orbit Around Selection to make the currently selected object the center of viewport orbiting.
- If you like to keep working in an orthographic perspective, uncheck Auto Perspective to avoid the viewport switching to a perspective view every time you start orbiting from a front / side / top / etc. view.
- Check Auto Depth to make Blender use the scene depth under the pointer to improve panning / rotating / zooming.
- Check Zoom to Mouse Position to make your pointer the center of zooming in.

Tip 07: Easily transform gizmo switching using just 1 key
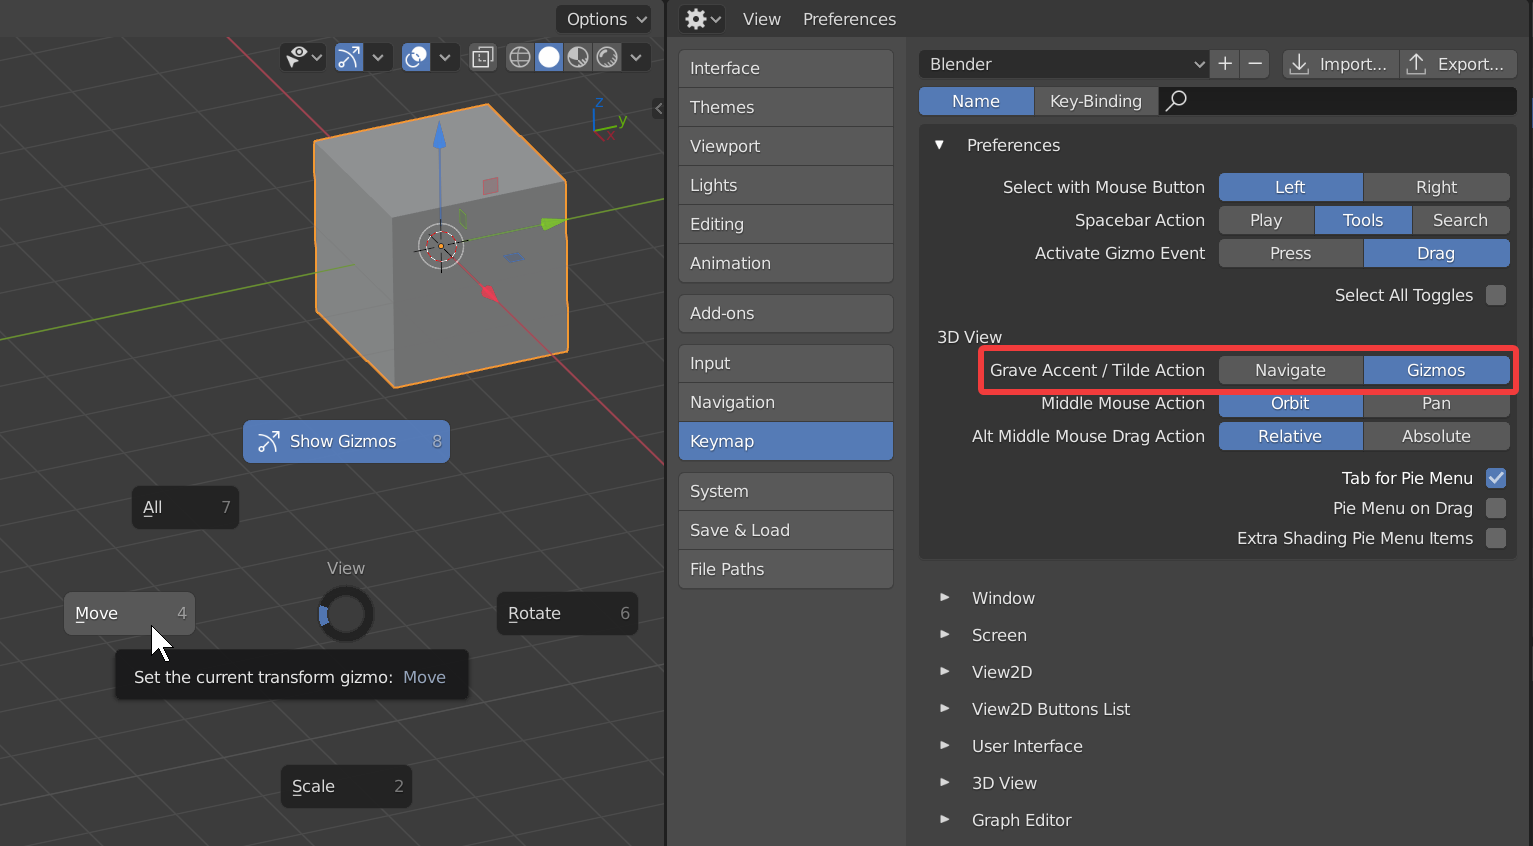
By default, the Grave Accent / Tilde key activates a 3D view navigation pie menu.
If you’re used to switching views with the numeric keypad or by holding Alt while orbiting, you can choose to turn the Grave Accent / Tilde key to a handy pie menu for fast switching between the Move, Rotate and Scale tool, and for toggling the transform gizmo on or off.
Head to Keymap ➔ Preferences ➔ 3D View ➔ Grave Accent / Tilde Action, and activate the Gizmos button.

Tip 08: Single-click to open folders in the file browser
In Blender versions prior to 2.8, you could conveniently single-click on folders to quickly navigate to a deeply nested subfolder.
This is particularly useful when you’re using a tablet + pen to control Blender.
To restore the single-click functionality, go to Keymap ➔ File Browser ➔ File Browser Main, unfold the top-most Select entry and activate the Open checkbox.

Tip 09: Extend your undo history
Don’t you hate it when you want to go back to a certain creation stage, only to discover that Blender’s Undo limit has been reached just before you could reach that stage?
Don't despair: the number of Undo Steps can be found in System ➔ Memory & Limits.
The default value has been 64 steps for a long time now. If your Blender system’s memory capacity is reasonably up to date, you can safely turn up the Undo Steps value to the maximum of 256, allowing you to go waaay back in the undo history when desired.
💡 Bonus tip: you can access the Undo History as a list via the Edit drop-down menu. For fast access, add it to your Quick Favorites by right-clicking on the Undo History entry.

Tip 10: Saving safety
Saving your Blender scene regularly is always recommended.
Ideally, you should do it incrementally using version numbering, so you can go back to earlier stages of a scene as well.
By default, Blender automatically saves a backup file with the BLEND1 extension. If you’re really cautious you could leave this function on, but it causes some undesirable clutter in your project folder, particularly in a folder with many Blender scene files. (Read more about what the mysterious BLEND1 file is all about...and why it's filling up your hard drive.)
To solve this, go to Save & Load ➔ Blend Files and set the Save Versions to a value of 0 to deactivate the automatic BLEND1 backup copy function.
Then move your pointer to Auto Save ➔ Timer (mins) and lower the value to the minimum of 1. Make sure the Auto Save Temporary Files checkbox is activated.
Now an automatic backup file of your scene will be saved every minute, so you’ll never lose much work in the unfortunate case of a Blender crash.
To access the latest scene backup file, go to File ➔ Recover ➔ Auto Save in the main Blender window, and pick the most recent file by switching the sort order to Modified Date

Happy Blending!

Very useful, thank you.
One quick question, how do I save these changes as a preference independent of Blender, so should I ever have to restore factory default, I can quickly rebuild my preferences? i.e. where do my saved preferences go?
Finally I can increase the undo limit
It took me a while to figure out how to get my nodes to look like Spaghetti Noodles. Super helpful feature. These are great metinseven thanks for the write up.