
It's already time to update Blender again!
Blender 3.2 comes with a solid list of improvements and speedups that should make your (3d) life a bit easier, and one or two larger features that are definitely worth getting excited about.
🎯 The latest stable version of Blender is always available on www.blender.org.
📅 Here is the full schedule of future releases, including Blender 3.3 (scheduled for release on September 7, 2022) and Blender 3.4 (December 7, 2022).
Everything that's new in Blender 3.2
Modeling
It used to be impossible to apply transforms or modifiers to instances or objects with linked mesh data. In Blender 3.2, instead of blocking that action completely, there’s a new option to make the object a single user (break the link) and then apply the changes.

Snapping is no longer universal, meaning that you can now enable it in the 3D View without enabling it in the UV Editor, Node Editor, or vice versa, which makes much more sense.
The other modeling changes are fairly minor - you can now use Select Similar to select vertices by their vertex crease values, NURBS curves have new knot generation types, and the Vertex Weight Mix modifier has new Minimum and Maximum mix modes.
Geometry Nodes
Performance was a big focus for this release. Several nodes got large speedups including many of the curve and utility nodes.

A Duplicate Elements node was added, which instances geometry a dynamic number of times.
The new Face is Planar node returns whether or not the triangles of a face are lying flat.
The Merge by Distance node now has a new option to only evaluate vertices that are connected, which can be significantly faster.
A Geometry Nodes node group attribute name inputs can now have a default value for if you want to assume that each object has an attribute of the same name, such as ‘UVMap’.
Speaking of attributes, named attributes are back in action! They can be stored, removed, and input via their respective new nodes. The Geometry Nodes modifier also has a new section, called Internal Dependencies, which lists all of the named attributes that are used in the node tree.
Lastly, the legacy nodes that predated the fields system have been removed, so those files will not be compatible with Blender 3.2 and above.
Sculpting and Painting
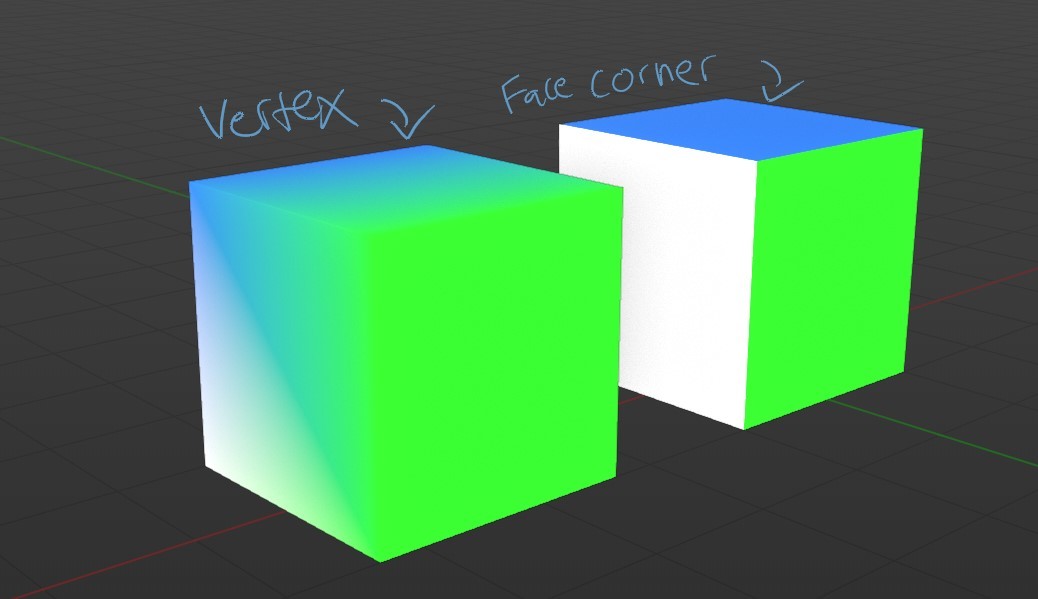
Vertex Colors have been refactored and renamed as Color Attributes. The big benefit of the update is that they can now be stored on face corners instead of just vertices, which allows you to paint individual faces separate colors.
Sculpt Mode now supports painting Color Attributes. I’m not sure how I feel about the merging of the two modes, but it’ll be interesting to see it evolve. Whichever mode you use to paint in though, holding Shift while drawing will apply a blur, similar to how Shift is Smooth in Sculpt Mode.
A new Color Filter tool in Sculpt Mode (but not the paint modes for some reason) allows you to adjust the hue, saturation, value, contrast, and more for the entire selected area.
Grease Pencil
The Scale Stroke Thickness toggle was added to the Grease Pencil Edit Mode transform (period key) pie menu.
A new modifier, called Envelope, can be used to connect all points that are a variable number of points away. The name doesn’t really give away what it does, but it can be used to create interesting webbing type effects.

The Dot Dash modifier has a lower bounds limit for the dash and gap lengths, and there’s a new option to make each individual dash cyclic.
The Smooth modifier can now smooth out the line without shrinking the overall shape, and the new and improved smoothing was added to the Edit Mode Smooth operator as well.
The Build modifier, which is great for creating drawing animations, has a new Additive mode that skips pre-existing strokes on each frame. It also has a new Fade option so that it can have less of a harsh cutoff and a new Object input where you can specify an object, such as an empty, that the effect should emanate from.

Rigging and Animation
Blender’s old proxy system for managing linked assets from other files, which was previously replaced by the new library overrides system, is now completely removed from Blender. The old Pose Library has been removed as well, with the old panel still there but grayed out next to a button that converts the poses to the new pose assets. May they rest in peace.
Apparently, in previous versions of Blender, any of the options in the Insert Keyframe menu were not able to be assigned to hotkeys. Now, if you’d like to have a hotkey for just keyframing location and rotation, or any other combo, you can! Hopefully that will save some animators a few clicks.
The hotkey for renaming timeline markers has been changed to F2 so that it matches the renaming hotkey for everything else in Blender. Markers also have new selection options, including selecting all markers to the right or left of the current frame.
The Graph Editor’s Discontinuity (Euler) Filter, which is great for cleaning up jumps in equivalent values (such as a jump between 0 and 360 degrees in rotation), can now be used in the Dope Sheet as well.

The NLA Editor also got the F2 to rename hotkey change and a few other improvements as well. The odd behavior of automatically changing the strip’s extrapolation mode based on whether it was the first strip has been removed, so you can now set it to Hold or Hold Forward and not have to change it again later when you move the strips around. There’s also a new Tweak mode, called Full Stack, which does not disable the strips above it while you’re editing, so you can see the final result. It’s not the default but you can find it in the Edit menu. You can also now bake actions from the Edit menu. Lastly, an action’s influence is now preserved when pushing it down to a strip by setting that value as the strip’s influence.
Calculating motion paths has been simplified, and you no longer need to set an exact frame range. Instead, you can just set it to All Keyframes, Selected Keyframes, or Scene Frame Range and have it set the range automatically. The motion paths panel could use a serious cleanup as it has gotten pretty unintuitive to use in the last few versions, but it’s great to see some progress being made on the operator.
Rendering
Eevee Bump nodes without anything plugged into them are no longer calculated, so they shouldn’t slow down the scene like before.
Eevee’s shader compilation information moved from the status bar as a progress bar to the viewport text info as a count of the remaining shaders to calculate.
The Subsurface Scattering radius in Eevee acts slightly differently as it has been changed to an actual average radius value rather than a scale factor.
Using Eevee’s Shader to RGB node now removes screen space reflections and subsurface scattering effects from a shader.
Cycles can now render faster caustics! Well, in some situations. The improvement is only for refractive caustics that happen to be inside of a shadow and from a mesh that is smooth shaded. Bump and normal maps are ignored in the calculation and they don’t work on Metal GPUs. To use these shadow caustics, you need to enable them for the casting and the receiving objects in the Object Properties as well as for the light in the Light Data properties. The effect seems to be pretty dependent on the amount of geometry, so you may need to play around with different detail levels to get the effect that you’re after.

Motion blur for volumes is now supported by Cycles, which really helps to reduce some of the artifact lines in fire and smoke simulations. Volumes need to have velocity data in order for this to work.
Light Groups (not to be confused with the long awaited Light Linking) have been added to Cycles in the View Layer tab, and you can use it to separately adjust each light’s influence in the compositor after rendering.

You can now bake UDIM textures in Cycles! Previously, baking only worked in the 0 - 1 texture space.
Cycles AMD GPU rendering on Linux machines is now available, at least for RDNA and RDNA2 cards like on Windows.
There’s a new Color Management panel in the Output properties that lets you apply different color management settings than what you see in the viewport when saving images or animations. The Linear ACEScg color space was also added to Blender’s defaults.
Compositing and Video Editing
The Compositor got the Combine and Separate XYZ nodes that the Shader Editor and Geometry Nodes Editor have had for a while now.
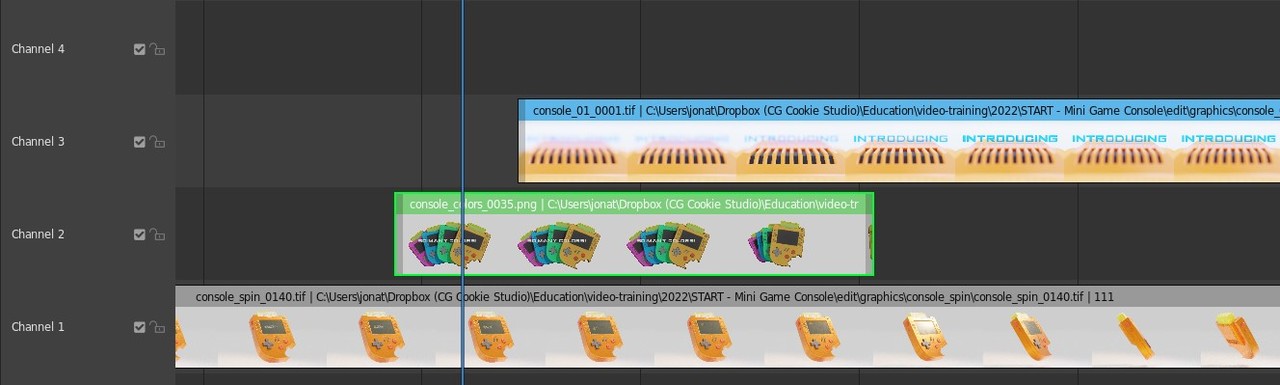
The Video Sequence Editor continues its slow but steady improvement in Blender 3.2. The most obvious change are the new channel headers, where you can rename, mute, or lock each channel. You can now optionally create a new scene via scene strips, the transform tools are much more reliable, a strip’s thumbnail (which can be enabled in the overlays menu) is now updated when you move its handle, and a new Limit View to Contents checkbox is enabled by default which locks the height and scrolling to only the used channels.
Long sequences that use keyframe pattern matching are now faster to track in the Motion Tracker.
Asset Browser and Pipeline
Collections are now supported by the Asset Browser, which is amazing! That must have been the most requested feature since its debut. You can now also drag and drop materials from the Asset Browser into an object’s material slots.
A new OBJ file importer and exporter was added, and it’s massively faster. The numbers speak for themselves!
New Importer:
- Minecraft level (269MB file, 1 object): 54.2s -> 5.9s, memory usage 7.0GB -> 1.9GB
- Blender 3.0 splash scene (2.4GB file, 24000 objects): 4 hours -> 53s
New Exporter:
- Suzanne, subdivided to 6th level (330MB obj file): 6.0s -> 1.0s
- Blender 3.0 splash scene (2.4GB obj file): 45.5s -> 3.9s
Lastly, Blender can now read and write to the WebP image format, which is a significantly lighter weight alternative to PNG. The file size can be about 35% less and save up to 15x faster than the same lossless image as a PNG.
That's all for this release! Which of those are you most excited about, or are you already looking forward to 3.3?
Additional Blender Resources